• Skip to primary navigation
  • Skip to main content
  • Skip to primary sidebar

Alice In Eatland

Recipes . Eateries . Inspiration

  • Recipe Index
  • Eateries

Vegetarian

Chocolate Custard Cream Cake

September 26, 2020 by aliceineatland Leave a Comment


Moist cake layers & fluffy custard cream – Chocolate Custard Cream Cake is an elegant cocoa-based take on the classic vanilla custard cake of yesteryear.

A WhatsApp conversation with some of my school friends got us all dreaming of a certain custard cake that used to be a popular thing to bake when we were growing up in Daharki back in the ‘80s and ‘90s.

The confection in question was a simple sponge-style cake filled and covered with vanilla custard made from Rafhan Custard Powder – in truth, the sort of homely, old-fashioned baking one rarely comes across that often now.

Chocolate Custard Cream Cake

Luckily, one of my friends still has the recipe and inspired by that, I made this cocoa version with a slightly different take on the custard filling & frosting.

The cake is my basic go-to chocolate cake recipe and you will find more ideas based around this recipe on the blog.

The custard here is made from scratch and “lightened” (in the textural sense only obviously) with a little whipped cream that gives it an airier, fluffier quality.

Try it.

Chocolate Custard Cream Cake


CHOCOLATE CUSTARD CREAM CAKE


RECIPE TYPE: DESSERT    AUTHOR: ALICE IN EATLAND
PREP TIME: 60 Minutes    COOK TIME: 60    TOTAL TIME: 2 HOURS
SERVES: 6 – 8


Moist cake layers & fluffy custard cream – Chocolate Custard Cream Cake is an elegant cocoa based take on the classic vanilla custard cake of yesteryear.


MOIST CHOCOLATE CAKE


INGREDIENTS

  • 1 cup milk
  • 4 tbsp white vinegar
  • 2 cups caster sugar or superfine sugar
  • 1 cup + 3/4 cup plain flour
  • 3/4 cup cocoa
  • 2 tsp baking soda
  • 1 tsp baking powder
  • 1 tsp salt
  • 2 large eggs
  • 1/2 cup oil
  • 1 tsp vanilla extract or essence
  • 2 tsp instant coffee
  • 1 cup boiling water


METHOD

  1. Preheat oven to 180 degrees C / 350 degrees F.
  2. Grease two 6.5” x 2.5” round cake pans and line with parchment paper.
    Grease and flour the paper.
    Or do what I usually do: line cake pans with aluminium foil and grease and flour the foil. Set aside.
  3. Stir the milk and vinegar together in a small cup or bowl to make buttermilk. Set aside.
  4. Combine all the dry ingredients, except coffee, in a bowl.
  5. Whisk the eggs. Stir the buttermilk and add to the eggs along with the oil and vanilla.
  6. Add the egg mixture to the dry ingredients and beat until well mixed.
  7. Stir the instant coffee into the boiling water and carefully stir into the cocoa mixture. Batter will be quite thin.
  8. Divide the batter into two and pour into the prepared cake pans.
  9. Bake 30 – 40 minutes or until the cakes have risen and a wooden pick inserted near the center comes out clean.
    This can take up to an hour depending on your oven.
  10. Let cakes cool in pans for 10 minutes then turn out onto a wire rack.
    Invert so that the top of the cakes is up and cool completely.
  11. Your cakes may have domed tops so trim off carefully with a long serrated knife and discard (by “discard” I mean eat with chai like I do).
  12. Slice each cake horizontally into two so you have 4 layers.


CUSTARD CREAM FILLING & TOPPING


INGREDIENTS

  • 4 egg yolks
  • 4 – 6 tablespoons sugar
  • 1 cup milk
  • 2 tablespoons butter
  • 1/2 – 1 teaspoon vanilla extract or essence
  • 1/2 cup heavy whipping cream, well chilled
  • A few tablespoons of icing sugar, sifted


METHOD

  1. Whip the cream till thick & fluffy. Cover & keep in the fridge.
  2. Whisk together the egg yolks, sugar & milk in a pan until combined.
  3. Place the pan on a medium-ish heat and keep whisking or stirring the mixture thickens and coats the back of a spoon thickly.
  4. Keep stirring and remove from the heat just as the custard begins to reach a gentle simmer. Do not let the custard boil as it may split or curdle.
  5. Once off the heat, stir in the butter and vanilla.
  6. Cover the entire surface of the hot custard with plastic wrap and cool completely.
  7. Push the cooled custard through a sieve so that you have a smooth custard & no tiny eggy lumps. Chill covered.
  8. When cold, fold in 2 tablespoons of the whipped cream.
  9. Sandwich the cake layers generously with this custard cream.
  10. Chill the cake in the fridge for at least 30 minutes.
  11. You may need to insert a long wooden skewer or satay stick into the centre to stabilise the cake layers.
  12. Fold any leftover custard cream into the remaining whipped cream and taste to see if it’s sweet enough. If not, beat in enough of the icing sugar till desired sweetness is reached.
  13. Frost the cake with the custard cream.
  14. Keep filled & frosted cake refrigerated.


Filed Under: Desserts, Recipes Tagged With: Autumn / Fall, Chocolate, Daharki, Dessert, Summer, Vegetarian

White Haleem

June 13, 2019 by aliceineatland Leave a Comment

White Haleem

White Haleem

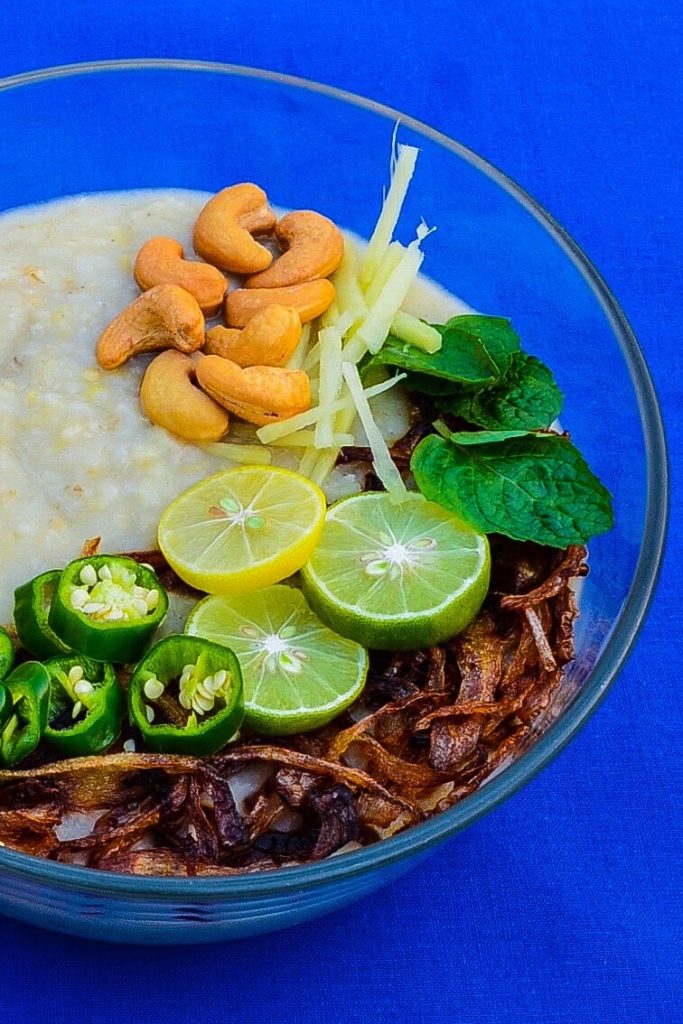
White Haleem is a delicately flavoured grain and lentil based stew that makes for a delicious, nourishing and satisfying meal.

Dubai based food blogger Tasneem Rajkotwala, and her beautiful blog “Thoughts Over Chai” introduced me to the wonders of White Haleem.

She refers to this haleem as her “Dadijaan’s Morning Haleem” and you can head to her blog for the original recipe and accompanying post here.

Tasneem’s blog is a treat and a great place to check out if you’re looking for traditional Bohra recipes.

I am always on the lookout for a good meatless Haleem recipe and this is a lovely vegetarian and vegan friendly version.

White Haleem is kind of like a milder sibling of traditional Haleem, the spicy meat, lentil and grain stew popular in Pakistan and parts of India.

White Haleem

Regular Haleem is meat based and generally packs quite a punch whereas White Haleem is meatless and fairly mild.

The lack of fire in this delicious stew however, by no means denotes any lack of flavour.

The absence of strong spices means that the actual flavour of the lentils and grains themselves really shines through.

The final damm of ground spices infuses the haleem with the pleasingly heady aromas of caraway seeds, nutmeg, mace and green cardamoms.

I love White Haleem and honestly, it reminds me more of Shorba, a light non-spicy Yemeni Haleem than of Pakistani Haleem.

I had Shorba over a decade ago at a school friend’s home in Sana’a, Yemen. It was made by her Mother and I have never been able to forget it’s tastiness.

White Haleem

I am hopelessly addicted to spicy food. But there are some recipes that work so well without being fiery that I don’t miss the bite of spices at all.

With White Haleem, I feel that an inclusion of heavy flavours would actually intrude on its deliciously soothing taste.

Traditional haleem toppings such as fresh herbs, green chillies, caramelised onions and roasted nuts provide a pleasant textural contrast to the creaminess of the haleem, the ghee or oil and garam masala add additional flavour and the lemon juice imparts subtle tartness.

To make this vegan, simply substitute the ghee called for in the recipe with oil.

Perfect for any meal or any time of the year really.

White Haleem

WHITE HALEEM


Recipe Type: Main    Author: Alice In Eatland
Prep Time: 15 Minutes (plus 2 – 4 hours soaking time)    Cook Time: 60 Minutes    Total Time: 2 – 3 Hours
Serves: 2 – 4


White Haleem, a satisfying, aromatic  grain & lentil stew. The topping of fresh herbs, ginger, cashews & caramelised onions add additional flavour & textural contrast.


INGREDIENTS

  • 1/4 cup white basmati rice
  • 1/4 cup barley porridge / barley cereal (jau ka dalia)
  • 1/2 cup split black gram (maash daal / urad daal)
  • 1/4 cup split yellow mung (moong daal)
  • 1/4 cup split Bengal gram (channa daal)
  • 1/2 teaspoon black cumin seeds / caraway seeds (kaala zeera / shah zeera)
  • 1/4 of an inch or so piece of nutmeg (jaiphal)
  • 1 – 2 blades of mace (javitri)
  • 2 – 4 green cardamoms (hari elachi)
  • 2 medium onions, peeled & thinly sliced
  • Oil to deep fry
  • 2 – 4 medium fresh green chillies, roughly chopped
  •  1 medium onion, peeled & roughly chopped
  • 1 MSG free vegetable stock cube / vegetable bouillon cube (optional but recommended)
  • Salt
  • A few tablespoons of desi ghee (omit if making the haleem vegan)
  • Fresh ginger, peeled & cut into thin batons
  • Fresh coriander leaves, chopped
  • Fresh mint leaves, chopped
  • Fresh mild green chillies, seeded & chopped
  • Lemons, cut into quarters
  • Roasted cashews
  • Garam Masala


METHOD

  1. Place the rice, barley porridge and lentils in a large bowl and wash in several changes of water until it runs almost clear.
  2. Finally fill the bowl with enough water to come a couple of inches up the sides and let the grains and lentils soak for 4 – 6 hours or overnight.
  3. Grind the black cumin seeds, nutmeg, mace and green cardamoms to a fine powder in a small spice / coffee grinder. Set aside.
  4. Heat oil for deep frying and when hot, fry the sliced onions until golden. Remove fried onions to a plate lined with kitchen paper. Set aside.
  5. Reserve about 4 – 6 tablespoons of oil after deep frying.
  6. Boil a kettle of water and set aside to simmer on a very low heat.
  7. Drain the soaked grains and lentils and rinse one more time with fresh water. Place into a pan along with 2 tablespoons of the reserved oil, stock cube (if using), chopped onion, chopped green chillies and around 4 – 6 cups of water.
  8. Bring to the boil on a high heat, then lower the heat to low and let cook partially covered, stirring occasionally until the grains and lentils are completely soft and mushy.
  9. The mixture can take anywhere from 1 hour to more to soften to a mush. If you feel the haleem is getting too thick, add more water from the simmering kettle to thin it down.
  10. When cooked, the haleem will be thick but the consistency should also be slightly on the looser side.
  11. Sieve in the reserved ground spice mixture, cover and simmer on a very low heat for 10 minutes.
  12. Remove from heat, cool to room temperature and blend in a blender or with a stick blender until somewhere between smooth and grainy.
  13. It is best not to overblend because you want some of that grainy texture to remain.
  14. Check salt and adjust if needed.
  15. White Haleem can be frozen airtight at this point, if wished.
  16. When ready to serve, ladle out hot haleem into serving bowl (or individual serving bowls, if wished).
  17. Heat ghee if using or the leftover reserved oil until hot and pour all over the surface of the haleem.
  18. Garnish with ginger, coriander, mint, green chillies, cashews and reserved fried onion.
  19. Sprinkle garam masala and squeeze lemon juice on top.
  20. Eat.

Filed Under: Mains, Recipes Tagged With: Autumn / Fall, Dinner, Lunch, Spring, Summer, Vegan, Vegetarian, Winter

Momofuku Ginger Scallion Noodles

August 7, 2018 by aliceineatland 2 Comments

Momofuku Ginger Scallion Noodles

Post Updated: 04.12.23

The one and only Momofuku Ginger Scallion Noodles – I am salivating while updating this post.

Also, I am mentally going through the contents of my fridge and pantry, hoping I have all the ingredients to make these noodles after I’m done with this post.

Momofuku Ginger Scallion Noodles: The Legend

Restaurateur David Chang, creator of Netflix cult favourite “Ugly Delicious” and founder of the Momofuku Group of Restaurants writes in his book “Momofuku” (written with Peter Meehan) that “Our ginger scallion noodles are an homage to / out-and-out-rip-off of one of the greatest dishes in New York City: the $4.95 plate of ginger scallion noodles at Great New York Noodle Town down on the Bowery in Chinatown.”

I agree with Chang when he says, “You need ginger scallion sauce on your noodles, in your fridge and in your life. For real.”

Momofuku Ginger Scallion Noodles

Momofuku Ginger Scallion Noodles: The Real Star Of The Show

The real star of this Momofuku Ginger Scallion Noodle dish is the Ginger Scallion Sauce. There is absolutely nothing like it.

Also, the sauce in question is more solid than liquid, more like a chunky condiment or a chutney than a pourable flavouring concoction.

This Ginger Scallion Sauce is also a perfect demonstration of how the correct combination of just a few simple ingredients can result in astoundingly astonishing flavours.

I use it not just for this noodle recipe but also to top fried rice, mashed potatoes and soups. The possibilities are quite literally, endless.

Momofuku Ginger Scallion Noodles: How Do You Serve Them?

The Ginger Scallion Noodles at Momofuku are served with things like bamboo shoots, pickled cucumbers, pan roasted cauliflower, sliced scallions and toasted nori.

I eat mine unadorned, except for a few fresh spring onions tops chopped into bits sometimes. But mostly with nothing else.

These noodles taste great at room temperature but somehow I love them cold straight from the fridge more. Cold buckwheat soba noodles would also go pretty well with this sauce.

Thanks to fellow foodie blogger friend Monita Sen for introducing me to these incredible Momofuku Ginger Scallion Noodles – check out Monita’s luscious Instagram feed; it is insanely gorgeous!

Momofuku Ginger Scallion Noodles

Momofuku Ginger Scallion Noodles


Recipe Type: Main, Snack
Author: Alice In Eatland
Prep Time: 10 Minutes   Cook Time: 10 Minutes    Total Time: 20 Minutes
Serves: 1
Keyword: 10 Minute Recipe, Asian Noodles, Asian Recipe Easy, Dinner Ideas, Easy Recipes, Healthy Asian Recipes, Noodles, Quick And Easy Recipe, Vegetarian Recipes, Quick Recipes


Momofuku Ginger Scallion Noodles:

7 everyday ingredients & 10 minutes of your time are all you need to make David Chang’s ultimate ramen noodle recipe.


INGREDIENTS

  • 100 grams (4 oz) cooked ramen or egg noodles
  • 1 1/4 cups finely chopped spring onions / green onions / scallions (both white and green parts)
  • 1/8 cup peeled, grated ginger
  • 1/4 cup – 1/2 cup oil*
  • Salt
  • A few teaspoons of white vinegar
  • A few teaspoons of soy sauce


METHOD

  1. Place the chopped spring onions / green onions / scallions and the grated ginger in a heatproof bowl.
  2. Pour the oil into a small saucepan and place over medium heat until the surface of the oil is shimmering slightly.
  3. Put a piece of chopped spring onion in to test the oil. If it sizzles immediately upon contact with the oil, your oil is hot enough.
  4. Remove pan from heat and pour the hot oil straight onto the chopped onions and grated ginger.
  5. Stir in salt, vinegar and soy sauce to taste.
  6. Let sit 10-15 minutes.
  7. Place noodles in a bowl and stir in a couple of tablespoons of your ginger scallion sauce.
  8. Top with some fresh spring onion green bits if liked.
  9. Store any leftover ginger scallion sauce airtight in the fridge for up to 2 – 4 days.


*David Chang recommends either grapeseed or any other neutral oil for this recipe.

I just use regular cooking oil from my kitchen.

Any oil would work alright except a strong tasting one like olive oil.

Filed Under: Budget Friendly, Mains, Recipes Tagged With: Budget-Friendly, Dinner, Lunch, Spring, Summer, Vegan, Vegetarian, Winter

Roasted Tomato & Thyme Soup with Fluffy Baked Potatoes

February 5, 2018 by aliceineatland Leave a Comment

Roasted Tomato & Thyme Soup with Fluffy Baked Potatoes

Roasted Tomato & Thyme Soup with Fluffy Baked Potatoes

Roasted Tomato & Thyme Soup with Fluffy Baked Potatoes is a delicious and flexible combination. It can be had as either a light but satisfying snack when you’re feeling peckish but don’t want a full meal. And it also makes a not-too-heavy yet adequately filling entree at meal times as well. Plus it’s gluten free.

I am including this as a Valentine’s Day recipe. Yes. Folks, I understand that tomato soup and baked potatoes usually do not qualify as “special” meals and are certainly not classified as “romantic” by most people. And that’s okay.

Roasted Tomato & Thyme Soup with Fluffy Baked Potatoes

There are those who go the Grilled Oysters with Chilli Herb Butter, Filet Mignon and Chanterelle Duxelles Strudel way on 14th February. And then there are unsophisticated chow hounds like yours truly, that are very happy gobbling down comfort foods at the most romantic of occasions. This recipe will obviously appeal more to the latter on Valentine’s Day. And hopefully to everyone else on all other days of the year, haha!

This rustic soup and potato recipe can actually be a fun starter. In order for it to be that, serve the Roasted Tomato & Thyme Soup in small cups, heatproof glasses or mugs, wide enough so that the eaters can easily dunk their Fluffy Baked Potatoes into the soup before eating.

Roasted Tomato & Thyme Soup with Fluffy Baked Potatoes

Tomato soup and baked potato make a fantastic combination. But obviously both the Roasted Tomato & Thyme Soup and the Fluffy Baked Potatoes can be served on their own as well. I just feel they’re better together.

The recipe is really quite simple. Tomatoes, onions, garlic and thyme are seasoned, roasted in the oven and then blended into the creamiest soup ever. No cream required.

The fluffy baked potatoes have a texture that I can only describe as somewhere between a potato & cheese croquette and a cheesy potato soufflé, if that makes any sense. The addition of creme fraiche or sour cream and a little beaten egg gives the filling a lovely lightness. So, so good.

Roasted Tomato & Thyme Soup with Fluffy Baked Potatoes

The recipe has been loosely adapted from Sophie Dahl’s recipe – the cooking show was “The Delicious Miss Dahl” and I would eagerly await each new episode while living in London. I was totally in love with the series! So pretty – all flowers, vintage utensils and what not. Plus the soft spoken and beautiful Miss Dahl.

Both the Roasted Tomato & Thyme Soup and the Fluffy Baked Potatoes can be made a few days ahead and reheated before serving. Add a crisp green salad and maybe a decadent dessert to follow and you have quite a meal there.

Roasted Tomato & Thyme Soup with Fluffy Baked Potatoes


Roasted Tomato & Thyme Soup with Fluffy Baked Potatoes


Recipe Type:    Starter & Snack, Main Meal
Author:    Alice In Eatland
Prep Time:    30 – 40 Minutes    Cook Time:    40 – 60 Minutes    Total Time: 1.5 Hours
Serves: 1 – 2


Roasted Tomato & Thyme Soup


Roasted tomatoes, onion, garlic & thyme blend to create creamy Roasted Tomato & Thyme Soup!


INGREDIENTS

  •  2-4 medium tomatoes (the ripest you can find), thickly sliced
  • 1 medium onion, peeled and thickly sliced
  • 4-6 garlic cloves, peeled and smashed lightly
  •  1 sprig fresh thyme or a few pinches of dried thyme
  • 2 tablespoons oil
  • Salt
  • Fresh milled pepper
  • A pinch of sugar
  • Water or vegetable stock, at room temperature
  • 1/2 a vegetable stock cube, crumbled (optional)
  • Cream to serve (optional)


METHOD:

  1. Preheat oven to 180 degrees C / 350 degrees F.
  2. Line a baking tray or flat oven proof glass dish with foil.
  3. Lay the tomatoes, onions and garlic onto the foil.
  4. Scatter the thyme all over, drizzle over the oil and season with salt and pepper.
  5. Bake uncovered until the vegetables look roasted and dehydrated and are beginning to darken in places. This can take anywhere from 20 minutes to an hour depending on your oven so keep an eye on your vegetables.
  6. Once done, remove the roasted vegetables from the oven and cool to room temperature.
  7. Put cooled vegetables into the jug of a blender with a little water or vegetable stock and blend until smooth.
  8. Pour the blended mixture out into a pan. Rinse out the blender jug with a little more water or stock and add to the pan.
  9. Add the sugar and also the crumbled vegetable stock cube into your pan, if using.
  10. Let soup come to a boil, stirring frequently. Check the consistency: add more water or stock if you need to thin it down a bit and let reduce if you prefer it thicker.
  11. Taste soup to see if it needs more seasoning.
  12. Pour soup into bowls, cups or a mug.
  13. Swirl a little cream on top before serving, if wished.
  14. Serve soup with Fluffy Baked Potatoes – dunk them into the soup before eating.


Fluffy Baked Potatoes


Twice cooked/baked cheesy & airy Fluffy Baked Potatoes like you’ve never had them before!


INGREDIENTS

  • 2-4 smallish to medium potatoes
  • 1-2 tablespoons butter, at room temperature
  • 2 teaspoons milk, at room temperature
  • 1/2 teaspoon fresh lemon juice or white vinegar
  • 2-4 tablespoons cream
  • 1-2 tablespoons cream cheese OR goat’s cheese OR grated cheddar cheese
  • Salt
  • Fresh milled black pepper
  • 1/2 of a small beaten egg
  • Chopped chives or other fresh herbs of choice


METHOD

  1. Preheat oven to 180 degrees C / 350 degrees F.
  2. Wash the potatoes.
  3. You can either cook the potatoes in plenty of water until soft but not over cooked.
  4. Or you can place the potatoes into your preheated oven and bake until they are cooked through.
  5. Stir the milk and lemon juice or white vinegar together in a small bowl and then stir in the cream. Set aside.
  6. When your potatoes are boiled or baked, slice each potato lengthwise into two.
  7. Carefully scoop out the potato pulp into a bowl, being careful not to let the potato skins/shells break.
  8. Mash the hot potato pulp with the butter until smooth.
  9. Give the sour cream a stir and stir into the potatoes followed by your cheese of choice, salt and black pepper.
  10. Taste the mixture to check if it needs more cheese or seasoning.
  11. Then stir in the beaten egg until smooth.
  12. Lastly stir in the chopped chives or other fresh herbs.
  13. Spoon the mixture equally into the potato skins/shells.
  14. Line a baking sheet or tray with foil and arrange the filled potatoes on it.
  15. Bake in your preheated oven until the filling looks a bit puffy and is browning in places.
  16. You can turn the grill on from above for a couple of minutes to brown the tops of the potatoes more. Keep an eye on them so they don’t burn.
  17. Remove the potatoes from the oven and sprinkle with extra chives or herbs right before serving.
  18. Serve Fluffy Baked Potatoes warm.


Filed Under: Mains, Recipes, Snack & Starter Tagged With: Soup, Starter, Valentine's Day, Vegetarian

  • « Go to Previous Page
  • Page 1
  • Page 2

Primary Sidebar

ABOUT ALICE

Favorite recipes, fun eating out experiences and some wonderful food memories from Lahore, Pakistan.

ALICE’S TOP PICKS

Rose Crème Brûlée

Rose Crème Brûlée

Three Cheese Roasted Chilli Bread Pudding

Patisserie at Mocca Coffee Gulberg

Mocca Coffee Gulberg

The Paloma

The Paloma

Tags

Autumn / Fall Baking Budget-Friendly Cafe Chocolate Christmas Daharki Desi Dessert Dinner Easter Eatery Freezer Friendly Halloween Lunch Pakistani Restaurant Romantic Soup Spring Starter Summer Valentine's Day Vegan Vegetarian Winter

Tags

Autumn / Fall Baking Budget-Friendly Cafe Chocolate Christmas Daharki Desi Dessert Dinner Easter Eatery Freezer Friendly Halloween Lunch Pakistani Restaurant Romantic Soup Spring Starter Summer Valentine's Day Vegan Vegetarian Winter

Categories

  • Breakfast & Brunch
  • Budget Friendly
  • Condiment
  • Desserts
  • Drinks
  • Eateries
  • Homemade Cheese
  • Homemade Cheese
  • Mains
  • Recipes
  • Snack & Starter
  • Uncategorized

ABOUT

Hello! If like me, you too love to cook, bake and eat then you're in the right place. From heartwarming, soul-satisfying comfort food to light, fresh and deliciously healthy meals, everything here is made with the utmost TLC :)

Tags

Autumn / Fall Baking Budget-Friendly Cafe Chocolate Christmas Daharki Desi Dessert Dinner Easter Eatery Freezer Friendly Halloween Lunch Pakistani Restaurant Romantic Soup Spring Starter Summer Valentine's Day Vegan Vegetarian Winter

Copyright © 2025 · Foodie Pro Theme by Shay Bocks · Built on the Genesis Framework · Powered by WordPress