• Skip to primary navigation
  • Skip to main content
  • Skip to primary sidebar

Alice In Eatland

Recipes . Eateries . Inspiration

  • Recipe Index
  • Eateries

Chocolate

Café Con Tres Leches Cake

October 31, 2021 by aliceineatland Leave a Comment

Café Con Tres Leches Cake

Café Con Tres Leches Cake
A hauntingly beautiful plant based Café Con Tres Leches Cake with fresh, tart berries and dark chocolate skulls is just the kind of dessert I need this Halloween. Or anytime of the year, really.

Making and assembling the cake is pretty straightforward, though you do need to plan slightly ahead due to the number to steps involved. A little time consuming maybe but not complicated at all.

Café Con Tres Leches Cake

Use your preferred combination of plant based milks, either store bought or homemade. The milks listed in the recipe are my personal preference and I have made both the almond and pistachio milks myself.

Some may feel that a chilled Café Con Tres Leches Cake is perhaps a little summery for autumn/fall since the season mostly calls for warming desserts and cosy sweets.

Café Con Tres Leches Cake

The cream white pumpkin & dried foliage autumn/fall centrepiece that I made for Halloween 2021


If you’re one of those folks, please be assured that this is pretty good enjoyed at room temperature too.

Tips For Making A Stunning Café Con Tres Leches Cake:

  • The cocoa can be omitted from the cake base for an uninterrupted coffee experience.
  • I added cocoa + coffee to the lovely Vegan Tres Leches Cake recipe by Cook’s Hideout for 2 reasons:

Café Con Tres Leches Cake

-For visual drama, since the topping, berries and skulls show up more vibrantly on a darker base

-The flavour combination, as coffee is one of my favourite pairings with chocolate based desserts.

The chocolate skulls are of course, in honour of Halloween though if you’re a true horror fan like me, you wouldn’t mind adding these to your celebratory desserts throughout the year.

On to the recipe for this easy and eerily elegant Café Con Tres Leches Cake.

Café Con Tres Leches Cake


CAFÉ CON TRES LECHES CAKE


Recipe Type: Dessert    Author: Alice In Eatland
Serves: 6 – 8


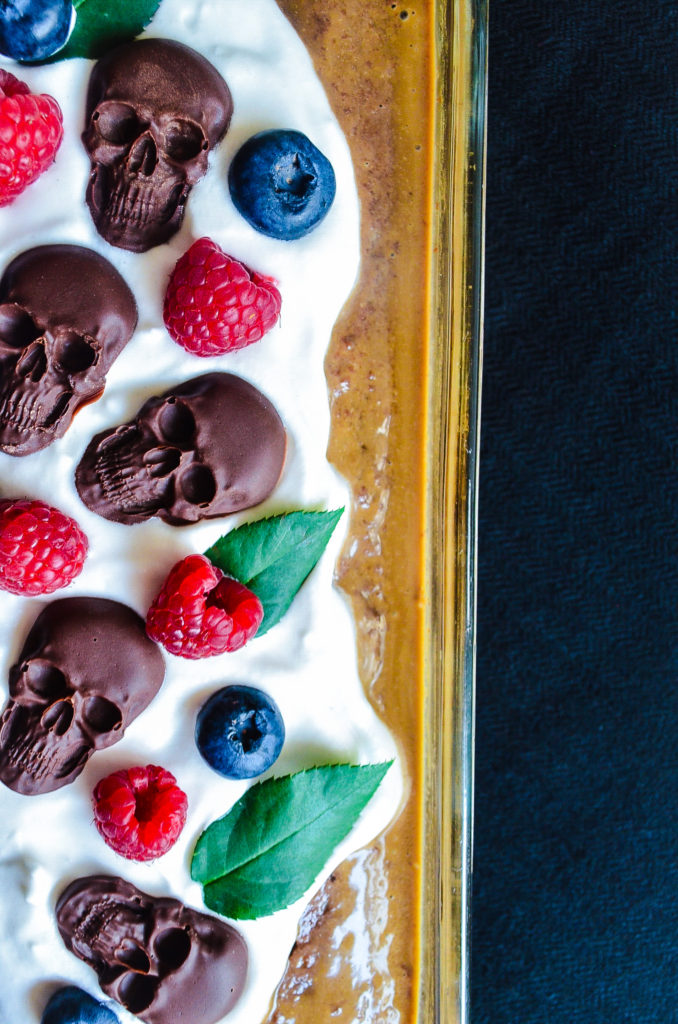
Milky mocha sponge, creamy topping, tart berries & dark chocolate skulls make this elegant vegan Café Con Tres Leches Cake perfect for Halloween or for any time of the year.


CAKE

  • 1 cup plant based milk (oat, almond, coconut or any milk of your choice)
  • 1 tablespoon lemon juice or white vinegar
  • 1 teaspoons instant coffee dissolved in 1 teaspoon boiling water, cooled completely
  • 3/4 caster sugar
  • 1/3 cup oil
  • 1 teaspoon vanilla extract or essence
  • 1 1/4 cups plain flour
  • 3 tablespoons cornflour
  • 1/4 cup cocoa powder
  • 1 teaspoon baking powder
  • 1/4 teaspoon baking soda
  • 1/4 teaspoon salt

3 MILK SOAK

  • 1 teaspoon instant coffee
  • 1/4 cup sweetened coconut condensed milk *(recipe below)
  • 1/4 cup almond milk **(for homemade option, please see the recipe below)
  • 1/4 cup pistachio milk **(for homemade option, please see the recipe below)

TOPPING

  • 1/2 – 3/4 cup coconut cream, well chilled
  • 1/4 – 1/2 cup sifted icing sugar
  • 1/2 teaspoon vanilla extract or essence
  • Raspberries, blueberries or any fruit of choice
  • Chocolate skulls*** (recipe below)


METHOD

  1. Preheat oven to 180 degrees C / 350 degrees F.
  2. Oil & flour an 8” square cake pan.
  3. Stir plant based milk & lemon juice or white vinegar to make buttermilk & set aside for 5 minutes.
  4. Whisk in the cooled coffee, sugar, oil & vanilla until combined.
  5. Sieve flour, cornflour, cocoa powder, baking powder, baking soda and salt together.
  6. Stir dry ingredient mixture into the wet ingredient mixture until just combined. Do not over mix.
  7. Pour batter into prepared pan and bake 30 – 35 minutes or until toothpick inserted near center of cake comes out clean.
  8. Remove cake from oven and let cool in pan 10 minutes.
  9. Poke the entire surface of the cake with either a fork, a skewer or a toothpick.
  10. For the 3 Milk Soak, stir the coffee, coconut condensed milk, almond milk, pistachio milk & vanilla together in a pan and bring to the boil.
  11. Lower the heat, let simmer 5 – 7 minutes & pour evenly over warm cake.
  12. Let the cake cool completely and then chill covered for at least 2-4 hours. Overnight is best.
  13. To make the topping, whip the cold coconut cream with icing sugar & vanilla until thick and fluffy.
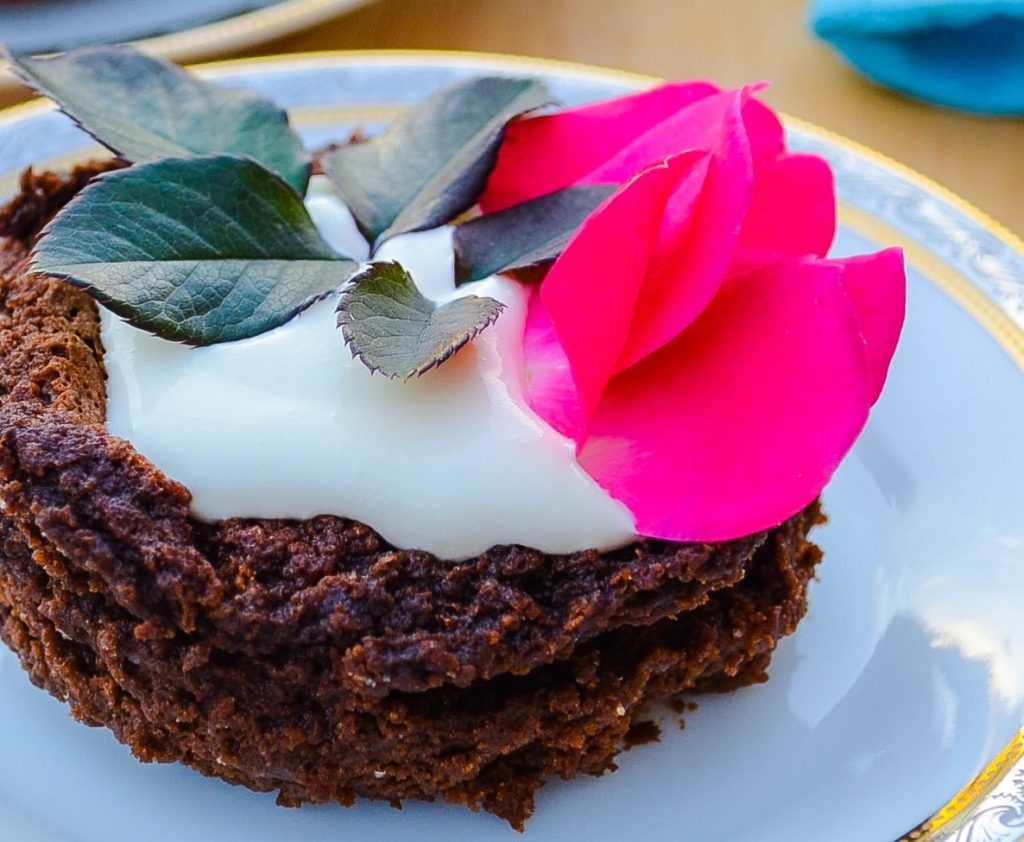
  14. Spread or pipe topping all over the top of the chilled cake.
  15. Decorate with fresh fruit & chocolate skulls, if using. I also added some well-washed leaves of a rose plant from my garden.
  16.  Keep refrigerated.


*Sweetened Coconut Condensed Milk

Stir 1/2 cup full fat coconut milk & 4 tablespoons sugar in a pan over medium heat.

Bring to the boil, stirring constantly and then lower heat and cook stirring frequently, until milk thickens & reduces by half ( 20 minutes or so).

Cool completely & store airtight in the fridge.


**Nut Milk

Soak 1/4 cup raw unroasted almonds or pistachios in 1 cup water for 8 -12 hours.

Drain, rinse with clean water and add to blender jar with 1/2 – 3/4 cups drinking water.

Blend until smooth and then strain through a nut bag, cheesecloth or muslin, squeezing all the milk out.

Save the leftover nut solids airtight in the freezer and add to things like roti dough, pizza dough or cookie dough for a nutty flavour & texture.

Stir a drop or so of vanilla extract into the strained milk, if you wish.

Cover airtight & store in the fridge.

Stir before using and consume within 2-3 days.


***Chocolate Skulls

Break a bar of vegan friendly chocolate (I used a bar of Nestlé Bourneville Classic Dark Chocolate) into pieces.

Microwave on high in 20 second increments, stirring every time until the chocolate is completely melted, being careful not to burn it.

You can melt the chocolate on top of a double boiler instead of using the microwave.

Pour melted chocolate into silicone skull moulds (I purchased my skull mould from Darak.pk) and freeze for an hour.

Unmould and store chocolate skulls in a paper towel lined airtight container in the fridge.


The raspberries & blueberries adorning this Café Con Tres Leches Cake were purchased from Al Fatah Gold Crest Mall, Lahore.

Filed Under: Desserts, Recipes Tagged With: Autumn / Fall, Baking, Chocolate, Dessert, Halloween, Vegan, Vegetarian, Winter

Chocolate Custard Cream Cake

September 26, 2020 by aliceineatland Leave a Comment


Moist cake layers & fluffy custard cream – Chocolate Custard Cream Cake is an elegant cocoa-based take on the classic vanilla custard cake of yesteryear.

A WhatsApp conversation with some of my school friends got us all dreaming of a certain custard cake that used to be a popular thing to bake when we were growing up in Daharki back in the ‘80s and ‘90s.

The confection in question was a simple sponge-style cake filled and covered with vanilla custard made from Rafhan Custard Powder – in truth, the sort of homely, old-fashioned baking one rarely comes across that often now.

Chocolate Custard Cream Cake

Luckily, one of my friends still has the recipe and inspired by that, I made this cocoa version with a slightly different take on the custard filling & frosting.

The cake is my basic go-to chocolate cake recipe and you will find more ideas based around this recipe on the blog.

The custard here is made from scratch and “lightened” (in the textural sense only obviously) with a little whipped cream that gives it an airier, fluffier quality.

Try it.

Chocolate Custard Cream Cake


CHOCOLATE CUSTARD CREAM CAKE


RECIPE TYPE: DESSERT    AUTHOR: ALICE IN EATLAND
PREP TIME: 60 Minutes    COOK TIME: 60    TOTAL TIME: 2 HOURS
SERVES: 6 – 8


Moist cake layers & fluffy custard cream – Chocolate Custard Cream Cake is an elegant cocoa based take on the classic vanilla custard cake of yesteryear.


MOIST CHOCOLATE CAKE


INGREDIENTS

  • 1 cup milk
  • 4 tbsp white vinegar
  • 2 cups caster sugar or superfine sugar
  • 1 cup + 3/4 cup plain flour
  • 3/4 cup cocoa
  • 2 tsp baking soda
  • 1 tsp baking powder
  • 1 tsp salt
  • 2 large eggs
  • 1/2 cup oil
  • 1 tsp vanilla extract or essence
  • 2 tsp instant coffee
  • 1 cup boiling water


METHOD

  1. Preheat oven to 180 degrees C / 350 degrees F.
  2. Grease two 6.5” x 2.5” round cake pans and line with parchment paper.
    Grease and flour the paper.
    Or do what I usually do: line cake pans with aluminium foil and grease and flour the foil. Set aside.
  3. Stir the milk and vinegar together in a small cup or bowl to make buttermilk. Set aside.
  4. Combine all the dry ingredients, except coffee, in a bowl.
  5. Whisk the eggs. Stir the buttermilk and add to the eggs along with the oil and vanilla.
  6. Add the egg mixture to the dry ingredients and beat until well mixed.
  7. Stir the instant coffee into the boiling water and carefully stir into the cocoa mixture. Batter will be quite thin.
  8. Divide the batter into two and pour into the prepared cake pans.
  9. Bake 30 – 40 minutes or until the cakes have risen and a wooden pick inserted near the center comes out clean.
    This can take up to an hour depending on your oven.
  10. Let cakes cool in pans for 10 minutes then turn out onto a wire rack.
    Invert so that the top of the cakes is up and cool completely.
  11. Your cakes may have domed tops so trim off carefully with a long serrated knife and discard (by “discard” I mean eat with chai like I do).
  12. Slice each cake horizontally into two so you have 4 layers.


CUSTARD CREAM FILLING & TOPPING


INGREDIENTS

  • 4 egg yolks
  • 4 – 6 tablespoons sugar
  • 1 cup milk
  • 2 tablespoons butter
  • 1/2 – 1 teaspoon vanilla extract or essence
  • 1/2 cup heavy whipping cream, well chilled
  • A few tablespoons of icing sugar, sifted


METHOD

  1. Whip the cream till thick & fluffy. Cover & keep in the fridge.
  2. Whisk together the egg yolks, sugar & milk in a pan until combined.
  3. Place the pan on a medium-ish heat and keep whisking or stirring the mixture thickens and coats the back of a spoon thickly.
  4. Keep stirring and remove from the heat just as the custard begins to reach a gentle simmer. Do not let the custard boil as it may split or curdle.
  5. Once off the heat, stir in the butter and vanilla.
  6. Cover the entire surface of the hot custard with plastic wrap and cool completely.
  7. Push the cooled custard through a sieve so that you have a smooth custard & no tiny eggy lumps. Chill covered.
  8. When cold, fold in 2 tablespoons of the whipped cream.
  9. Sandwich the cake layers generously with this custard cream.
  10. Chill the cake in the fridge for at least 30 minutes.
  11. You may need to insert a long wooden skewer or satay stick into the centre to stabilise the cake layers.
  12. Fold any leftover custard cream into the remaining whipped cream and taste to see if it’s sweet enough. If not, beat in enough of the icing sugar till desired sweetness is reached.
  13. Frost the cake with the custard cream.
  14. Keep filled & frosted cake refrigerated.


Filed Under: Desserts, Recipes Tagged With: Autumn / Fall, Chocolate, Daharki, Dessert, Summer, Vegetarian

Mini Flourless Chocolate Cakes

February 14, 2018 by aliceineatland Leave a Comment

Mini Flourless Chocolate Cakes


Mini Flourless Chocolate Cakes

Mini Flourless Chocolate Cakes, small rustic looking discs of pure indulgence – quick to make and usually gone in a flash.

So this is the second Sophie Dahl recipe adaptation in a row on the blog. I know I should’ve posted it at least a few days earlier for folks who might want to make it for Valentine’s Day.

Mini Flourless Chocolate Cakes are fairly easy to put together and don’t require a lot of time to make. However,  these cakes are not picture perfect pretty little rounds – they are very rustic looking, cracked and even broken in places. Their beauty lies in imperfection.

And obviously, no one has to wait for Valentine’s Day to make these Mini Flourless Chocolate Cakes. I make these at times just to brighten up an otherwise regular meal. It’s a lovely dessert to make for gluten intolerant family or friends.

Mini Flourless Chocolate Cakes

I would describe the texture of these cakes somewhere between a fudgy brownie and a softened bar of chocolate. I might try making these with white chocolate one day, which is my favourite type of chocolate.

Good dark chocolate works best here but if you’re not a fan then semisweet is fine. If you must use milk chocolate, do a 50/50 with dark chocolate otherwise your Mini Flourless Chocolate Cakes may become overly sweet and lack the depth that dark chocolate imparts.

Sour cream or crème fraîche provides a slightly tart and refreshing contrast. You can use plain whipped cream to top these as well if you wish plus a bit of fresh fruit or edible flowers to garnish. I used rose petals and leaves from a home grown rose plant to crown my Mini Flourless Chocolate Cakes.

Mini Flourless Chocolate Cakes


Mini Flourless Chocolate Cakes


Recipe Type: Dessert    Author: Alice In Eatland
Prep Time: 10 Minutes    Cook Time: 20 Minutes
Resting Time: 2 – 4 Hours   Total Time: 2 – 4 Hours
Serves: 2


Mini Flourless Chocolate Cakes – discs of deep dark chocolate goodness topped with contrasting tart crème fraîche. A rich & decadent dessert. Gluten free.


INGREDIENTS

  • Butter to grease ramekins
  • Cocoa powder to dust ramekins
  • 75 grams chocolate (dark, semisweet or half dark chocolate + half milk chocolate), broken into pieces
  • 60 grams salted butter
  • 60 grams caster / superfine sugar
  • 1 medium egg
  • 1/4 teaspoon instant coffee powder dissolved in 1/4 teaspoon boiling water
  • 1/4 teaspoon vanilla extract or essence
  • Sour cream, crème fraîche or whipped cream to serve
  • Fresh fruit (strawberries, cherries, blueberries, kiwi etc) or fresh edible unsprayed flowers to decorate


METHOD

  1. Preheat oven to 180 degrees C / 350 degrees F.
  2. Line 2 ramekins (each 4″ in diameter) with foil. Each piece of foil should be big enough to be easily pressed onto the bottom and all the way up the sides of each ramekin.
  3. Butter the foil and sprinkle with cocoa powder, shaking and turning the ramekins round until the bottoms and sides are coated with cocoa. Shake off any excess cocoa.
  4. Place the broken chocolate pieces and butter in a microwave safe bowl. Microwave uncovered, stopping and stirring every 10 seconds until both are almost melted. Stir thoroughly for the final melting of the chocolate. The mixture should be uniform and smooth.
  5. Put the sugar, the egg, the cooled coffee that had been dissolved in the boiling water and the vanilla in a bowl and beat until thick and pale.
  6. Fold in the melted chocolate and butter mixture with a spatula or spoon.
  7. Pour the mixture equally into the prepared ramekins and bake 20-30 minutes.
  8. The tops of the cakes will rise flat and look crusty. Keep an eye on them and the cakes are done as soon as you see the risen tops deflate slightly.
  9. You should also be able to smell a very chocolatey aroma in your kitchen – that’s your Mini Flourless Chocolate Cakes telling you they are ready.
  10. Remove from the oven and place on a wire rack. The centres of the cakes will begin to collapse right after removal from the oven, with a crater forming in the cracked centre. The sides will also cool imperfect. That is the beauty of these.
  11. Let cool to room temperature and then place ramekins in the fridge for 2 – 4 hours or even overnight. You want them to be thoroughly cool.
  12. When ready to serve, carefully lift out the cakes using the foil lining. Gently peel away the foil and place cakes on serving plates. Don’t worry if the sides are cracked or even a bit broken in places.
  13. Top with a few dollops of whipped cream, sour cream or crème fraîche in the craters in the centre.
  14. Decorate with your choice of fresh fruit or edible flowers. Or both.

Filed Under: Desserts, Recipes Tagged With: Chocolate, Romantic, Valentine's Day

Gothic Chic Cupcakes

October 19, 2017 by aliceineatland Leave a Comment

Gothic Chic Cupcakes

Post Updated: 11.03.24

Gothic Chic Cupcakes have been my favourite Halloween dessert idea since 2017! Moist vanilla cupcake base topped with a very chocolatey black cocoa fudge frosting, these are perfect for any special occasion during the year and absolute showstoppers especially at Halloween.

The first cupcake recipe on my blog was for Chocolate Cobweb Cupcakes for Halloween 2016. Check that one out too for a fun but sweetly spooky Halloween cupcake recipe.

The first Halloween cupcake recipe had a chocolate cupcake base topped with vanilla frosting. The Gothic Chic Cupcake recipe is the other way around – my favourite moist vanilla cupcake recipe with a very old fashioned and very delicious cocoa fudge frosting.

As mentioned in my previous Halloween post, I did not grow up celebrating Halloween except for one year in the ’90s. As an adult now, I have been getting more and more excited about Halloween each year.

Gothic Chic Cupcakes

Instagram and Pinterest with their fabulous Halloween related food, decor and craft posts are definitely to be credited for making Halloween popular in parts of the world where it isn’t really celebrated as such.

I had decided that along with food, I would do some sort of Halloween DIY craft or decor project as well this year.

I had a very clear idea of something very chic and very minimalistic Gothic in mind hence the black, gold and silver theme for my Halloween.

Not being very “crafty” as such, I wanted to do something simple but effective so I chose the very aptly titled Creepy Black Twig Wreath – thanks to Earnest Home Co. for the fabulous idea and the easy tutorial.

I collected the branches and twigs off a basil plant and a rose bush – both from my garden and both completely dried up. I then put the twig wreath together bit by bit according to the step by step tutorial.

My brother says the finished wreath looks like something out of the horror movie “The Ring” – target achieved!

Gothic Chic Cupcakes

Pumpkins were next and after trawling through various pumpkin ideas on Pinterest, I decided on simple painted pumpkins for Halloween 2017.

Pinterest has a photo of a large pumpkin painted matte black sitting on a chair and as soon as I saw it I knew I had to have a black pumpkin this Halloween. I was finding gold and silver painted pumpkins on Pinterest quite appealing as well.

So my sister-in-law and I spray painted a few pumpkins black, gold and silver. I could not get hold of perfectly shaped pumpkins but after they were painted and were sitting in all their beautiful painted glory, I felt the irregular shapes, indents and imperfections here and there somehow added to the Gothic appeal that I was after.

And lastly, the Gothic Chic Cupcakes. I adore this moist vanilla cupcake recipe so much and for the life of me I can’t find the link to the original recipe because I wrote the recipe down the old fashioned way in my crumbling old recipe diary.

Like a fool, I completely forgot to write down the name of the blog where I took the recipe from. I am trying to search for that particular blog and hopefully if I find it I will update this blog post with proper credit to the original creator of this wonderful recipe.

Gothic Chic Cupcakes

The frosting recipe comes via My Gluten Free Kitchen with a deep cocoa flavour and dreamy pipeability. The idea was to dye the cocoa fudge  frosting a jet black with food colour.

As I was adding the black food colour to the frosting and mixing it in, I stopped when the icing reached a deep dark charcoal gray. It looked incredible and very broodingly sexy – so much cooler than the flat black I had intended to achieve.

I used gold and silver cupcake liners / paper bake cups for my Gothic Chic Cupcakes.

I wanted the vanilla part of the cupcake to show very clearly so instead of covering almost the entire top of the cupcakes with frosting, I opted to pipe rosettes that would leave room for the vanilla part to show.

I have been ‘piping partially’ this way lately and liking it. You can obviously cover the entire tops of your Gothic Chic Cupcakes in frosting like it is usually done.

Happy baking and frosting and a very happy Halloween to all!

Gothic Chic Cupcakes

Gothic Chic Cupcakes


Recipe Type: Dessert    Author: Alice In Eatland
Prep Time: 30 Minutes    Cook Time: 20 Minutes    Total Time: 50 Minutes
Serves: 8 – 10
Keyword: Gothic Cupcakes Recipe, Goth Cupcakes Recipe, Halloween Cupcakes,


These moist & fluffy Gothic Chic Cupcakes are perfumed with vanilla & frosted with a dark & intensely chocolate cocoa fudge frosting – so tasty & so chic!


INGREDIENTS FOR MOIST VANILLA CUPCAKES

  • 2 tablespoons milk
  • 1 tablespoon white vinegar
  • 1/4 cup + 1/8 cup cream
  • 1/2 cup + 1 tablespoon flour
  • 1/8 cup cornflour or cornstarch
  • 1/2 teaspoon + 1/4 teaspoon baking powder
  • 1/4 teaspoon salt
  • 1/4 cup + 1 tablespoon oil
  • 1/4 cup + 1/8 cup + 1 tablespoon caster sugar or superfine sugar
  • 1 medium egg
  • 1 teaspoon vanilla extract or essence
  • 1/8 teaspoon almond extract or essence (optional)


METHOD

  1. Preheat oven to 180 degrees C / 350 degrees F.
  2. Line a standard size muffin pan / cupcake pan with gold and silver paper baking cups / cupcake liners. Set aside.
  3. Stir the milk and vinegar together to make buttermilk.
  4. Add prepared buttermilk to the cream and stir together to make sour cream. Set aside.
  5. Combine the flour, cornflour or cornstarch, baking powder and salt in a bowl. Set aside.
  6. Beat the oil and sugar together for 30 – 60 seconds.
  7. Add the egg and extracts and beat until combined.
  8. Beat in the combined dry ingredients until smooth.
  9. Lastly beat in prepared sour cream until just mixed.
  10. Pour batter into a glass measuring jug.
  11. Fill the paper baking cups in the muffin pan between 1/2 – 3/4 full.
  12. Bake 18 – 20 minutes or until the cupcakes turn slightly golden and a wooden pick inserted into the centre of cupcakes comes out nearly clean. Do not overbake.
  13. Remove baked cupcakes onto a wire rack. Cool completely before frosting.
  14. Store cool unfrosted cupcakes airtight until ready to frost.


INGREDIENTS FOR COCOA FUDGE FROSTING

  • 1/4 cup butter
  • 1/4 cup cocoa
  • 1 1/2 cups + 1/3 cup icing sugar or confectioner’s sugar
  • 3 tablespoons milk
  • 1/2 teaspoon vanilla extract or essence
  • Black gel food colour (prefereably from Wilton or AmeriColor)


METHOD

  1. Put butter in a microwave safe bowl and microwave uncovered on high 10 – 20 seconds or until almost melted.
  2. Remove bowl from microwave and stir until butter is completely melted.
  3. Whisk in the cocoa and then microwave uncovered again on high for 30 seconds.
  4. Remove from microwave and beat in icing sugar and milk alternately until creamy.
  5. Beat in vanilla.
  6. Lastly add the black food colour, a little at a time while beating until desired colour is achieved.
  7. Frosting dyed with black food colour deepens in hue as the frosting sits, so wait 10 or so minutes after adding food colour to see how much the colour of the frosting darkens before adding more.
  8. Make sure the frosting is completely cool before piping onto cupcakes.
  9. Use a Wilton 1M tip to pipe rosettes of cocoa fudge frosting onto the cupcakes.
  10. Store your Gothic Chic Cupcakes airtight. These can be refrigerated but make sure you bring the cupcakes completely down to room temperature before serving.

Filed Under: Desserts, Recipes Tagged With: Autumn / Fall, Baking, Budget-Friendly, Cafe, Chocolate, Dessert, Halloween

Katharine Hepburn’s Mint Chocolate Brownies

March 13, 2017 by aliceineatland 2 Comments

Katherine Hepburn's Mint Chocolate Brownies

Katharine Hepburn’s Mint Chocolate Brownies are just what you need when looking for a decadent brownie fix – intensely fudgy brownie base, topped with a creamy cool peppermint frosting and drizzled with melted chocolate!

Anyone who knows me well enough is well aware of my fascination with Classic Hollywood – the time roughly from the late ’30s to the early ’60s when the Golden Age of Hollywood regretfully came to an end.

Other than famous Classic Hollywood films, I have this fondness for discovering obscure and relatively unknown old Hollywood movies and stars. YouTube has a staggering choice of such movies to choose from and I’ve found out about quite a number of long forgotten but good movies and little known yet talented stars there so a big thank you to all you wonderful classic movie uploaders!

I love all things Classic Hollywood, be it the movies, the stars, the fashion – you name it. I named my beautiful tortoiseshell cat Harlow because Jean Harlow was the original platinum blonde bombshell. Also because of the ’90s supermodel Shalom Harlow but that’s another story.

…

Read More »

Filed Under: Desserts Tagged With: Baking, Chocolate, Dessert

Chocolate Fudge Cake

November 5, 2016 by aliceineatland 6 Comments

Chocolate Fudge Cake

Chocolate Fudge Cake
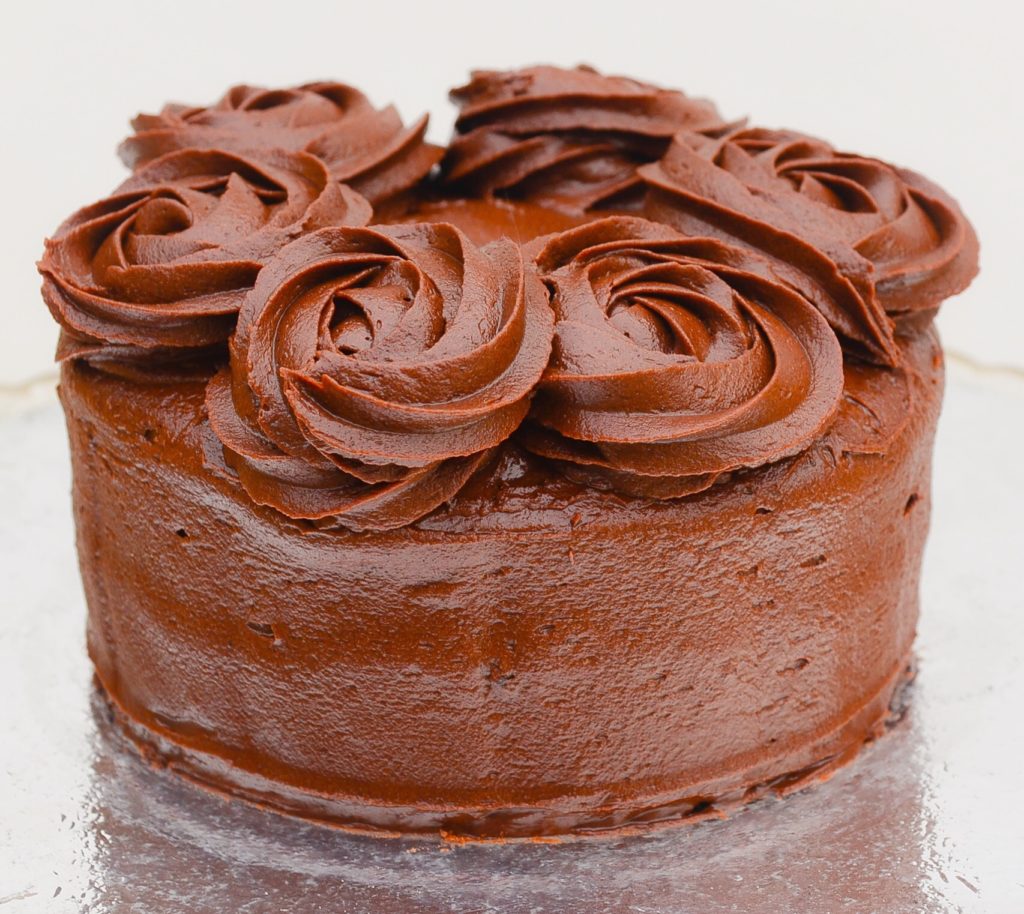
The moistest chocolate cake and the fudgiest chocolate frosting come together to make this super delicious Chocolate Fudge Cake. If you are a chocolate lover, then this cake will take you straight to chocolate heaven!

My previous post was about chocolate cupcakes with vanilla buttercream. I try to vary my posts as in one sweet and then one savoury post and so on and so forth but then this chocolate cake happened and I felt it was too yummy not to be shared. Hence here I am with another “sweet” post and another chocolate post at that which is funny considering what I’m going to reveal about myself in the next paragraph.

Unlike many women, I am, perhaps shockingly, not crazy about chocolate. As a child chocolate was admittedly, the ultimate flavour for me and chocolate bars, chocolate cakes and basically chocolate anything was my first love. Not anymore. I do like chocolatey things once in a while but it’s not something I would have all the time. Unless it is white chocolate, which I hopelessly adore to bits.

This Chocolate Fudge Cake is one of those few chocolatey things that even someone not fond of chocolate would find hard not to like. The cake part is deeply chocolate and moist plus the chocolate fudge icing is like eating a softened bar of milk chocolate; what’s not to love!

Chocolate Fudge Cake

Normally, I like to pair my chocolate cakes with contrasting flavoured frostings such as vanilla or coffee but this cake was requested by a close friend for his Mom’s birthday and the only cake that that particular family eats is chocolate cake. So I made them the one chocolate on chocolate cake that I really like which is this Chocolate Fudge Cake. It did look quite lovely in my humble opinion and I felt I must share it on my blog.

The chocolate cake is made using my all-time favourite moist chocolate cake/cupcake recipe that I wrote about in detail in my previous post. It is an easy, straightforward and foolproof recipe that results in amazingly moist and lusciously chocolatey cakes and cupcakes.

The chocolate fudge frosting is actually a cocoa-based frosting and is a breeze to make plus it tastes wonderful. I have adapted it very slightly from this recipe by “Chocolate, Chocolate and More”. I am not a big fan of ganache type frostings and call my taste buds unsophisticated but my heart still belongs to the basic old-fashioned cocoa frostings of childhood.

Chocolate Fudge Cake

I came across a photo of Pink Cherry Cake with Fudge Frosting by the bake queen “I Am Baker” sometime last year and instantly fell in love with how she had iced her cake. The frosting was done in an elegantly minimalist way with fudge icing rosettes crowning the cake and I knew I was going to try frosting a chocolate cake the same way one day. Well, I got my chance when I baked this Chocolate Fudge Cake; I am working on honing my cake frosting skills so one day I too can ice my cakes as flawlessly as “I Am Baker” does.

The best thing about this Chocolate Fudge Cake is that it reminds me of the chocolate birthday cakes my Mom would bake for my brother and I when we were kids. Since my Mom’s chocolate cake is the best chocolate cake in the world for me, anything that reminds me of it has to be a close second.

Chocolate Fudge Cake


Chocolate Fudge Cake

Recipe Type: Desserts    Author: Alice In Eatland
Prep Time: 10 Minutes    Cook Time: 50 Minutes    Total Time: 60 Minutes    Serves: 6 – 8


Chocoholics, one bite of this sinful Chocolate Fudge Cake will take you straight to chocolate heaven! Moist chocolate cake & fudgy chocolate frosting – yum!


MOIST CHOCOLATE CAKE:

INGREDIENTS

  • 1 cup milk
  • 4 tbsp white vinegar
  • 2 cups caster sugar or superfine sugar
  • 1 cup + 3/4 cup plain flour
  • 3/4 cup cocoa
  • 2 tsp baking soda
  • 1 tsp baking powder
  • 1 tsp salt
  • 2 large eggs
  • 1/2 cup oil
  • 1 tsp vanilla extract or essence
  • 2 tsp instant coffee
  • 1 cup boiling water


METHOD

  1. Preheat oven to 180 degrees C / 350 degrees F.
  2. Grease a deep round cake pan (I use an 8″ by 3.5″ round cake pan) or two 8″ or 9″ round cake pans (cake pans should be a bit deep as this batter rises!) and line with parchment paper. Grease and flour the paper. Or line cake pan(s) with aluminium foil and grease and flour the foil. Set aside.
  3. Stir the milk and vinegar together in a small cup or bowl to make buttermilk. Set aside.
  4. Combine all the dry ingredients, except coffee, in a bowl.
  5. Whisk the eggs. Stir the buttermilk and add to the eggs along with the oil and vanilla.
  6. Add the egg mixture to the dry ingredients and beat until well mixed.
  7. Stir the instant coffee into the boiling water and carefully stir into the cocoa mixture. Batter will be quite thin.
  8. Pour batter into prepared cake pan(s).
  9. Bake 30 – 40 minutes or until the cake has risen and a wooden pick inserted near the center of the cake comes out clean. This can take up to an hour depending on your oven.
  10. Let cake(s) cool in pan(s) for 10 minutes then turn out onto a wire rack. Invert so that the top of the cake(s) is up and cool completely.
  11. Your cake(s) might have a domed top so trim it off carefully with a long serrated knife and discard (by “discard” I mean eat with chai like I do).
  12. Now your flat topped cake is ready to be frosted.


CHOCOLATE FUDGE FROSTING:

INGREDIENTS

  • 1/2 cup salted butter (I use Lurpak’s Slightly Salted Butter)
  • 1 cup + 4 tbsp cocoa
  • 5 cups icing sugar
  • 2 tsp vanilla extract or essence
  • 4 tbsp cream
  • 4 tbsp milk
  • Extra milk


METHOD

  1. Melt butter in a small pan over low heat.
  2. Stir in cocoa so that the mixture forms a thickish paste.
  3. Add the remaining ingredients except extra milk into a mixing bowl and add the cocoa mixture.
  4. Beat well until smooth.
  5. Add extra milk if needed, a teaspoon at a time until frosting is of spreading consistency.
  6. Sandwich the cake(s) with about a third of the frosting and use the rest to frost the top and sides and to pipe out rosettes at the top.
  7. Pipe an additional layer of rosettes directly on top of the first set of rosettes for added height and a gorgeous effect. This is what I did.
  8. Store frosted cake airtight and serve at room temperature – please do not serve it cold straight from the fridge!


Filed Under: Desserts, Recipes Tagged With: Baking, Chocolate, Dessert

Chocolate Cobweb Cupcakes

October 24, 2016 by aliceineatland 2 Comments

Chocolate Cobweb Cupcakes

Chocolate Cobweb Cupcakes

Trick or treat! These chocolate cobweb cupcakes are absolutely delicious and a confirmed crowd pleaser. Make these for Halloween or for any day of the year really – they are as good to eat as they are to look at!

I adore this chocolate cupcake recipe because it is so easy and incredibly delicious plus it gives me the moistest chocolate cupcakes ever – dry cakes and dry cupcakes are one of my pet peeves!

The creamy vanilla frosting that these chocolate cobweb cupcakes are topped with is actually a crusting buttercream that tastes really lovely and is perfect for piping swirls, rosettes etc as it really holds its shape while remaining soft and creamy inside – this has to be my favourite recipe for pipeable frosting.

The fun cobweb toppers that the cupcakes are crowned with are made from melted chocolate and are a breeze to make!

Chocolate Cobweb Cupcakes

Growing up, Halloween was something we’d just read about in books or comics or watch on tv or movies. Thanks in most part to Hollywood, many of us knew of Halloween as the spookiest time of the year when folks don scary costumes and kids dress up in adorably spooky costumes or as their favourite characters from books, cartoons or tv shows and movies and go trick-or-treating for candy.

I am a big fan of all things “horror” be it scary movies, creepy stories, haunted houses – you name it. So you can imagine how the spookiest time of the year makes me feel. The late October autumn/fall weather adds an additional something to the atmosphere; I love it! Even if Halloween isn’t celebrated in Pakistan as such, at least those of us who want to enjoy it can do so in ways that make us happy, be it pumpkin carving, making scary costumes or coming up with cutely creepy food!

Chocolate Cobweb Cupcakes

The only time we actually kind of ‘celebrated’ Halloween was in the early ’90s in Daharki. A few Canadian engineers had been emlpoyed by Engro to help set up its new fertilizer plant that had been shipped from Canada. So they, along with their families, had relocated to the Engro Colony in Daharki from Canada until the new plant was up and running. It was Halloween, and the Canadians thought why not celebrate Halloween with the Pakistani residents of the colony and it was a great idea indeed.

Since there was obviously no “trick-or-treat” culture in the colony, the Canadian families arranged an evening Halloween party at the colony’s Club and everyone was invited. The Halloween celebration was more of a fancy dress party for us non-Canadians and it was a lot of fun.

There were some really nice things to eat at the party, made by the Club and I think some made by the Canadian ladies. As there are none of those huge gorgeous orange pumpkins growing in the middle of Sindh, the Canadians made do with what was available; they carved those classic scary Jack-o’-Lantern pumpkin faces on stocky little roundish green kaddus from the vegetable shop at the local Gulnar Market. Necessity truly is the mother of invention!

Chocolate Cobweb Cupcakes

The party was arranged within a day or so of being decided which left almost no time for anyone to think of or make any elaborate costumes. All the kids were in costume and by costumes I mean all of us more or less improvised with whatever we had lying around at home or could borrow from friends.  I went to the party dressed as a fairy. That decision was based solely on a shimmery green (the hue of green that was known as “bottle green” back then; haven’t heard that color described as such in decades!) dress that I owned and I think we created a makeshift wand for me to hold from a small cane stick with one of those decorative stars that you get at party decoration stores stuck at the top. So I was a fairy and a wingless one into the bargain as there was absolutely no time to make any DIY fairy wings.

Fast forward to the present and with that one Halloween celebrated long ago, there was not much after that and frankly there are still no Halloween celebrations as such apart from a few parties here and there. But in the last few years, social media and Instagram and Pinterest in particular, have literally brought Halloween to the rest of the world with the celebration becoming something exciting to look forward to. There is an amazing array of wonderful Halloween ideas such as for food, decor and makeup shared by bloggers, makeup artists and other insanely creative folks that has made the countdown to Halloween one of the most exciting times of the year, for me at least.

This year, I have decided to do the creepy-cool half skull makeup look made popular by the uber talented makeup artist Chrisspy that she posted on her YouTube channel back in 2014. Though I obviously cannot come even remotely close to matching her finesse and experience as a makeup artist, I think I did a pretty okay job practicing getting the half skull look to look decent enough, haha!  Fingers crossed for the final look on the day! You can watch Chrisspy’s tutorial here as she uses her mastery over makeup to transform her look in minutes.

Chocolate Cobweb Cupcakes

Just like Chrisspy, the sheer scale of talent and creativity of ideas, be it makeup, costume design, baking or anything really, on social platforms such as YouTube, Pinterest etc is nothing short of staggeringly impressive; so many great ideas and the fact that people share them in near microscopic detail to make it as easy as possible for anyone who might want to try them – how amazing is that! Thank you kind, helpful and crazily talented people for sharing your wonderful ideas and techniques so wholeheartedly!

I too wanted to do something in the spirit of Halloween (pun intended, hehe!). I had been wanting to put my go to chocolate cupcake recipe on the blog for a while so thought of making some Halloween-ish cupcakes to accommodate that idea. So I started browsing Pinterest for some spooky cupcake ideas and came across so many amazing Halloween cupcakes! It was hard to choose just one idea but these Pumpkin Chocolate Spiderweb Cupcakes by Bright-Eyed Baker frosted with orange colored frosting and topped with chocolate spiderweb toppers stood out as they were so arrestingly beautiful! So I decided that these would be my food inspiration for Halloween this year and that is how my chocolate cobweb cupcakes came to be.

Chocolate Cobweb Cupcakes

The chocolate cupcake recipe I use most is a chocolate cake recipe that was shared by someone back in Daharki during the late ’90s – early 2000s and was titled “Deep Chocolate Cake.” It is such a flavourful and supermoist recipe that I instantly fell in love with it. Years later I discovered it is actually the recipe for Hershey’s Black Magic Cake. It is pretty much the same recipe that Ina Garten used to make “Beatty’s Chocolate Cake” on an episode of “The Barefoot Contessa” so, if the recipe has her approval, then you know it must be pretty good.

The vanilla frosting recipe is a very slight adaptation of the wonderful Crusting American Buttercream Icing by Peggy Does Cake. It is a very good recipe, not overly sweet or too intensely buttery and the original can be found here.

I used orange coloured frosting for my Chocolate Cobweb Cupcakes plus the classic bewitching purple of Halloween, thanks to a post on Wilton’s Instagram earlier this month of chocolate cupcakes with purple frosting topped with mint green spiderwebs! Wilton has been posting some really fun Halloween ideas this month so you might want to check them out.

Chocolate Cobweb Cupcakes

So before we go on to actually making and decorating the cupcakes let’s keep the following in mind:

  • The first time I made orange icing for these cupcakes by mixing red and yellow gel food colors (both by AmeriColor) I added the red a little too enthusiastically which meant that I had to use A LOT of yellow to bring it to any semblance of orange. I did end up with a very vibrant, heart-stopping orange but also ended up thinning my frosting a bit – yes, even gel food colors, when used in copious amounts, can affect the texture of your frosting so note to self: Practice restraint when using food colors! You can obviously use orange food color for the frosting. AmeriColor’s “Electric Orange” seems to be a popular choice for bright orange frosting.
  • The chocolate cupcake toppers are very delicate. If you live in a place with a warmer climate it would be best to freeze the toppers until ready to serve and add them to complete your chocolate cobweb cupcakes right before serving. They’ll soften to room temperature fairly quickly.  Literally seconds after being placed on the cupcakes, the toppers began bending at the base which is the point where they’d been pushed into the frosting and finally, gently toppled over. The toppled cobwebs then softened and meltingly drooped over the frosting which kind of gave them a fairly cool look in a creepy sort of way, which if less pretty, was actually far more realistic as you can see in the photo above.
  • I discovered, rather very late in the day (after 2 attempts at making the chocolate cobwebs and having them topple over the cupcakes both times) that it is best to use chocolate that contains no cocoa butter to make the toppers as that kind of chocolate sets up firm and is not prone to softening just seconds after being placed on buttercreamed cupcakes. I used Hershey’s semisweet chocolate chips to make the cobwebs, which obviously contain cocoa butter, hence the super quick softening and yes I wish I had researched more before attempting to make the toppers. Candy coating or candy melts might work well too in creating firm toppers. I would still place the toppers atop the cupcakes just before serving to be on the safe side.
  • Serve the frosted chocolate cobweb cupcakes at room temperature. Store them airtight and if they’ve been in the fridge, allow them to come to room temperature before serving. Cold cupcake and cold frosting are not very nice, unless it’s a whipped cream frosted cupcake.

Chocolate Cobweb Cupcakes


Chocolate Cobweb Cupcakes

Recipe Type: Desserts    Author: Alice In Eatland
Prep Time: 30 Minutes    Cook Time: 20 Minutes    Total Time: 50 Minutes    Serves: 10 – 12


Moist chocolate cobweb cupcakes with swirls of creamy vanilla frosting – perfect for the spookiest time of the year or for any time of the year!


CUPCAKES:

INGREDIENTS

  • Around 12 – 14 (1.5″ base) cupcake liners/paper bake cups
  • 1/2 cup milk
  • 2 tbsp white vinegar
  • 1 cup caster sugar or superfine sugar
  • 1/2 cup + 1/4 cup + 1/8 cup plain flour
  • 1/4 cup + 1/8 cup cocoa
  • 1 tsp baking soda
  • 1/2 tsp baking powder
  • 1/2 tsp salt
  • 1 large egg
  • 1/4 cup oil
  • 1/2 tsp vanilla extract or essence
  • 1 tsp instant coffee
  • 1/2 cup boiling water


METHOD

  1. Preheat oven to 180 degrees C / 350 degrees F.
  2. Line cupcake/muffin pans with the cupcake liners/paper bake cups and set aside.
  3. Stir the milk and vinegar together in a small cup or bowl to make buttermilk. Set aside.
  4. Combine all the dry ingredients, except coffee, in a bowl.
  5. Whisk the egg. Stir the buttermilk and add to the egg along with the oil and vanilla.
  6. Add the egg mixture to the dry ingredients and beat until well mixed.
  7. Stir the instant coffee into the boiling water and carefully stir into the cocoa mixture. Batter will be quite thin.
  8. Pour batter into a measuring jug.
  9. Fill cupcake liners/paper bake cups with batter almost 3/4 full. I fill them nearly to the top with less than an 1/8 of an inch to spare at the top as I like my cupcakes to have nice high domed tops but if you’re making these for the first time, fill them 1/2 or 3/4ths full to see how they bake in your oven as every oven is different and you don’t want your cupcake batter spilling out and over while baking.
  10. Bake 18 – 20 minutes or until cupcakes are risen and a wooden pick inserted near the center comes out almost clean. Its okay if a few crumbs are sticking to the wooden pick. Try not to overbake.
  11. Remove baked cupcakes to a wire rack.
  12. Cool completely before frosting.


CREAMY VANILLA FROSTING:

INGREDIENTS

  • 200 grams salted butter (I use Lurpak’s Slightly Salted Butter), soft but cool
  • 1 tbsp water, at room temperature
  • 1 lb (around 450 grams) icing sugar, sifted/sieved
  • 1 tbsp cream
  • 1/2 tbsp vanilla extract or essence
  • Orange food colour (I used “Super Red” and “Electric Yellow” both by AmeriColor to make orange)
  • Purple food colour (I used “Violet” by Wilton)

METHOD

  1. Cream butter until creamy, fluffy and pale in colour.
  2. Add the water and beat until combined.
  3. Add the rest of the ingredients, except the food colours, and beat until smooth, thick and creamy.
  4. Divide the frosting equally into two and colour each half with the food colours.
  5. Pipe onto cooled cupcakes and store airtight.
  6. If storing in the fridge, allow your frosted chocolate cobweb cupcakes to come down to room temperature for 10 or so minutes before serving.


CHOCOLATE COBWEBS:

  1. Print out cobweb templates (I used the one available here by Candiquik – there are some cute bat and cat templates as well and these too would make pretty awesome chocolate toppers).
  2. Tape the cobweb printout on a flat cookie sheet or the backside of a flat tray.
  3. Lay a sheet of greaseproof or wax paper on top of the printout and tape it flat on top of it. You will be able to see the template design below.
  4. Fit a piping bag or a Ziploc bag snipped at one corner with a small plain writing nozzle/icing tip (I used tip number 4 by Ateco).
  5. Put 1 cup of dark or semisweet chocolate chips or chopped chocolate (whichever chocolate you use, make sure it has NO cocoa butter in it) in a bowl and microwave on high for 20 seconds. Stir and microwave again in 10 second increments, stirring every time until the chips are melted and smooth.
  6. Cool the melted chocolate a few minutes and put into the prepared piping bag.
  7. Carefully pipe out the chocolate over the wax paper covered templates, tracing out the pattern beneath. Don’t worry if you’re not super neat, as long as all the lines of each cobweb are connected by the chocolate.
  8. Once all the cobwebs have been piped, put the tray or cookie sheet in the fridge to set for at least half an hour.
  9. To remove cobwebs, carefully slide a thin spatula or thin flat butter knife under the cobwebs to dislodge them and carefully and quickly place them on top of the frosted cupcakes just before serving.

Filed Under: Desserts, Recipes Tagged With: Autumn / Fall, Baking, Chocolate, Daharki, Dessert, Halloween

Primary Sidebar

ABOUT ALICE

Favorite recipes, fun eating out experiences and some wonderful food memories from Lahore, Pakistan.

ALICE’S TOP PICKS

Rose Crème Brûlée

Rose Crème Brûlée

Three Cheese Roasted Chilli Bread Pudding

Patisserie at Mocca Coffee Gulberg

Mocca Coffee Gulberg

The Paloma

The Paloma

Tags

Autumn / Fall Baking Budget-Friendly Cafe Chocolate Christmas Daharki Desi Dessert Dinner Easter Eatery Freezer Friendly Halloween Lunch Pakistani Restaurant Romantic Soup Spring Starter Summer Valentine's Day Vegan Vegetarian Winter

Tags

Autumn / Fall Baking Budget-Friendly Cafe Chocolate Christmas Daharki Desi Dessert Dinner Easter Eatery Freezer Friendly Halloween Lunch Pakistani Restaurant Romantic Soup Spring Starter Summer Valentine's Day Vegan Vegetarian Winter

Categories

  • Breakfast & Brunch
  • Budget Friendly
  • Condiment
  • Desserts
  • Drinks
  • Eateries
  • Homemade Cheese
  • Homemade Cheese
  • Mains
  • Recipes
  • Snack & Starter
  • Uncategorized

ABOUT

Hello! If like me, you too love to cook, bake and eat then you're in the right place. From heartwarming, soul-satisfying comfort food to light, fresh and deliciously healthy meals, everything here is made with the utmost TLC :)

Tags

Autumn / Fall Baking Budget-Friendly Cafe Chocolate Christmas Daharki Desi Dessert Dinner Easter Eatery Freezer Friendly Halloween Lunch Pakistani Restaurant Romantic Soup Spring Starter Summer Valentine's Day Vegan Vegetarian Winter

Copyright © 2025 · Foodie Pro Theme by Shay Bocks · Built on the Genesis Framework · Powered by WordPress