• Skip to primary navigation
  • Skip to main content
  • Skip to primary sidebar

Alice In Eatland

Recipes . Eateries . Inspiration

  • Recipe Index
  • Eateries

Budget-Friendly

Tamatar Paneer Recipe

March 18, 2023 by aliceineatland Leave a Comment

Tamatar Paneer

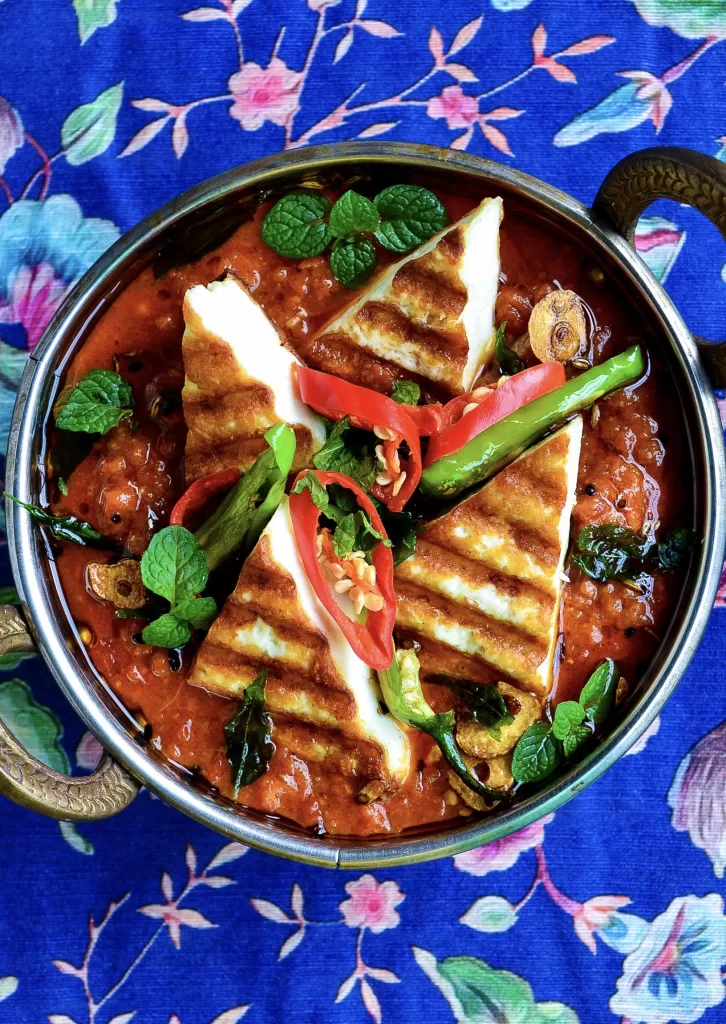
Tamatar PaneerTamatar Paneer, a vibrantly spiced Hyderabadi-style tomato curry with “crisp-on-the-outside-creamy-on-the-inside” grilled homemade paneer wedges.

A spring-summer favourite, ideal for cooking when tomatoes are in seasonal abundance and one of my top favourite ways to enjoy paneer.

This recipe has been inspired by the Tamatar Paneer on the menu of Patli Galli, a desi restaurant that I am very, very fond of.

During Lockdown 2020, the restaurant started offering takeaway vegetarian and non-vegetarian thalis and Tamatar Paneer was one of the veg thali offerings. Notable mention: the Mirchi Ka Saalan from the veg thali was quite possibly, the best I’ve ever had.

The thalis have been discontinued but the delicious vegetarian options such as the ubiquitous Daal Maash and Palak Paneer are still available (both very good, actually). Thankfully, Tamatar Paneer is also still being offered and I believe, Patli Galli is the only restaurant in Lahore that has it on the menu. I hope they bring the Mirchi Ka Saalan back.

Tamatar Paneer Recipe

The phenomenal takeaway Vegetarian Thali (Tamatar Paneer in the centre) from Patli Galli Restaurant, during Lockdown 2020. They need to bring this back!

6 Tips For Making The Best Tamatar Paneer

  • Use ripe tomatoes for best results.
  • Tomato Paste adds great depth of flavour so please try not to omit it.
  • A small amount of sugar (preferably soft brown sugar, but regular white sugar is fine)  is essential to balance out the acidity of the tomatoes.
  • Please use the best quality paneer you can find for this recipe.
    Search for home-based vendors or small scale artisanal cheese makers. Commercially available cottage cheese is no substitute for paneer and is “highly NOT recommended” here!
  • I have used homemade paneer and would encourage you to do the same to make a really standout Tamatar Paneer. The recipe for homemade paneer is linked in the ingredients list (or just type in the search bar above).
    If you follow the recipe correctly, your paneer will turn out rich and creamy and will stay moist and velvety inside even after being grilled to a crisp outside.
  • Try Tamatar Tofu for a delicious vegan spin on this dish.
    Simply replace the paneer with firm or extra firm tofu.
    Slice tofu slab in half horizontally and  microwave 2 minutes on high. Much of of the liquid will get released.
    Drain and place tofu between heavy duty paper towels or a kitchen towel with a cutting board and a weight on top to press out as much moisture as possible.
    After 30 minutes, cut the pressed tofu into cubes or wedges and proceed with the grilling part of the recipe.

Tamatar Paneer is best served with garlic naan but a simple roti or a paratha will do in a pinch. Good with boiled white rice too. Surprisingly decent cold, straight out of the fridge as well.

Tamatar Paneer Recipe


How To Make Tamatar Paneer


Tamatar Paneer, a vibrantly spiced Hyderabadi style tomato curry with “crisp-on-the-outside-creamy-on-the-inside” grilled homemade paneer wedges.


Recipe Type: Main

Author: Alice In Eatland

Cook Time: 20 Minutes

Total Time: 30 Minutes

Serves: 2


INGREDIENTS


TOMATO CURRY

  • 2 tablespoons oil
  • 1 dried red chilli
  • 1/4 teaspoon cumin seeds
  • 1/4 teaspoon brown mustard seeds
  • 1/4 teaspoon nigella seeds
  • Salt
  • 6 – 8 fresh or dried curry leaves
  • 1/2 tablespoon crushed garlic
  • 1/2 tablespoon grated ginger
  • 2 teaspoons gram flour
  • 1 tablespoon tomato paste
  • 1/4 teaspoon turmeric powder
  • 1/4 teaspoon red chilli powder
  • 1/4 teaspoon Kashmiri chilli powder (optional)
  • 1/2 teaspoon cumin powder
  • 1/2 teaspoon coriander powder
  • Good pinch brown sugar or white sugar
  • 500 grams ripe tomatoes, blended to a coarse purée
  • 3/4 cup hot water


GRILLED PANEER

  • 100 – 200 grams paneer wedges or cubes (find the recipe to make your own paneer at home here
  • 1 tablespoon oil


TEMPERING & GARNISH

  • 1 tablespoon oil
  • 1 dried red chilli
  • 1/4 teaspoon cumin seeds
  • 1/4 teaspoon brown mustard seeds
  • 1/4 teaspoon nigella seeds
  • 2 cloves garlic, peeled & thinly sliced
  • 2 fresh green chillies, quartered
  • 6  – 8 fresh or dried curry leaves
  • Fresh mint leaves
  • Fresh coriander leaves
  • Fresh red chillies (optional)


METHOD


TOMATO CURRY

  1. Heat oil.
  2. Add dried red chilli, cumin seeds, brown mustard seeds and nigella seeds.
  3. Sauté until the seeds start crackling.
  4. Add curry leaves, followed by crushed garlic and grated ginger.
  5. Stir until fragrant and add the gram flour.
  6. Sauté until the gram flour doesn’t smell raw anymore and the colour deepens slightly, about 2 – 4 minutes.
  7. Add tomato paste, salt, turmeric powder, red chilli powder, Kashmiri chilli powder (if using, cumin powder, coriander powder and sugar.
  8. Cook, stirring and adding a splash of water if needed, till the masala thickens and the oil begins to separate from it.
  9. Pour in the coarsely blended tomato purée and bring to the boil, stirring constantly.
  10. Cover partially and cook on medium heat, stirring frequently, until the liquid evaporates and the tomato mixture thickens and begins to come together.
  11. Add water at this stage, stir and bring to a simmer.
  12. Let cook 5 – 10 minutes, stirring occasionally, until the oil begins to float on top in places and the curry is as thick as your preference.


GRILLED PANEER

  1. Heat a grill pan or heavy bottomed frying pan (non-stick works better here) on high heat and brush with half a tablespoon of oil.
  2. Coat the paneer wedges or cubes thoroughly with the remaining half tablespoon of oil.
  3. When the grill pan/frying pan is searingly hot (this is important, otherwise the paneer will stick to it), add the oil-coated paneer pieces. (Please follow the same instructions if you’re grilling tofu for a vegan Tamatar Tofu – see tip #6 at the top first though!)
  4. Let sit undisturbed 2 – 4 minutes or until you can see the bottom edges of the paneer browning.
  5. Turn carefully, prying gently to loosen with a spatula or butter knife if needed, and cook the same way on the other side.
  6. Remove paneer pieces to a plate.


TEMPERING & GARNISH

  1. Spoon the Tomato Curry into a serving dish or bowl.
  2. Arrange the grilled paneer pieces on top.
  3. Heat oil in a small pan.
  4. Add all other ingredients, except the mint and coriander leaves.
  5. Sauté until the garlic turns light golden and pour the hot tempering over the tomato curry and grilled paneer.
  6. Garnish with fresh min leaves, fresh coriander leaves and sliced red chillies, if using and serve.
Filed Under: Budget Friendly, Eateries, Mains, Recipes Tagged With: Budget-Friendly, Desi, Dinner, Eatery, Lunch, Pakistani, Spring, Summer, Vegan, Vegetarian

Homemade Paneer: Made With Just 3 Ingredients

March 18, 2023 by aliceineatland Leave a Comment

Paneer: How To Make It With Just 3 Ingredients

Homemade Paneer Recipe

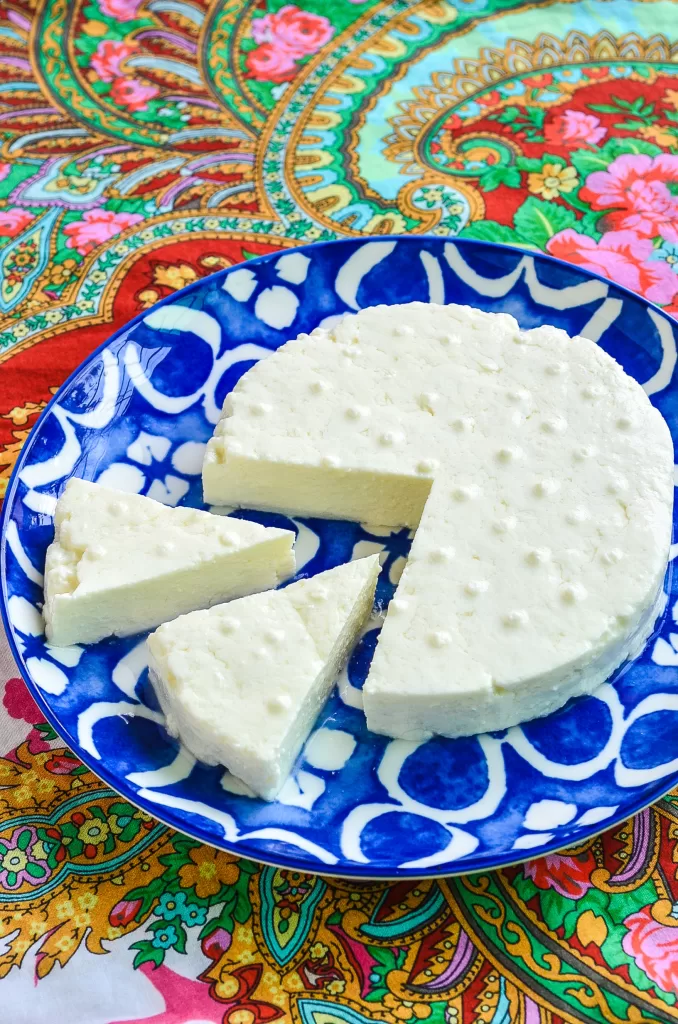
Homemade paneer, with its mild milky flavour and firm but creamy texture is the easiest cheese you can make with just 3 ingredients.

This lovely tasting non-melting cheese is a great source of vegetarian protein and is good either on its own or as an ingredient in vegetarian recipes.

Homemade paneer is pretty easy to make but there are certain things that need to be kept in mind if you want to make a really good one as opposed to just the okay-ish kind.

I have been making it myself for many years now and hope that the following tips will help you make excellent paneer at home.

Tips For Making The Best Homemade Paneer:

How To Make Paneer

  • Raw, unpasteurised whole milk is a must for good quality and decent yield.
  • UHT treated milk can be used but both the quality and quantity of your final product will be significantly lower.
  • Fresh lemon juice can be used instead of white vinegar in the recipe, though I find paneer made with lemon juice tends to have a very pale yellow tint compared to the bright white shade that paneer made with white vinegar has.
  • A clean muslin cloth (that you use exclusively for cheese making) placed over a sieve is excellent for draining the whey from the curds.
  • The handy dandy paneer press that I use and was sent to me by my maternal aunt from Karachi. It measures nearly 4” in diameter and is around 2 1/4” high.
    She purchased it from Bohri Bazaar but in case you wish to order one online, a couple of sellers on Daraz.pk are stocking stainless steel ones.
  • 1 litre of quality unpasteurised milk usually yields around 170 grams or so of cheese.
  • For a rich and creamy paneer, store it  submerged in drinking water in an airtight container in the fridge.
    The yield will increase to around 200+ grams within 24 hours.
  • It will not dry out should you grill or fry it, which seems to be a common issue with paneer.
  • Stored airtight, submerged in drinking water in the fridge, the paneer stays fresh up to 3-4 days as long as you change the water once daily.

Delicious Recipes Made With Homemade Paneer:

Paneer is a pretty versatile ingredient. Check out my recipe for Paneer Hara Masala Rangoons for the ultimate crispy, cheesy starter.
For a satisfying Hyderabadi style main course, have a look at my super delicious Tamatar Paneer.

Homemade Paneer Recipe

My Pac-Man style paneer 🙂

Homemade Paneer: Made With Just 3 Ingredients


Recipe Type: Homemade Cheese

Author: Alice In Eatland

Cook Time: 10 Minutes

Total Time: 60 Minutes

Serves: 2


INGREDIENTS

  • 1/2 cup water
  • 1 litre raw unpasteurised whole milk
  • 2 tablespoons white vinegar


METHOD

  1. Add 1/4 cup water to a heavy bottomed pan.
  2. Pour in the milk and bring to the boil over medium heat.
  3. When milk reaches the boil, lower the heat and let boil for 5 minutes.
  4. Stir the white vinegar into the remaining 1/4 cup of water.
  5. Lower the heat under the milk and slowly stir in the vinegar solution.
  6. The curds will begin to separate from the whey (which will have a greenish tinge, ideally).
  7. Turn off the heat, let sit a minute or so.
  8. Line a sieve suspended over a bowl with a clean muslin cloth.
  9. Transfer the separated curds onto the muslin cloth with a slotted spoon.
  10. Alternatively, the curds can be transferred directly into a paneer press if using one.
  11. Let drain 2 minutes then cover with the cloth sides and place a weight on top.
  12. If using a paneer press, place the lid down firmly and place a weight on top (I usually use my small steel mortar).
  13. After an hour or so, remove the disc of paneer from the muslin or press and place in a container with a lid.
  14. The paneer is ready to be used though I find the texture vastly improves in creaminess once it is submerged in drinking water and stored airtight in the fridge for a day.
  15. Store 3-4 days in the fridge, changing the water once daily.
  16. This recipe makes a 3.5” – 4” paneer disc with a 3/4” thickness.

Filed Under: Homemade Cheese, Homemade Cheese, Recipes Tagged With: Budget-Friendly, Desi, Spring, Summer, Vegetarian

How To Make Moutabal

March 7, 2023 by aliceineatland Leave a Comment

Moutabal

Moutabal
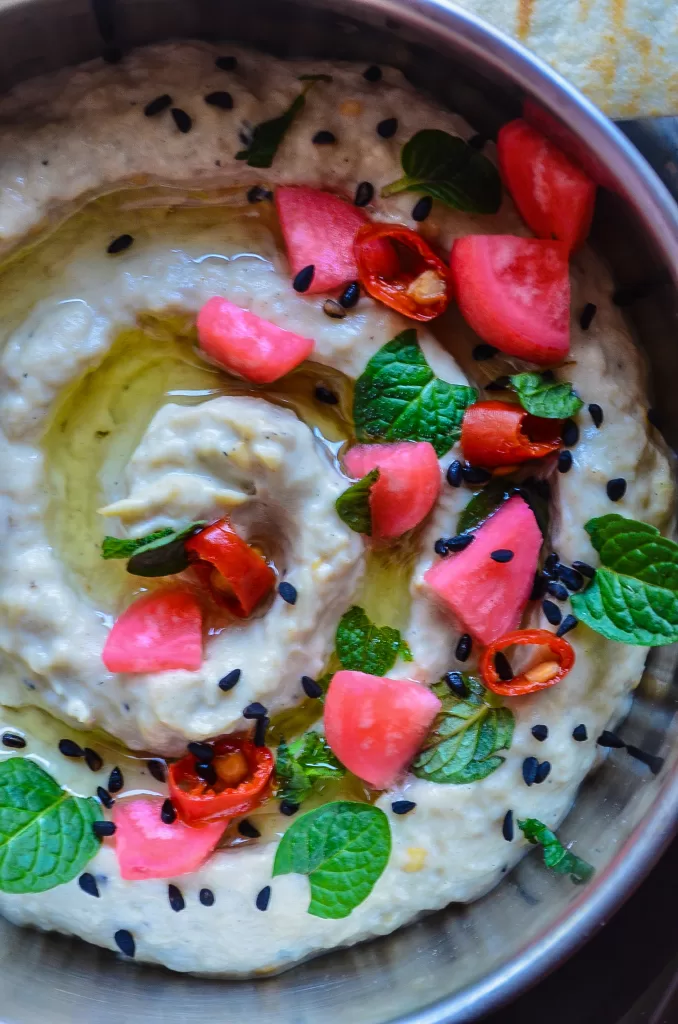
Moutabal is a creamy, smokey and pleasingly textured Middle Eastern eggplant dip. Healthy, budget-friendly and delicious, it is a must add to your “dips” repertoire, if you have one.

When served with crudités, pita chips or crackers, Moutabal is a fantastic everyday snack and a fabulous mezze platter item.

What’s the difference between Moutabal and Baba Ghanoush?

Aren’t Moutabal and Babaghanoush interchangeable names for what is essentially the same dip? No.

While the star of the show in both dips is charred eggplant, the recipe for Moutabal calls for the addition of tahini as a key ingredient, that gives the dip it’s characteristic taupe creaminess.

Many recipes for Moutabal also call for the addition of a bit of yoghurt which balances out the slight bitterness that sometimes charred eggplant and tahini can have.

Babaghanoush, on the other hand, has no tahini and a couple of additional ingredients such as tomatoes, onions and capsicum/bell pepper. It is another delectable dip that’s a great addition to a mezze spread.

Here’s an easy recipe for Moutabal that you can whip up in no time. As long as you have the ingredients on hand, it doesn’t take long to make. No special equipment required either.

Tips For Making Delish Moutabal:

-charring the eggplant directly on fire with a pair of steel tongs gives the best smokey flavour.

-alternatively, the eggplant can be roasted in the oven under the grill/broiler.

-when the skin of the eggplant blackens, chars in places and the size of the fruit (yes, eggplants are technically fruits and not vegetables) reduces, it is ready.

-a butter knife works well here, allowing you to scrape off the charred eggplant skin without slicing off any flesh underneath.

-peeling the burnt eggplant skin may be a bit of a pain, but kindly do not give in to the temptation of giving the eggplant a rinse under running water or worse, submerging it in a bowl of water  to loosen every bit of skin *shudder*

-if your eggplant has been roasted to perfection, a fork is all you need to shred the eggplant flesh and mash it into a semi chunky purée along with the other ingredients.

-if using a food processor, pulse the ingredients in quick, short bursts so that the texture remains slightly chunky and you don’t purée everything into a gray coloured paste.

Moutabal


MOUTABAL


Recipe Type: Starter/Appetiser/Snack

Author: Alice In Eatland

Serves: 2


Moutabal, a mezze superstar! A creamy, smokey and pleasingly textured Middle Eastern eggplant dip that’s healthy, budget-friendly and absolutely delish!


INGREDIENTS

  • 1 large or 2 medium eggplants
  • 2 tablespoons tahini
  • 2 cloves garlic, grated
  • 1-2 tablespoons dairy or plant-based yoghurt (optional)
  • Lemon juice
  • Salt
  • Extra virgin olive oil
  • Pomegranate seeds, fresh red chillies or pickled radishes (to garnish)
  • Fresh parsley (to garnish)
  • Black sesame seeds or nigella seeds (to garnish)
  • Crudités, pita chips, crackers (to serve)


INSTRUCTIONS

  1. Place the eggplant(s) directly on the burner on a gas stove on medium high heat.
  2. Roast, turning and rotating the eggplant frequently with metal tongs, until it shrinks slightly and the skin blackens and chars with no purple areas remaining.
  3. Remove to a heatproof bowl or plate, cool and peel off the skin.
  4. Remove the stem and place peeled eggplant flesh in a colander or sieve with a bowl underneath for 10-15 minutes.
  5. Whip (either in a food processor, blender or using a hand whisk) the tahini with grated garlic, lemon juice, salt & yoghurt (if using) till pale and creamy.
  6. Add drained eggplant to a mixing bowl along with the with the tahini mixture and mash until a semi-smooth yet textured consistency is reached.
  7. Check seasoning and adjust if needed.
  8. Serve swirled with extra virgin olive oil and garnish as you wish.

Filed Under: Recipes, Snack & Starter Tagged With: Budget-Friendly, Spring, Starter, Summer, Vegan, Vegetarian

Momofuku Ginger Scallion Noodles

August 7, 2018 by aliceineatland 2 Comments

Momofuku Ginger Scallion Noodles

Post Updated: 04.12.23

The one and only Momofuku Ginger Scallion Noodles – I am salivating while updating this post.

Also, I am mentally going through the contents of my fridge and pantry, hoping I have all the ingredients to make these noodles after I’m done with this post.

Momofuku Ginger Scallion Noodles: The Legend

Restaurateur David Chang, creator of Netflix cult favourite “Ugly Delicious” and founder of the Momofuku Group of Restaurants writes in his book “Momofuku” (written with Peter Meehan) that “Our ginger scallion noodles are an homage to / out-and-out-rip-off of one of the greatest dishes in New York City: the $4.95 plate of ginger scallion noodles at Great New York Noodle Town down on the Bowery in Chinatown.”

I agree with Chang when he says, “You need ginger scallion sauce on your noodles, in your fridge and in your life. For real.”

Momofuku Ginger Scallion Noodles

Momofuku Ginger Scallion Noodles: The Real Star Of The Show

The real star of this Momofuku Ginger Scallion Noodle dish is the Ginger Scallion Sauce. There is absolutely nothing like it.

Also, the sauce in question is more solid than liquid, more like a chunky condiment or a chutney than a pourable flavouring concoction.

This Ginger Scallion Sauce is also a perfect demonstration of how the correct combination of just a few simple ingredients can result in astoundingly astonishing flavours.

I use it not just for this noodle recipe but also to top fried rice, mashed potatoes and soups. The possibilities are quite literally, endless.

Momofuku Ginger Scallion Noodles: How Do You Serve Them?

The Ginger Scallion Noodles at Momofuku are served with things like bamboo shoots, pickled cucumbers, pan roasted cauliflower, sliced scallions and toasted nori.

I eat mine unadorned, except for a few fresh spring onions tops chopped into bits sometimes. But mostly with nothing else.

These noodles taste great at room temperature but somehow I love them cold straight from the fridge more. Cold buckwheat soba noodles would also go pretty well with this sauce.

Thanks to fellow foodie blogger friend Monita Sen for introducing me to these incredible Momofuku Ginger Scallion Noodles – check out Monita’s luscious Instagram feed; it is insanely gorgeous!

Momofuku Ginger Scallion Noodles

Momofuku Ginger Scallion Noodles


Recipe Type: Main, Snack
Author: Alice In Eatland
Prep Time: 10 Minutes   Cook Time: 10 Minutes    Total Time: 20 Minutes
Serves: 1
Keyword: 10 Minute Recipe, Asian Noodles, Asian Recipe Easy, Dinner Ideas, Easy Recipes, Healthy Asian Recipes, Noodles, Quick And Easy Recipe, Vegetarian Recipes, Quick Recipes


Momofuku Ginger Scallion Noodles:

7 everyday ingredients & 10 minutes of your time are all you need to make David Chang’s ultimate ramen noodle recipe.


INGREDIENTS

  • 100 grams (4 oz) cooked ramen or egg noodles
  • 1 1/4 cups finely chopped spring onions / green onions / scallions (both white and green parts)
  • 1/8 cup peeled, grated ginger
  • 1/4 cup – 1/2 cup oil*
  • Salt
  • A few teaspoons of white vinegar
  • A few teaspoons of soy sauce


METHOD

  1. Place the chopped spring onions / green onions / scallions and the grated ginger in a heatproof bowl.
  2. Pour the oil into a small saucepan and place over medium heat until the surface of the oil is shimmering slightly.
  3. Put a piece of chopped spring onion in to test the oil. If it sizzles immediately upon contact with the oil, your oil is hot enough.
  4. Remove pan from heat and pour the hot oil straight onto the chopped onions and grated ginger.
  5. Stir in salt, vinegar and soy sauce to taste.
  6. Let sit 10-15 minutes.
  7. Place noodles in a bowl and stir in a couple of tablespoons of your ginger scallion sauce.
  8. Top with some fresh spring onion green bits if liked.
  9. Store any leftover ginger scallion sauce airtight in the fridge for up to 2 – 4 days.


*David Chang recommends either grapeseed or any other neutral oil for this recipe.

I just use regular cooking oil from my kitchen.

Any oil would work alright except a strong tasting one like olive oil.

Filed Under: Budget Friendly, Mains, Recipes Tagged With: Budget-Friendly, Dinner, Lunch, Spring, Summer, Vegan, Vegetarian, Winter

Gothic Chic Cupcakes

October 19, 2017 by aliceineatland Leave a Comment

Gothic Chic Cupcakes

Post Updated: 11.03.24

Gothic Chic Cupcakes have been my favourite Halloween dessert idea since 2017! Moist vanilla cupcake base topped with a very chocolatey black cocoa fudge frosting, these are perfect for any special occasion during the year and absolute showstoppers especially at Halloween.

The first cupcake recipe on my blog was for Chocolate Cobweb Cupcakes for Halloween 2016. Check that one out too for a fun but sweetly spooky Halloween cupcake recipe.

The first Halloween cupcake recipe had a chocolate cupcake base topped with vanilla frosting. The Gothic Chic Cupcake recipe is the other way around – my favourite moist vanilla cupcake recipe with a very old fashioned and very delicious cocoa fudge frosting.

As mentioned in my previous Halloween post, I did not grow up celebrating Halloween except for one year in the ’90s. As an adult now, I have been getting more and more excited about Halloween each year.

Gothic Chic Cupcakes

Instagram and Pinterest with their fabulous Halloween related food, decor and craft posts are definitely to be credited for making Halloween popular in parts of the world where it isn’t really celebrated as such.

I had decided that along with food, I would do some sort of Halloween DIY craft or decor project as well this year.

I had a very clear idea of something very chic and very minimalistic Gothic in mind hence the black, gold and silver theme for my Halloween.

Not being very “crafty” as such, I wanted to do something simple but effective so I chose the very aptly titled Creepy Black Twig Wreath – thanks to Earnest Home Co. for the fabulous idea and the easy tutorial.

I collected the branches and twigs off a basil plant and a rose bush – both from my garden and both completely dried up. I then put the twig wreath together bit by bit according to the step by step tutorial.

My brother says the finished wreath looks like something out of the horror movie “The Ring” – target achieved!

Gothic Chic Cupcakes

Pumpkins were next and after trawling through various pumpkin ideas on Pinterest, I decided on simple painted pumpkins for Halloween 2017.

Pinterest has a photo of a large pumpkin painted matte black sitting on a chair and as soon as I saw it I knew I had to have a black pumpkin this Halloween. I was finding gold and silver painted pumpkins on Pinterest quite appealing as well.

So my sister-in-law and I spray painted a few pumpkins black, gold and silver. I could not get hold of perfectly shaped pumpkins but after they were painted and were sitting in all their beautiful painted glory, I felt the irregular shapes, indents and imperfections here and there somehow added to the Gothic appeal that I was after.

And lastly, the Gothic Chic Cupcakes. I adore this moist vanilla cupcake recipe so much and for the life of me I can’t find the link to the original recipe because I wrote the recipe down the old fashioned way in my crumbling old recipe diary.

Like a fool, I completely forgot to write down the name of the blog where I took the recipe from. I am trying to search for that particular blog and hopefully if I find it I will update this blog post with proper credit to the original creator of this wonderful recipe.

Gothic Chic Cupcakes

The frosting recipe comes via My Gluten Free Kitchen with a deep cocoa flavour and dreamy pipeability. The idea was to dye the cocoa fudge  frosting a jet black with food colour.

As I was adding the black food colour to the frosting and mixing it in, I stopped when the icing reached a deep dark charcoal gray. It looked incredible and very broodingly sexy – so much cooler than the flat black I had intended to achieve.

I used gold and silver cupcake liners / paper bake cups for my Gothic Chic Cupcakes.

I wanted the vanilla part of the cupcake to show very clearly so instead of covering almost the entire top of the cupcakes with frosting, I opted to pipe rosettes that would leave room for the vanilla part to show.

I have been ‘piping partially’ this way lately and liking it. You can obviously cover the entire tops of your Gothic Chic Cupcakes in frosting like it is usually done.

Happy baking and frosting and a very happy Halloween to all!

Gothic Chic Cupcakes

Gothic Chic Cupcakes


Recipe Type: Dessert    Author: Alice In Eatland
Prep Time: 30 Minutes    Cook Time: 20 Minutes    Total Time: 50 Minutes
Serves: 8 – 10
Keyword: Gothic Cupcakes Recipe, Goth Cupcakes Recipe, Halloween Cupcakes,


These moist & fluffy Gothic Chic Cupcakes are perfumed with vanilla & frosted with a dark & intensely chocolate cocoa fudge frosting – so tasty & so chic!


INGREDIENTS FOR MOIST VANILLA CUPCAKES

  • 2 tablespoons milk
  • 1 tablespoon white vinegar
  • 1/4 cup + 1/8 cup cream
  • 1/2 cup + 1 tablespoon flour
  • 1/8 cup cornflour or cornstarch
  • 1/2 teaspoon + 1/4 teaspoon baking powder
  • 1/4 teaspoon salt
  • 1/4 cup + 1 tablespoon oil
  • 1/4 cup + 1/8 cup + 1 tablespoon caster sugar or superfine sugar
  • 1 medium egg
  • 1 teaspoon vanilla extract or essence
  • 1/8 teaspoon almond extract or essence (optional)


METHOD

  1. Preheat oven to 180 degrees C / 350 degrees F.
  2. Line a standard size muffin pan / cupcake pan with gold and silver paper baking cups / cupcake liners. Set aside.
  3. Stir the milk and vinegar together to make buttermilk.
  4. Add prepared buttermilk to the cream and stir together to make sour cream. Set aside.
  5. Combine the flour, cornflour or cornstarch, baking powder and salt in a bowl. Set aside.
  6. Beat the oil and sugar together for 30 – 60 seconds.
  7. Add the egg and extracts and beat until combined.
  8. Beat in the combined dry ingredients until smooth.
  9. Lastly beat in prepared sour cream until just mixed.
  10. Pour batter into a glass measuring jug.
  11. Fill the paper baking cups in the muffin pan between 1/2 – 3/4 full.
  12. Bake 18 – 20 minutes or until the cupcakes turn slightly golden and a wooden pick inserted into the centre of cupcakes comes out nearly clean. Do not overbake.
  13. Remove baked cupcakes onto a wire rack. Cool completely before frosting.
  14. Store cool unfrosted cupcakes airtight until ready to frost.


INGREDIENTS FOR COCOA FUDGE FROSTING

  • 1/4 cup butter
  • 1/4 cup cocoa
  • 1 1/2 cups + 1/3 cup icing sugar or confectioner’s sugar
  • 3 tablespoons milk
  • 1/2 teaspoon vanilla extract or essence
  • Black gel food colour (prefereably from Wilton or AmeriColor)


METHOD

  1. Put butter in a microwave safe bowl and microwave uncovered on high 10 – 20 seconds or until almost melted.
  2. Remove bowl from microwave and stir until butter is completely melted.
  3. Whisk in the cocoa and then microwave uncovered again on high for 30 seconds.
  4. Remove from microwave and beat in icing sugar and milk alternately until creamy.
  5. Beat in vanilla.
  6. Lastly add the black food colour, a little at a time while beating until desired colour is achieved.
  7. Frosting dyed with black food colour deepens in hue as the frosting sits, so wait 10 or so minutes after adding food colour to see how much the colour of the frosting darkens before adding more.
  8. Make sure the frosting is completely cool before piping onto cupcakes.
  9. Use a Wilton 1M tip to pipe rosettes of cocoa fudge frosting onto the cupcakes.
  10. Store your Gothic Chic Cupcakes airtight. These can be refrigerated but make sure you bring the cupcakes completely down to room temperature before serving.

Filed Under: Desserts, Recipes Tagged With: Autumn / Fall, Baking, Budget-Friendly, Cafe, Chocolate, Dessert, Halloween

How To Make Hot Cross Buns

April 13, 2017 by aliceineatland Leave a Comment

‍Hot Cross Buns are just what one needs when Easter is around the corner. It would be very hard to imagine Easter time without these delicious dried fruit studded, fragrantly spiced sweet buns! (Post Updated: 25th March ‘23)

I can hardly remember any Easter from my childhood where Hot Cross Buns did not feature. Even when we were living in Daharki, with nary a Hot Cross Bun providing bakery anywhere, my maternal Grandmother would either send or bring us the buns from either Misquita Bakers or sometimes from Lawrence Bakers, both in Karachi, so we could have them for Good Friday.


Hot Cross Buns

Dough for the Hot Cross Buns after the first rise


Easter in Lahore meant that my paternal Grandmother would get Hot Cross Buns for the family from Mohkam Din Bakers. I believe Shezan Bakers too used to make Hot Cross Buns around Easter time though I’m not sure.

This year I decided to have a go at making homemade Hot Cross Buns and to make it a yearly Easter tradition, provided they turned out well.


Hot Cross Buns

The dough cut into pieces for forming the buns


I’m happy to say that my family and I quite loved my homemade Hot Cross Buns and I shall try to make these every Easter from now on.

I followed respected British food expert Delia Smith’s Hot Cross Bun recipe. Miss Smith’s cookery shows on BBC Good Food are some of my earliest memories of British tv cooking which is why I decided to follow her traditional Hot Cross Bun recipe.


Hot Cross Buns

The dough balls placed well apart in a buttered pan, to allow room for expansion


Thoughts And Tips On Making Hot Cross Buns

  • There are some very deliciously innovative variations of Hot Cross Buns now, including the savoury variety.
    I made a Savoury Hot Cross Bun Ring for Easter ‘22, using this same base recipe but by giving it a savoury twist. I will share that version soon hopefully.
  • This one here is perhaps one of the most traditional Hot Cross Bun recipes out there and it is spicy and fruity in that comfortingly old-fashioned sort of way that is hard to beat.
  • I like to bake these Hot Cross Buns until they are deep golden brown so that the pale pastry crosses show prominently against the dark bun tops in stark contrast.
  • The sugar glaze brushed on the buns at the end is essential in my opinion as it provides the final shining touch.
  • Hot Cross Buns can easily be frozen if you decide to make them in advance, thus leaving you time to do other things during the busy week leading up to Easter.
  • Simply thaw frozen Hot Cross Buns completely in the fridge and reheat in the oven for a few minutes before slicing.
  • Hot Cross Buns taste best spread with soft butter and enjoyed with a cup of hot tea.


Hot Cross Buns

The dough balls after the second rising; they have almost doubled in size, have the pastry crosses pressed onto them and are finally ready to go into the oven


The recipe has quite a few steps, but I assure you that it is not difficult at all and every point that has been listed down at each stage is just to make it easier for you and to ensure that your Hot Cross Buns turn out wonderful.


Hot Cross Buns


Hot Cross Buns


Recipe Type: Breakfast & Brunch    Author: Alice In Eatland
Prep Time: 1 – 2 Hours    Cook Time: 15 – 20 Minutes
Serves: 8


Fruity, spicy & utterly delicious, nothing says Easter more than these easy to make traditional Hot Cross Buns spread with butter & enjoyed with tea!


INGREDIENTS FOR THE BUNS

  • 2 (around 3″ each) cinnamon sticks
  • 6 – 8 cloves
  • 1 blade mace
  • 250 grams flour
  • 1/2 teaspoon fine sea salt OR regular salt
  • 1/2 teaspoon ginger powder
  • A good grating of nutmeg
  • 55 grams black currants, stemmed if necessary
  • 25 grams candied peel, chopped
  • 25 grams soft butter
  • 2 1/2 tablespoons milk
  • 1 egg
  • 1/3 cup water
  • 2 tablespoons granulated sugar
  • 2 teaspoons instant yeast *
  • Extra flour
  • Extra milk


INGREDIENTS FOR THE CROSSES

  • 20 grams flour
  • 5 grams butter, soft but cool
  • A few teaspoons cold water


INGREDIENTS FOR THE GLAZE

  • 1/2 tablespoon granulated sugar
  • 1 tablespoon water


METHOD

  1. Put the cinnamon sticks, cloves and mace in a small coffee grinder and grind as finely as possible. Sieve.
  2. Stir flour, salt, ginger powder, nutmeg, currants and chopped candied peel and sieved ground spices until combined.
  3. Heat the butter and milk in a small pan or in a microwaveable bowl until butter melts. Cool 5 minutes and quickly whisk in the egg. Make sure the liquid isn’t too warm or the egg might scramble in it.
  4. Heat the water until warm enough that you can comfortably submerge your finger in it (about 105 degrees F – 110 degrees F).
  5. Stir in the sugar and then sprinkle the yeast on the surface. Let sit without stirring 2 – 5 minutes or until the mixture smells yeasty and begins to form a creamy foam around the edges.
  6. Once that happens give a quick stir and let sit another 2 – 5 minutes or until the yeast begins to gently bubble up in places and the mixture begins to foam up. This stage is crucial and if it doesn’t happen, your buns may not rise.
  7. Stir yeast mixture into the butter, milk and egg mixture until combined.
  8. Make a well in the centre of the combined dry ingredients and pour in the wet mixture. Mix with a large spoon or spatula or with a dough hook if using a stand mixer.
  9. When the ingredients are mixed, the dough should come together, be elasticky and the bowl should be clean. If the dough is too sticky, add some of the extra flour. If it seems too dry, add extra milk, a teaspoon at a time.
  10. Knead 1 – 2 minutes by hand on a floured work surface and then put dough into a large oiled bowl.
  11. Brush oil onto the entire surface of your dough ball to prevent any skin from forming, cover tightly with a tea towel or plastic wrap and let sit in a warm, draft free place (like in a switched off oven or in an off microwave) for 1 – 2 hours or until dough rises to almost double its size.
  12. Turn out the risen dough onto a lightly floured work surface.
  13. Punch out the air from the dough, roll it lightly into a longish oblong between your hands on the work surface and cut into eight roughly equal pieces.
  14. Roll each piece into a smooth round ball and arrange all the dough balls in a buttered baking pan, leaving enough room between the balls for expansion.
  15. Cover the dough balls in the pan loosely with plastic wrap and let sit again in a warm place until they almost double in size.
  16. To make the crosses, rub the butter into the flour until like breadcrumbs. Add a little cold water, a bit at a time, mixing until the dough comes together. Roll out thinly, using a little flour to stop sticking if necessary and cut into 16 strips, each strip about 3″ – 4″ long.
  17. Preheat oven to 220 degrees C / 428 degrees F.
  18. Once the dough balls have risen, brush the pastry strips with water to make them stick and place on top of each dough ball, making crosses and pressing lightly.
  19. Bake the buns until golden brown. This can take anywhere from 15 minutes to more depending on your oven.
  20. While the buns are baking, make the glaze by swirling the sugar and water together in a small pan until the sugar has dissolved and a clear syrup forms. Remove from heat.
  21. When the buns are done, remove from the oven and brush immediately with the prepared glaze.
  22. Cool completely on a wire rack and store airtight. The buns can also be frozen airtight at this point.
  23. Serve warm, lightly toasted if wished, with butter.


* Proofing instant yeast may seem unnecessary but personally I have never had an entirely satisfactory rise using this type of yeast without proofing / blooming it in warm sugared water. Hence the additional proofing step in the recipe.

This step also ensures that you know that the yeast you are using is active and not dead, thus saving you from ruining your buns and wasting your ingredients, time and effort. Trust me –  I know from personal experience.

Filed Under: Breakfast & Brunch Tagged With: Baking, Budget-Friendly, Easter, Spring

Primary Sidebar

ABOUT ALICE

Favorite recipes, fun eating out experiences and some wonderful food memories from Lahore, Pakistan.

ALICE’S TOP PICKS

Rose Crème Brûlée

Rose Crème Brûlée

Three Cheese Roasted Chilli Bread Pudding

Patisserie at Mocca Coffee Gulberg

Mocca Coffee Gulberg

The Paloma

The Paloma

Tags

Autumn / Fall Baking Budget-Friendly Cafe Chocolate Christmas Daharki Desi Dessert Dinner Easter Eatery Freezer Friendly Halloween Lunch Pakistani Restaurant Romantic Soup Spring Starter Summer Valentine's Day Vegan Vegetarian Winter

Tags

Autumn / Fall Baking Budget-Friendly Cafe Chocolate Christmas Daharki Desi Dessert Dinner Easter Eatery Freezer Friendly Halloween Lunch Pakistani Restaurant Romantic Soup Spring Starter Summer Valentine's Day Vegan Vegetarian Winter

Categories

  • Breakfast & Brunch
  • Budget Friendly
  • Condiment
  • Desserts
  • Drinks
  • Eateries
  • Homemade Cheese
  • Homemade Cheese
  • Mains
  • Recipes
  • Snack & Starter
  • Uncategorized

ABOUT

Hello! If like me, you too love to cook, bake and eat then you're in the right place. From heartwarming, soul-satisfying comfort food to light, fresh and deliciously healthy meals, everything here is made with the utmost TLC :)

Tags

Autumn / Fall Baking Budget-Friendly Cafe Chocolate Christmas Daharki Desi Dessert Dinner Easter Eatery Freezer Friendly Halloween Lunch Pakistani Restaurant Romantic Soup Spring Starter Summer Valentine's Day Vegan Vegetarian Winter

Copyright © 2025 · Foodie Pro Theme by Shay Bocks · Built on the Genesis Framework · Powered by WordPress