• Skip to primary navigation
  • Skip to main content
  • Skip to primary sidebar

Alice In Eatland

Recipes . Eateries . Inspiration

  • Recipe Index
  • Eateries

Snack & Starter

Roasted Tomato & Thyme Soup with Fluffy Baked Potatoes

February 5, 2018 by aliceineatland Leave a Comment

Roasted Tomato & Thyme Soup with Fluffy Baked Potatoes

Roasted Tomato & Thyme Soup with Fluffy Baked Potatoes

Roasted Tomato & Thyme Soup with Fluffy Baked Potatoes is a delicious and flexible combination. It can be had as either a light but satisfying snack when you’re feeling peckish but don’t want a full meal. And it also makes a not-too-heavy yet adequately filling entree at meal times as well. Plus it’s gluten free.

I am including this as a Valentine’s Day recipe. Yes. Folks, I understand that tomato soup and baked potatoes usually do not qualify as “special” meals and are certainly not classified as “romantic” by most people. And that’s okay.

Roasted Tomato & Thyme Soup with Fluffy Baked Potatoes

There are those who go the Grilled Oysters with Chilli Herb Butter, Filet Mignon and Chanterelle Duxelles Strudel way on 14th February. And then there are unsophisticated chow hounds like yours truly, that are very happy gobbling down comfort foods at the most romantic of occasions. This recipe will obviously appeal more to the latter on Valentine’s Day. And hopefully to everyone else on all other days of the year, haha!

This rustic soup and potato recipe can actually be a fun starter. In order for it to be that, serve the Roasted Tomato & Thyme Soup in small cups, heatproof glasses or mugs, wide enough so that the eaters can easily dunk their Fluffy Baked Potatoes into the soup before eating.

Roasted Tomato & Thyme Soup with Fluffy Baked Potatoes

Tomato soup and baked potato make a fantastic combination. But obviously both the Roasted Tomato & Thyme Soup and the Fluffy Baked Potatoes can be served on their own as well. I just feel they’re better together.

The recipe is really quite simple. Tomatoes, onions, garlic and thyme are seasoned, roasted in the oven and then blended into the creamiest soup ever. No cream required.

The fluffy baked potatoes have a texture that I can only describe as somewhere between a potato & cheese croquette and a cheesy potato soufflé, if that makes any sense. The addition of creme fraiche or sour cream and a little beaten egg gives the filling a lovely lightness. So, so good.

Roasted Tomato & Thyme Soup with Fluffy Baked Potatoes

The recipe has been loosely adapted from Sophie Dahl’s recipe – the cooking show was “The Delicious Miss Dahl” and I would eagerly await each new episode while living in London. I was totally in love with the series! So pretty – all flowers, vintage utensils and what not. Plus the soft spoken and beautiful Miss Dahl.

Both the Roasted Tomato & Thyme Soup and the Fluffy Baked Potatoes can be made a few days ahead and reheated before serving. Add a crisp green salad and maybe a decadent dessert to follow and you have quite a meal there.

Roasted Tomato & Thyme Soup with Fluffy Baked Potatoes


Roasted Tomato & Thyme Soup with Fluffy Baked Potatoes


Recipe Type:    Starter & Snack, Main Meal
Author:    Alice In Eatland
Prep Time:    30 – 40 Minutes    Cook Time:    40 – 60 Minutes    Total Time: 1.5 Hours
Serves: 1 – 2


Roasted Tomato & Thyme Soup


Roasted tomatoes, onion, garlic & thyme blend to create creamy Roasted Tomato & Thyme Soup!


INGREDIENTS

  •  2-4 medium tomatoes (the ripest you can find), thickly sliced
  • 1 medium onion, peeled and thickly sliced
  • 4-6 garlic cloves, peeled and smashed lightly
  •  1 sprig fresh thyme or a few pinches of dried thyme
  • 2 tablespoons oil
  • Salt
  • Fresh milled pepper
  • A pinch of sugar
  • Water or vegetable stock, at room temperature
  • 1/2 a vegetable stock cube, crumbled (optional)
  • Cream to serve (optional)


METHOD:

  1. Preheat oven to 180 degrees C / 350 degrees F.
  2. Line a baking tray or flat oven proof glass dish with foil.
  3. Lay the tomatoes, onions and garlic onto the foil.
  4. Scatter the thyme all over, drizzle over the oil and season with salt and pepper.
  5. Bake uncovered until the vegetables look roasted and dehydrated and are beginning to darken in places. This can take anywhere from 20 minutes to an hour depending on your oven so keep an eye on your vegetables.
  6. Once done, remove the roasted vegetables from the oven and cool to room temperature.
  7. Put cooled vegetables into the jug of a blender with a little water or vegetable stock and blend until smooth.
  8. Pour the blended mixture out into a pan. Rinse out the blender jug with a little more water or stock and add to the pan.
  9. Add the sugar and also the crumbled vegetable stock cube into your pan, if using.
  10. Let soup come to a boil, stirring frequently. Check the consistency: add more water or stock if you need to thin it down a bit and let reduce if you prefer it thicker.
  11. Taste soup to see if it needs more seasoning.
  12. Pour soup into bowls, cups or a mug.
  13. Swirl a little cream on top before serving, if wished.
  14. Serve soup with Fluffy Baked Potatoes – dunk them into the soup before eating.


Fluffy Baked Potatoes


Twice cooked/baked cheesy & airy Fluffy Baked Potatoes like you’ve never had them before!


INGREDIENTS

  • 2-4 smallish to medium potatoes
  • 1-2 tablespoons butter, at room temperature
  • 2 teaspoons milk, at room temperature
  • 1/2 teaspoon fresh lemon juice or white vinegar
  • 2-4 tablespoons cream
  • 1-2 tablespoons cream cheese OR goat’s cheese OR grated cheddar cheese
  • Salt
  • Fresh milled black pepper
  • 1/2 of a small beaten egg
  • Chopped chives or other fresh herbs of choice


METHOD

  1. Preheat oven to 180 degrees C / 350 degrees F.
  2. Wash the potatoes.
  3. You can either cook the potatoes in plenty of water until soft but not over cooked.
  4. Or you can place the potatoes into your preheated oven and bake until they are cooked through.
  5. Stir the milk and lemon juice or white vinegar together in a small bowl and then stir in the cream. Set aside.
  6. When your potatoes are boiled or baked, slice each potato lengthwise into two.
  7. Carefully scoop out the potato pulp into a bowl, being careful not to let the potato skins/shells break.
  8. Mash the hot potato pulp with the butter until smooth.
  9. Give the sour cream a stir and stir into the potatoes followed by your cheese of choice, salt and black pepper.
  10. Taste the mixture to check if it needs more cheese or seasoning.
  11. Then stir in the beaten egg until smooth.
  12. Lastly stir in the chopped chives or other fresh herbs.
  13. Spoon the mixture equally into the potato skins/shells.
  14. Line a baking sheet or tray with foil and arrange the filled potatoes on it.
  15. Bake in your preheated oven until the filling looks a bit puffy and is browning in places.
  16. You can turn the grill on from above for a couple of minutes to brown the tops of the potatoes more. Keep an eye on them so they don’t burn.
  17. Remove the potatoes from the oven and sprinkle with extra chives or herbs right before serving.
  18. Serve Fluffy Baked Potatoes warm.


Filed Under: Mains, Recipes, Snack & Starter Tagged With: Soup, Starter, Valentine's Day, Vegetarian

Kurkuri Masala Bhindi

August 6, 2017 by aliceineatland Leave a Comment

Kurkuri Masala Bhindi

Ladies and gentlemen, please say hello to my new favourite side dish that I’ve been enjoying a lot lately with a number of desi main dishes.

Kurkuri Masala Bhindi is a new discovery for me and an absolutely delicious one into the bargain. Crispy, spicy and ever so slightly tangy – yum!

Okra has always featured fairly frequently on the everyday home cooked meals roster at my home.

However, it has almost always been prepared as a stir fried dryish sort of curry – the usual Pakistani way of making bhindi ki sabzi.

Kurkuri Masala Bhindi

I had heard of folks making fried bhindi but since I’d never had it, I had no idea what I was missing out on.

The first time that fried okra really caught my attention was when I watched legendary Pakistani food expert Mrs Zubaida Tariq make what she called “Crispy Bhindi” on a show on Masala TV a year or so ago maybe.

Kurkuri Masala Bhindi

I loved how crunchy the deep fried okra slices looked and the fact that Mrs Tariq mixed in roasted slivered almonds into the fried okra just before serving made things seem even more enticing.

So here is my take on this fried okra phenomenon, inspired by a recipe titled “Crunchy Okra” in this recipe book called ‘Vegetarian Fiesta’ which is said to be complied by Indian Master Chefs.

Kurkuri Masala Bhindi

I find that Kurkuri Masala Bhindi goes very well as a side dish with desi main dishes such as daal chaawal and karrhi chaawal.

I also find it very hard to keep myself from finishing Kurkuri Masala Bhindi before it makes its way from the kitchen to the dining table.

If you have a fondness for delicious deep fried foods, you will find this  Kurkuri Masala Bhindi a delightful treat.

Kurkuri Masala Bhindi

Kurkuri Masala Bhindi


Recipe Type: Starter & Side    Author: Alice In Eatland
Prep Time: 10 Minutes    Cook Time: 5 Minutes    Total Time: 15 Minutes
Serves: 2 – 4


Crispy, spicy shards of deep fried okra! Kurkuri Masala Bhindi is an excellent desi side dish and equally wonderful as a crunchy snack on its own!


INGREDIENTS

  • 250 grams – 300 grams okra
  • Salt
  • 1/4 teaspoon red chilli powder
  • 1/4 teaspoon Kashmiri red chilli powder
  • 1/2 teaspoon chaat masala
  • 1/2 teaspoon garam masala
  • 1/2 teaspoon aamchoor (optional)
  • 1 tablespoon gram flour
  • Oil for deep frying


METHOD

  1. Wash the okra and dry thoroughly between sheets of kitchen paper.
  2. When completely dry, top and tail the okra.
  3. Slice each okra lengthwise into four pieces so that you have long shards of cut okra. Place okra slices on a flat plate or tray.
  4. Combine salt, red chilli powder, Kashmiri red chilli powder, chaat masala, garam masala and aamchoor, if using.
  5. Sprinkle this spice mix all over the okra slices and mix gently but thoroughly with your fingers until combined. Set aside.
  6. Over a medium highish flame, heat enough oil for deep frying in a pan.
  7. When the oil is fairly hot, sprinkle the gram flour over the okra. Mix gently by hand and then add the okra carefully into the hot oil.
  8. Make sure you do not overcrowd or overfill the pan – fry okra in batches if your pan isn’t big enough.
  9. If your oil is the right temperature, the surface will start bubbling with small bubbles as soon as the okra is added and then after a couple of seconds, the okra will rise up to the surface of the oil.
  10. Separate the frying okra lightly with a fork to keep from sticking together. When it looks golden brown and feels crisp, remove, preferably with a metal spider skimmer, onto plates lined with kitchen paper. I usually remove the bhindi from the oil directly into a wiry metal colander to minimise surface contact – this ensures that the fried bhindi does not become soggy and remains crisp.
  11. Serve Kurkuri Masala Bhindi hot or at room temperature.
  12. This makes an excellent side dish for both vegetarian and meaty mains. Very good on its own as a crunchy snack to munch on.


Filed Under: Recipes, Snack & Starter, Uncategorized

Green Goddess Hummus

August 25, 2016 by aliceineatland Leave a Comment

Green Goddess Hummus

Green Goddess Hummus

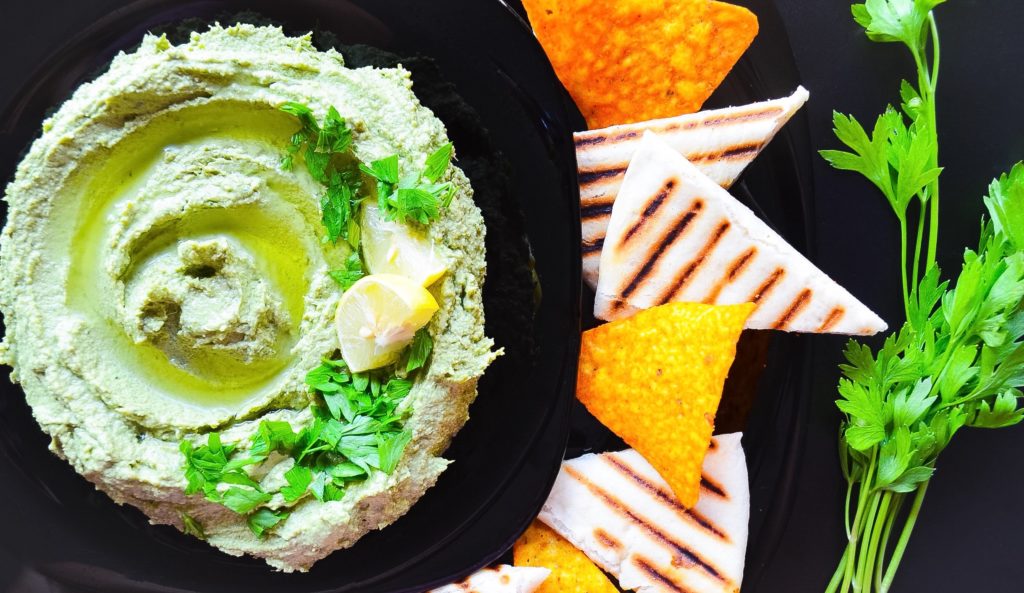
Take regular hummus up a notch by making it refreshingly herby and spectacularly green – this delicious Green Goddess Hummus makes a super tasty snack or a super yummy starter!

The first time I had (and made) hummus was years and years ago in Daharki.

Back then hummus was non-existent on local restaurant and café menus unlike now, so people who wanted to have it would make it themselves.

image1 (12)

Prior to life in London, I had no idea what “flavoured” hummus was.

Most people are purists when it comes to hummus and even though I agree that great tasting well-made plain hummus is a joy, there are a few flavor additions that do take it to the next level.

The first hummus I bought in London was a caramelized onion hummus from good ‘ol Sainsbury’s.

It was very good and a staple at my place, since popping over to the Middle Eastern restaurants and cafés along Edgware Road every other day for my hummus fix was not exactly a financially feasible option!

Now back in Lahore, I make it at home and experiment with additional flavors that might add a little extra oomph to the regular version.

Green Goddess Hummus

Hummus is a very personal thing.

Once you start making it yourself, you begin adjusting the ingredients called for in the basic recipe to get it to taste exactly the way you like it.

Regular or flavored, it is always a great idea to have it on hand for an enjoyable snack or as a pleasing party menu item.

I have to thank Cookie and Kate, one of my favorite blogs for fresh and healthy vegetarian recipes, for this Green Goddess Hummus.

This gorgeous blog is also the inspiration behind my wanting to start my own blog – many thanks to adorable little Cookie and to Kate Taylor for being an inspiration and also for her ever so helpful blogger resources and selfless guidance that made setting up the blog so much easier for a technologically challenged person like me!

You can find the original Green Goddess Hummus recipe by Cookie and Kate here.

Green Goddess Hummus

Green Goddess Hummus contains herbs that make up the classic Green Goddess salad dressing, namely parsley, tarragon and chives.

Since the dressing was primarily named for its lovely pale jade color, you can use any combination of fresh green herbs to make your Green Goddess Hummus.

I stuck with the classic Green Goddess salad dressing herbs since I am fond of them.

Use the herbs that you like; there’s no point in making Green Goddess Hummus with say, parsley, if you do not like it.

Fresh basil, coriander, mint etc are some of the many herbs that make a delicious green herby hummus.

I had to wait a long time before I could actually make this Green Goddess Hummus.

First of all, I could not find parsley.

This perennial herb was surprisingly not available anywhere in Lahore which reaffirmed my belief in the fact that I seriously need to start growing my own herbs again.

Green Goddess Hummus

A chance comment by the admin on one of the popular local food forums Pakistan Food Forum helped me discover Isloo Fresh, an Islamabad based supplier of organic herbs, vegetables and fruit.

They also supply other organic foods such as honey, ghee, eggs and chicken.

I was delighted to find that they not only had parsley but the flat leaf variety into the bargain.

I have seen only curly parsley at the local shops here and just adore the fresh grassiness of flat leaf parsley.

So I placed my order with Isloo Fresh and was rewarded with insanely fresh flat leaf parsley and chives shipped from Islamabad to Lahore, 24 hours later.

I got the tarragon from the Lahore stalwart Pioneer Store.

Green Goddess Hummus

I use both my food processor and my blender to make hummus.

I start with the food processor but since it is fairly old and I refuse to part with it for sentimental reasons, it doesn’t process the hummus into the creamy consistency that it should.

So I transfer the slightly chunky hummus to my blender and blend it into cloud-like oblivion, which is exactly how it should be.

The result is a creamy, fresh and gloriously green hummus that I can’t get enough of!

Serve Green Goddess Hummus with grilled pita bread cut into wedges, fresh vegetables crudités or, my favorite way to eat hummus – with Doritos.

Green Goddess Hummus


Green Goddess Hummus


Recipe Type:    Snack & Starter    Author: Alice In Eatland
Prep Time: 5 Minutes    Cook Time: 5 Minutes    Total Time: 10 Minutes    Serves 2 – 4


Jazz up regular hummus for a deliciously creamy and refreshingly herby taste with this light-as-a-cloud, herb specked Green Goddess Hummus!


INGREDIENTS

  • 2 tablespoons fresh parsley
  • 1 tbsp fresh tarragon leaves
  • 1 tbsp chopped fresh chives
  • 1 – 2 tbsp fresh lemon juice
  • 1 tbsp olive oil
  • 1 large clove garlic, finely grated
  • A few tablespoons water
  • 2 tbsp tahini
  • 1 cup canned or boiled chickpeas
  • 1/4 teaspoon ground cumin (optional)
  • Salt
  • Chopped fresh herbs to garnish
  • Extra virgin olive oil to drizzle


METHOD

  1. Put the fresh herbs, lemon juice, olive oil, grated garlic and a tablespoon or so of water in the bowl of a food processor or blender.
  2. Process or blend until the herbs are well chopped.
  3. Add tahini and process or blend again until the mixture looks smooth.
  4. Add the chickpeas (drained and rinsed, if canned), ground cumin (if using) and salt. Continue processing or blending until the hummus looks creamy.
  5. If needed, add a little water, a teaspoon at a time while blending or processing until the desired consistency of hummus is reached.
  6. Taste to check if more lemon juice or salt is needed.
  7. Serve hummus swirled in a bowl with a good drizzle of extra virgin olive oil and some chopped herbs, if liked.

Filed Under: Snack & Starter

  • « Go to Previous Page
  • Page 1
  • Page 2

Primary Sidebar

ABOUT ALICE

Favorite recipes, fun eating out experiences and some wonderful food memories from Lahore, Pakistan.

ALICE’S TOP PICKS

Rose Crème Brûlée

Rose Crème Brûlée

Three Cheese Roasted Chilli Bread Pudding

Patisserie at Mocca Coffee Gulberg

Mocca Coffee Gulberg

The Paloma

The Paloma

Tags

Autumn / Fall Baking Budget-Friendly Cafe Chocolate Christmas Daharki Desi Dessert Dinner Easter Eatery Freezer Friendly Halloween Lunch Pakistani Restaurant Romantic Soup Spring Starter Summer Valentine's Day Vegan Vegetarian Winter

Tags

Autumn / Fall Baking Budget-Friendly Cafe Chocolate Christmas Daharki Desi Dessert Dinner Easter Eatery Freezer Friendly Halloween Lunch Pakistani Restaurant Romantic Soup Spring Starter Summer Valentine's Day Vegan Vegetarian Winter

Categories

  • Breakfast & Brunch
  • Budget Friendly
  • Condiment
  • Desserts
  • Drinks
  • Eateries
  • Homemade Cheese
  • Homemade Cheese
  • Mains
  • Recipes
  • Snack & Starter
  • Uncategorized

ABOUT

Hello! If like me, you too love to cook, bake and eat then you're in the right place. From heartwarming, soul-satisfying comfort food to light, fresh and deliciously healthy meals, everything here is made with the utmost TLC :)

Tags

Autumn / Fall Baking Budget-Friendly Cafe Chocolate Christmas Daharki Desi Dessert Dinner Easter Eatery Freezer Friendly Halloween Lunch Pakistani Restaurant Romantic Soup Spring Starter Summer Valentine's Day Vegan Vegetarian Winter

Copyright © 2025 · Foodie Pro Theme by Shay Bocks · Built on the Genesis Framework · Powered by WordPress