• Skip to primary navigation
  • Skip to main content
  • Skip to primary sidebar

Alice In Eatland

Recipes . Eateries . Inspiration

  • Recipe Index
  • Eateries

Snack & Starter

Paneer Hara Masala Rangoons

August 10, 2023 by aliceineatland Leave a Comment

Paneer Hara Masala Rangoons

Paneer Hara Masala RangoonsPaneer Hara Masala Rangoons are a flavourful Pakistani style take on Panda Express’s popular cream cheese rangoons.

I have never had Panda Express so my understanding of the flavour profile of the chain’s cream cheese rangoons and their texture is based solely on the description and copycat recipes found online.

Paneer, cheddar and green masala ingredients along with dry aromatics make up the rangoon filling. Instead of wonton wrappers, I use samosa patti or spring roll patti cut into squares. A simple but punchy green chutney to dip the crisp Paneer Hara Masala Rangoons in rounds things off nicely.

My hardcore Pakistani tastebuds love desi-fying recipes wherever they feel that particular fusion will work. And I feel it works rather well here.

Paneer Hara Masala Rangoons

Make Ahead & Freeze Paneer Hara Masala Rangoons:

A stash of frozen Paneer Hara Masala Rangoons on hand means that you can fry, air fry or bake these in no time should you have guests over or should a craving for hot melty flavoursome cheese encased in a crisp filling suddenly arise.

Follow the recipe till you’ve completed the “Assembly” part.

Then freeze flat on a plastic wrap lined tray or cookie sheet overnight.

Once frozen solid, place in an airtight container in a single layer, using plastic wrap between layers.

Paneer Hara Masala Rangoons

Paneer Hara Masala Rangoons


Paneer Hara Masala Rangoons: crisp cheesy bags with coriander, mint, green onion & green chillies for a uniquely desi take on cream cheese rangoons!


Recipe Type: Starter & Snack

Author: Alice In Eatland

Cook Time: 10 Minutes

Total Time: 30 Minutes

Serves: 2-3


INGREDIENTS

Rangoons

  • 1 cup grated paneer, store bought or homemade
  • 3/4 cup grated cheddar cheese
  • 1/2 cup very finely sliced spring onion (green part only)
  • 6 – 8 green chillies, deseeded & finely chopped 1/2 – 1 teaspoon garlic powder
  • 1/4 – 1/2 teaspoon onion powder
  • Salt
  • 2-4 tablespoons cream or cream cheese

Slurry

  • 2-4 tablespoons plain flour
  • 1/2 – 1 cup water

Wrappers

  • Samosa patti, spring roll patti/wrappers or wonton wrappers (cut into 3” squares)

Green Chutney

  • Handful fresh coriander leaves
  • Handful fresh mint leaves
  • 1/4” piece ginger, peeled
  • 1 clove garlic, peeled
  • 2-4 fresh green chillies
  • 1/2 a slice of bread
  • Splash of white vinegar
  • Pinch of sugar
  • 1/2 teaspoon ground cumin
  • Fresh lemon juice
  • Salt
  • Drinking water

METHOD

Filling

  1. Mix all the filling ingredients, adding enough cream or cream cheese to make a sticky mixture that comes together.
  2. Divide into 12-14 equal portions and shape into balls with wet palms.

Slurry

  1. Whisk flour into the water until combined and heat, whisking until thick, opaque and bubbly.
  2. Cool completely.

Assembly

  1. Place a ball of filling in the centre of a samosa patti square (or spring roll patti or wonton wrapper, whichever you are using).
  2. Rub slurry along all 4 edges.
  3. Bring the opposite corners of the square to meet in the middle and pinch together, sealing the sides as well. (see image 2 above for reference).

Frying

  1. Deep fry till golden.
  2. To air fry, brush rangoons and your air fryer basket both with oil and cook 10 minutes at 200 degrees C or until golden.

Freezing

  1. To freeze, lay uncooked rangoons flat on a plastic wrap lined tray or cookie sheet and freeze 2-4 hours or till frozen solid.
  2. Place in an airtight container in a single layer, using plastic wrap between layers.

Green Chutney

Blend all ingredients together either with a stick blender or in a regular blender until the desired consistency is reached.

Filed Under: Recipes, Snack & Starter Tagged With: Desi, Freezer Friendly, Pakistani, Spring, Starter, Vegetarian

Harissa Hummus Recipe

March 7, 2023 by aliceineatland Leave a Comment

Harissa Hummus

Harissa Hummus
Harissa Hummus: 
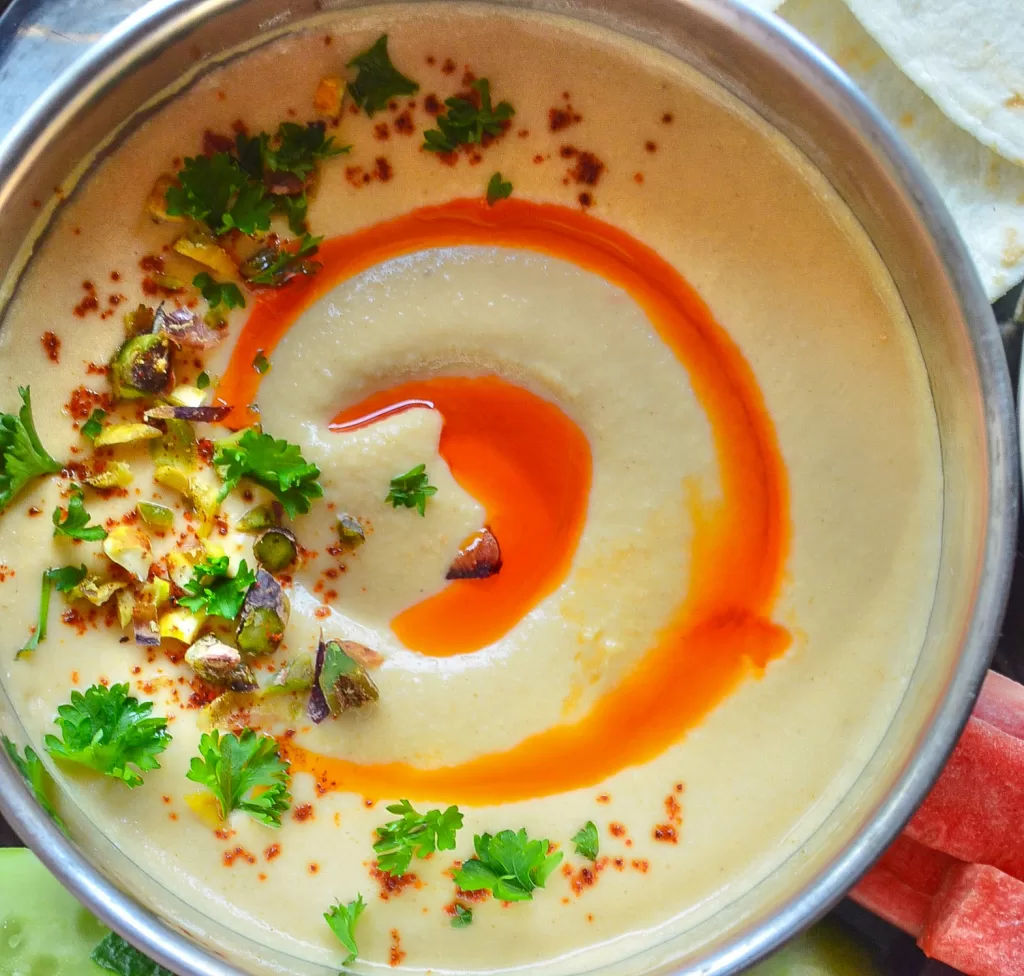
Of all the takes, spins and flavour additions on the classic hummus recipe, this one in particular may just be my favourite.

I like my hummus smooth, airy and as cloud-like as possible. Spike that velvety creaminess with fiery harissa and you have the kind of flavour profile that makes you wonder why it took you so long to finally getting around to making this. I speak from personal experience, naturally.

I have used a homemade harissa (recipe below) to make this Harissa Hummus recipe but you may use any canned or jarred variety of this sensational North African condiment you like or have on hand.

As with any hummus recipe, it is important that you use it as a guide and taste along the way using your own judgement in terms of adjusting the texture and the flavour.

My Harissa Hummus is reasonably fiery (pleasantly so though by no means unbearable) enough as it but since I like to go just a bit too far I drizzle chilli oil over the top as well. Not necessary at all but recommended if you’re a heat junkie like yours truly.

Tips For Making A Damn Fine Harissa Hummus:

-Use a blender (a high speed one if you have it) to make this Harissa Hummus recipe.

-Texture is a matter of personal preference but ideally, hummus is great when it’s smooth, creamy and not too thick, dry-ish or grainy.

-If you prefer a chunkier hummus, using a food processor may be a better idea.

-I find that the order in which ingredients are added and blended makes a real difference in the texture of the hummus.

-Cold water is necessary to ensure that your hummus is light and airy and not dense and heavy.

-For a smooth and creamy hummus, please follow the instructions as written.

-Skinning the chickpeas apparently makes for a smoother hummus. If you have the patience, try it.

-Rather than skinning the chickpeas, I prefer blending the hummus really, really well and then pushing it through a sieve for the smoothest texture possible.

Harissa Hummus


HARISSA HUMMUS


Recipe Type: Starter, Appetiser, Snack

Author: Alice In Eatland

Serves: 2


Harissa Hummus: airy and cloud-like with its velvety creaminess spiked with fiery North African harissa. A truly sensational flavour profile!


INGREDIENTS

  • 1-2 tablespoons tahini
  • Juice of 1 -2 lemons
  • 1-2 garlic cloves, peeled & grated
  • 1-2 tablespoons harissa
  • 1 cup well boiled or canned chickpeas
  • Cold drinking water
  • Salt
  • Chilli oil or extra virgin olive oil
  • Fresh parsley (to garnish, optional)
  • Finely chopped pistachios (to garnish, optional)


INSTRUCTIONS

  1. Blend tahini, grated garlic and lemon juice with a few tablespoons of cold water until thick and pale white in colour.
  2. Add harissa (starting with just a teaspoon or two), chickpeas (drained and rinsed, if using canned), salt (add sparingly, since the harissa is quite salty) and a little more water (only if required).
  3. Blend, scraping down sides occasionally, and tasting, until the Harissa Hummus is smooth and fluffy looking.
  4. Check for seasoning and add more harissa if necessary.
  5. Optional: Push Harrisa Hummus through a sieve for a creamier consistency.
  6. Serve topped with extra virgin olive oil or chilli oil and chopped parsley and pistachios, if liked.


Harissa

Ingredients

  • 1/2 cup dried red chillies (Kashmiri, round red chillies, etc. whatever you can find)
  • 2 cloves garlic
  • 1 tablespoon salt
  • 1 tablespoon ground coriander
  • 1 tablespoon ground cumin
  • 1 tablespoon tomato paste
  • 1/4 cup oil
  • extra oil to pour on top

Instructions

  1. Slit the dried chillies and remove seeds.
  2. Place in a bowl and pour over enough boiling hot water to cover and let sit 10-15 minutes.
  3. Drain and blend with the rest of the ingredients (except extra oil), adding a couple of teaspoons or so of the soaking liquid if needed until a semi smooth paste forms.
  4. Cool completely.
  5. Transfer harissa to a container and pour over a thin layer of oil to cover the surface complainant.
  6. Store airtight in the fridge for around 2 weeks and up to a month in the freezer.

Filed Under: Recipes, Snack & Starter Tagged With: Spring, Starter, Vegan, Vegetarian

How To Make Moutabal

March 7, 2023 by aliceineatland Leave a Comment

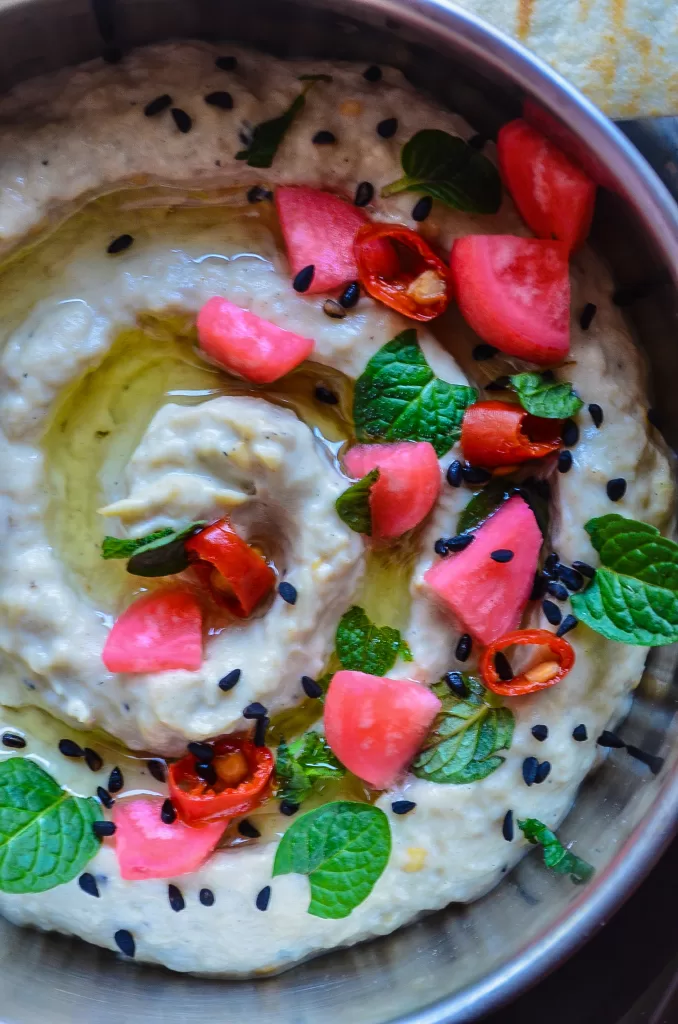
Moutabal

Moutabal
Moutabal is a creamy, smokey and pleasingly textured Middle Eastern eggplant dip. Healthy, budget-friendly and delicious, it is a must add to your “dips” repertoire, if you have one.

When served with crudités, pita chips or crackers, Moutabal is a fantastic everyday snack and a fabulous mezze platter item.

What’s the difference between Moutabal and Baba Ghanoush?

Aren’t Moutabal and Babaghanoush interchangeable names for what is essentially the same dip? No.

While the star of the show in both dips is charred eggplant, the recipe for Moutabal calls for the addition of tahini as a key ingredient, that gives the dip it’s characteristic taupe creaminess.

Many recipes for Moutabal also call for the addition of a bit of yoghurt which balances out the slight bitterness that sometimes charred eggplant and tahini can have.

Babaghanoush, on the other hand, has no tahini and a couple of additional ingredients such as tomatoes, onions and capsicum/bell pepper. It is another delectable dip that’s a great addition to a mezze spread.

Here’s an easy recipe for Moutabal that you can whip up in no time. As long as you have the ingredients on hand, it doesn’t take long to make. No special equipment required either.

Tips For Making Delish Moutabal:

-charring the eggplant directly on fire with a pair of steel tongs gives the best smokey flavour.

-alternatively, the eggplant can be roasted in the oven under the grill/broiler.

-when the skin of the eggplant blackens, chars in places and the size of the fruit (yes, eggplants are technically fruits and not vegetables) reduces, it is ready.

-a butter knife works well here, allowing you to scrape off the charred eggplant skin without slicing off any flesh underneath.

-peeling the burnt eggplant skin may be a bit of a pain, but kindly do not give in to the temptation of giving the eggplant a rinse under running water or worse, submerging it in a bowl of water  to loosen every bit of skin *shudder*

-if your eggplant has been roasted to perfection, a fork is all you need to shred the eggplant flesh and mash it into a semi chunky purée along with the other ingredients.

-if using a food processor, pulse the ingredients in quick, short bursts so that the texture remains slightly chunky and you don’t purée everything into a gray coloured paste.

Moutabal


MOUTABAL


Recipe Type: Starter/Appetiser/Snack

Author: Alice In Eatland

Serves: 2


Moutabal, a mezze superstar! A creamy, smokey and pleasingly textured Middle Eastern eggplant dip that’s healthy, budget-friendly and absolutely delish!


INGREDIENTS

  • 1 large or 2 medium eggplants
  • 2 tablespoons tahini
  • 2 cloves garlic, grated
  • 1-2 tablespoons dairy or plant-based yoghurt (optional)
  • Lemon juice
  • Salt
  • Extra virgin olive oil
  • Pomegranate seeds, fresh red chillies or pickled radishes (to garnish)
  • Fresh parsley (to garnish)
  • Black sesame seeds or nigella seeds (to garnish)
  • Crudités, pita chips, crackers (to serve)


INSTRUCTIONS

  1. Place the eggplant(s) directly on the burner on a gas stove on medium high heat.
  2. Roast, turning and rotating the eggplant frequently with metal tongs, until it shrinks slightly and the skin blackens and chars with no purple areas remaining.
  3. Remove to a heatproof bowl or plate, cool and peel off the skin.
  4. Remove the stem and place peeled eggplant flesh in a colander or sieve with a bowl underneath for 10-15 minutes.
  5. Whip (either in a food processor, blender or using a hand whisk) the tahini with grated garlic, lemon juice, salt & yoghurt (if using) till pale and creamy.
  6. Add drained eggplant to a mixing bowl along with the with the tahini mixture and mash until a semi-smooth yet textured consistency is reached.
  7. Check seasoning and adjust if needed.
  8. Serve swirled with extra virgin olive oil and garnish as you wish.

Filed Under: Recipes, Snack & Starter Tagged With: Budget-Friendly, Spring, Starter, Summer, Vegan, Vegetarian

Grilled Peach, Feta & Walnut Salad

August 16, 2018 by aliceineatland Leave a Comment

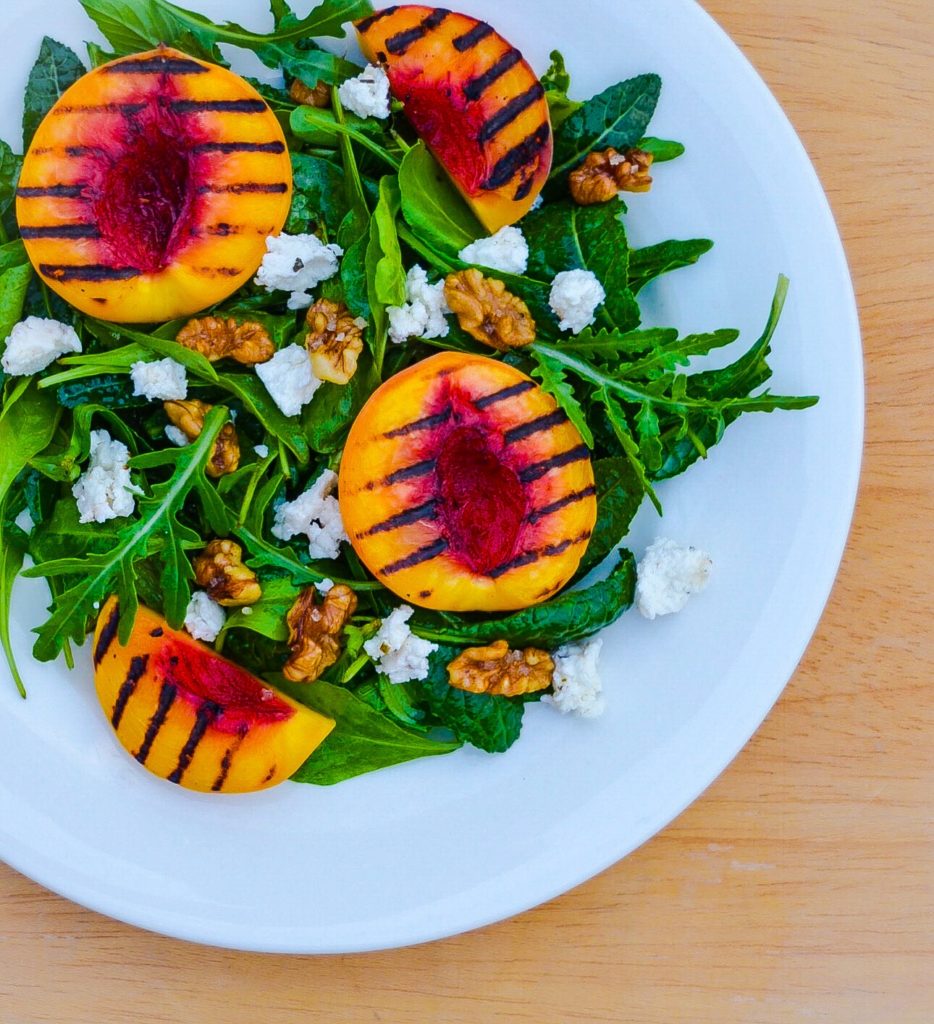
Grilled Peach, Feta & Walnut Salad

Grilled Peach, Feta & Walnut Salad There is autumn / fall in the air. Yes, the temperatures will not really fall enough to be classified as autumn / fall weather until October, but there is a definite change in the air.

We are in the mid – late stages of summer 2018.

Summer in most parts of Pakistan generally means soaring temperatures and unending bouts of severe humidity followed by much welcome monsoon rain. Grilled Peach, Feta & Walnut Salad Summer for us also means an abundance of glorious sun ripened fruit such as mangoes, faalsa (rather unromantically classified as Grewia Asiatica in English) watermelons and peaches.

This simple yet beautiful Grilled Peach, Feta & Walnut Salad is an elegant tribute to summer fruit – an easy, delicious and restaurant worthy salad that comes together in no time. Grilled Peach, Feta & Walnut Salad Ripe peaches, juicy and slightly smoky from being grilled contrast wonderfully atop a bed of fresh crisp salad greens doused in a sweet and tart Honey Citrus Dressing and topped with salty feta and earthy toasted walnuts – how gorgeous and refreshing is that?

This salad does well at being served at room temperature but I like it best cold. Grilled Peach, Feta & Walnut Salad Grilled Peach, Feta & Walnut Salad
Recipe Type: Starters & Sides    Author: Alice In Eatland
Prep Time: 15 Minutes    Cook Time: 10 Minutes    Total Time: 25 Minutes
Serves: 1 – 2


Smoky peaches, crisp salad greens, Honey Citrus Dressing, feta & toasted walnuts contrast perfectly in this lovely Grilled Peach, Feta & Walnut Salad.


INGREDIENTS

  • 1 – 2 medium sized peaches (ripe but firm)*
  • Olive oil
  • Salt
  • 2 tablespoons good extra virgin olive oil
  • 1 tablespoon honey + extra
  • 1/2 – 1 tablespoon fresh lemon or lime juice + extra
  • Salt
  • Fresh milled black pepper
  • 1 – 2 cups salad greens / mesclun mix**
  • Feta cheese, crumbled
  • Toasted or caramelised walnuts
  • Balsamic glaze (optional)


METHOD

  1. Preheat a cast iron grill or a grill pan over medium heat.
  2. Halve peaches, remove the pits / stones and slice into thick rounds.
  3. Brush / coat both sides of peach slices evenly with olive oil and sprinkle with salt.
  4. Grill sliced peaches on both sides, 2-5 minutes per side, or until good dark char marks appear.
  5. Cool on wire rack & cool completely.
  6. When peaches have cooled to room temperature, transfer them to a flat plate and place in the fridge to chill.
  7. Prepare the Honey Citrus Dressing by whisking together the extra virgin olive oil, honey, fresh lime or lemon juice with a pinch each of salt and black pepper.
  8. When the dressing emulsifies and thickens, taste it.
  9. It should be sweet, tart and zingy. Add more lemon / lime juice, honey, salt or pepper if needed. Set aside.
  10. When ready to serve, toss your washed and dried salad greens in  the dressing and place on serving plate.
  11. Place cold grilled peach slices on top, crumble over some salty feta and scatter toasted walnuts all over.
  12. If wanted, give the salad a final drizzle of balsamic glaze – the salad will taste great without it as well.


NOTES

*Mangoes, pears and apricots also grill well and make good substitutes for / alternatives to peaches in this kind of salad.

**Here I’ve used a 50 gram packet of salad mix by Origi Nature available at Haryali Store. It is a mix of rocket (arugula), baby spinach, baby kale and tender basil.

Filed Under: Recipes, Snack & Starter

Quick Pita Pizzas

July 24, 2018 by aliceineatland Leave a Comment

Quick Pita Pizzas

Quick Pita Pizzas

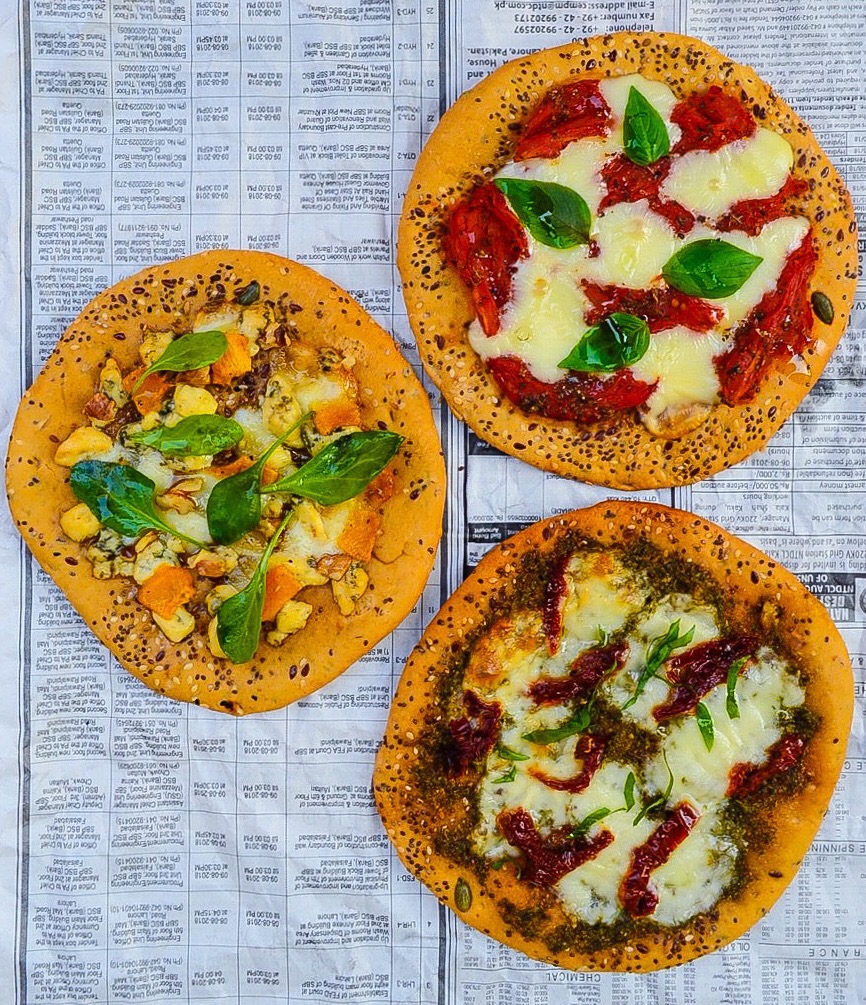
Pita pizzas are a pretty kickass idea when you’re looking to make versatile pizza style snacks or appetisers fast.

These good looking crispy discs are perfect for times when:

* You don’t want to bake your own pizza crust.

* You want to experiment with toppings other than the ones offered by commercial pizza places.

* You don’t own things like a pizza stone, a pizza steel, a pizza peel or a cool kiln-like brick oven.

* Baking pizza on an upturned baking sheet hasn’t helped much because your oven doesn’t operate at the kind of furnace-like temperatures required to make a really awesome pizza crust.

* All of the above.

You can use any of your favourite pizza toppings to make these. The possibilities are endless and consider these 3 types of pita pizzas as guides and build your own favourites.

Use your favourite pizza sauce, mushrooms, olives, caramelised onions, feta cheese or anything your heart desires and that you like to top your pizzas with.

It is hard to give exact quantities for the ingredients here because it will all depend on the size of the pita breads you use and how generous or stingy you are with the toppings.

Quick Pita Pizzas

The pita breads I used to make these pita pizzas were roughly maybe 6″ in diameter so use that as a guide.

I used a homemade Parsley Walnut Pesto to top one of the pizzas. That is what I had in the fridge so that is what I used. The pesto recipe below is flexible; if you want to make a traditional pesto, use sweet basil and pine nuts.

I had roasted pumpkin pieces in the freezer so I defrosted some of those and added to one of the pizzas and topped it with some leftover baby spinach from a salad that I had made the previous evening.

The pita breads I’ve used here were purchased a few weeks before and had been sitting in my deep freezer. I put them to defrost on the kitchen counter while I got the pizza toppings ready.

I’m all about what’s available and making life easy. So work with what you have and what you like.

Also, these pita pizzas look best when they’re not perfectly prettified. The more rustic looking, the better, in my humble opinion.

It is ok to be generous when topping your pita pizzas but remember not to overload them with the toppings. It is pita bread after all, hence not as sturdy as thick crust pizza dough so keep that in mind.

Quick Pita Pizzas


QUICK PITA PIZZAS


Recipe Type: Starter & Snack    Author: Alice In Eatland
Prep Time: 10 Minutes    Cook Time: 10 Minutes    Total Time: 20 Minutes
Serves: 2 – 3


Crispy quick pita pizzas – easy, fast & fun to put together thanks to readymade pita breads & a myriad of topping possibilities – yum!


PIZZA MARGHERITA

INGREDIENTS

  • Pita bread*
  • Olive oil
  • 4 – 6 canned whole peeled tomatoes, preferably Italian style
  • Dried oregano
  • Dried basil
  • Garlic powder
  • Onion powder
  • Salt
  • Fresh ground black pepper
  • Mozzarella cheese, sliced into squares or rectangles
  • Fresh sweet basil leaves


METHOD

  1. Preheat oven to 200 degrees C / 400 degrees F.
  2. Brush pita bread evenly with olive oil.
  3. Cut or tear tomatoes roughly into quarters and drain as well as possible.
  4. Add a good pinch each of oregano, basil, garlic powder and onion powder.
  5. Pour in a teaspoon or so of olive oil, add salt & pepper to taste and toss lightly to combine, being careful not to break tomatoes.
  6. Arrange seasoned tomatoes randomly all over the pita.
  7. Top with squares or rectangles of sliced mozzarella.
  8. Drizzle a little olive oil all over.
  9. Place directly onto your oven’s wire rack.
  10. Bake 10 minutes or until cheese is well melted.
  11. Remove from oven, top with fresh sweet basil leaves.
  12. Slice into wedges & serve.


PESTO & SUNDRIED TOMATO PIZZA


INGREDIENTS

  • Pita bread*
  • Olive oil
  • Pesto, store / deli bought or homemade (recipe below)
  • Mozzarella cheese, sliced into squares or rectangles
  • Sundried tomatoes in oil, drained
  • Fresh sweet basil leaves, chiffonaded


METHOD

  1. Preheat oven to 200 degrees C / 400 degrees F.
  2. Spread pita bread evenly with pesto leaving a 1/2″ – 1″ border.
  3. Place mozzarella randomly over the top.
  4. Top with sundried tomatoes.
  5. Drizzle a bit of olive oil all over.
  6. Place directly onto your oven’s wire rack.
  7. Bake 5 – 10 minutes or until cheese has melted.
  8. Remove from oven, top with chiffonaded sweet basil, cut into wedges and serve.


BLUE CHEESE, ROASTED PUMPKIN & WALNUT PIZZA


INGREDIENTS

  • Pita bread*
  • Olive oil
  • Mozzarella cheese, sliced into squares or rectangles
  • Blue cheese, crumbled
  • Roasted Pumpkin bits (recipe below)
  • Walnuts
  • Arugula / Rocket leaves or baby spinach


METHOD

  1. Preheat oven to 200 degrees C / 400 degrees F.
  2. Brush pita bread evenly with olive oil, leaving a 1/2″ – 1″ border.
  3. Place mozzarella randomly on top & scatter blue cheese over it.
  4. Place roasted pumpkin pieces on top and add walnuts.
  5. Drizzle olive oil all over.
  6. Place directly onto your oven’s wire rack.
  7. Bake 5 – 10 minutes or until mozzarella has melted.
  8. Remove from oven and top with fresh arugula/ rocket or baby spinach leaves.
  9. Drizzle a little extra virgin olive oil on top of the leaves if wished.
  10. Cut into wedges and serve.


PESTO 2 WAYS


INGREDIENTS

  • 1/2 cup fresh sweet basil leaves OR flat leaf parsley
  • 1/2 tablespoon pine nuts OR walnuts, ground
  • 1 clove garlic, peeled & grated
  • 2 tablespoons extra virgin olive oil + extra
  • 1 tablespoon grated Parmesan cheese
  • Salt


METHOD

  1. Put all ingredients together in a small blender or in the small bowl of a food processor.
  2. Blend or process until combined and a thick paste forms.
  3. If not using straight away, put in an airtight container and cover with a layer of extra virgin olive oil.
  4. Store pesto airtight in the fridge for up to a week.


ROASTED PUMPKIN


INGREDIENTS

  • Pumpkin, peeled & cut into 1″ pieces
  • Olive oil
  • Salt
  • Fresh ground pepper
  • Dried herbs such as thyme, Italian herb mix, fines herbes, herbes de Provence etc (optional)


METHOD

  1. Preheat oven to 180 degrees C / 350 degrees F.
  2. Line a roasting tin or baking sheet with foil.
  3. Add the pumpkin cubes and drizzle with a few tablespoons of olive oil.
  4. Season with salt, pepper and herbs if using.
  5. Give everything a good mix with your fingers so that the pumpkin in thoroughly coated with the oil and seasonings.
  6. Bake 15 – 30 minutes, stirring pumpkin pieces halfway through baking or until fully cooked. Plus points if any light charring occurs in places.
  7. Remove roasted pumpkin from oven and cool completely to room temperature.
  8. Store airtight in the fridge up to 1 day and a few weeks in the freezer.


* You can use any type of pita bread to make these pita pizzas such as whole wheat, gluten free etc.

The ones I’ve used here are multi grain pita breads from La Patisserie.

Filed Under: Recipes, Snack & Starter

Russian Salad Olivier

July 21, 2018 by aliceineatland Leave a Comment

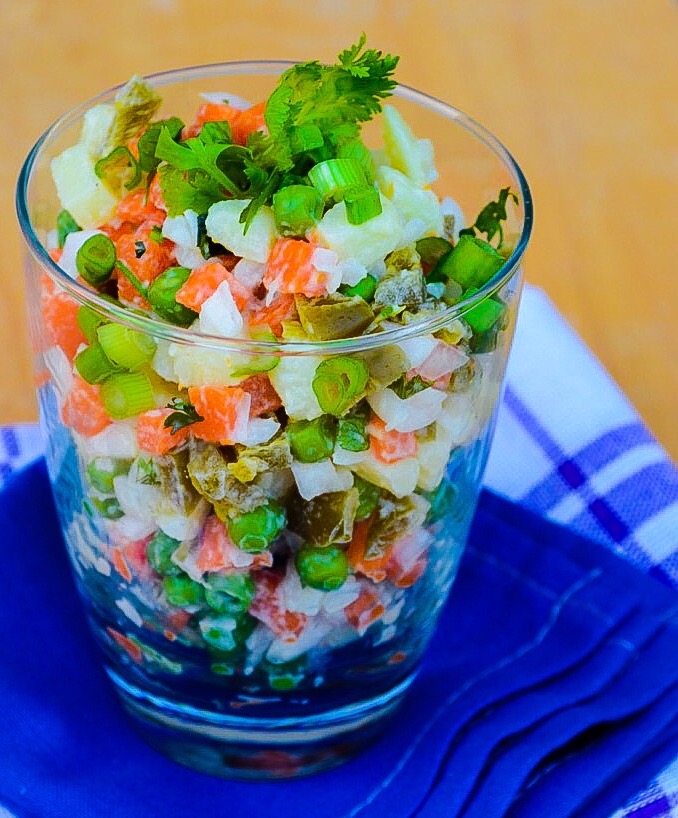
Russian Salad Olivier

Russian Salad Olivier

Up until the ’90s, the most popular salad in Pakistan (second only to our local Kachumer Salad) used to be Russian Salad.

Basically any combination of salad ingredients, such as shredded cabbage,
boiled potato cubes, hard boiled egg bits, with or without chopped apples and / or pomegranate seeds doused in a ton of mayonnaise was loosely referred to as Russian Salad.

Because of my childhood aversion to most things containing mayonnaise, I wasn’t exactly in love with any form of this salad.

Fast forward to early – mid 2000s and I happened to taste a Russian Salad so incredible that I was an instant convert. It was as authentic as it can get because it was made by a Russian family friend, a Moscow native, living in Daharki.

Olga, the Russian lady in question, was happy to share with me the list of simple ingredients that go into making a traditional Russian Salad.

I told her that that was the first time I had actually enjoyed eating a Russian Salad at which she told us of her annoyance at people who combine things like cubes of tinned pineapple with mayonnaise and present that as Russian Salad 😁.

Russian Salad Olivier

Post-Soviet countries such as Ukraine and other countries like Bulgaria love Russian Salad or Salad Olivier. This salad is also pretty popular in Iran where it is known as Salad Olivieh.

In an age where superstars of the modern salad world such as heirloom tomatoes, burrata and dried cranberries rule, I feel classic salads such as Waldorf Salad, Salad Niçoise, Russian Salad etc also need to be revisited and savoured from time to time.

Except for a few of the older eateries and clubs in Pakistan that have been around for a couple of decades, Russian Salad has sadly been relegated to the “Forgotten Classics” list.

I call my take on this classic salad Russian Salad Olivier. This is a salad that I can happily have in place of a regular meal.

Sprightly, fresh tasting & filling without being stodgy, this is usually the first salad (& many times the only salad when entertaining carnivorous relatives who sadly consider anything with potatoes as the only vegetable dish worth eating 😁) that gets finished when I do an assortment of salads as part of a family daawat / party.

Russian Salad Olivier

Russian Salad Oliver


Recipe Type: Starter & Snack    Author: Alice In Eatland
Prep Time: 20 Minutes + Chilling Time    Cook Time: 10 Minutes    Total Time: 30 Minutes
Serves: 2 – 4


Cooked, raw & pickled vegetables make up this classic Russian Salad Olivier. Tangy citrus & fresh herbs add sprightliness to the salad’s satisfying flavour.


INGREDIENTS

  • 2 medium potatoes, peeled & cut into 1/2″ – 1″ cubes
  • 2 medium carrots, peeled & cut into 1/2″ – 1″ cubes
  • 1 cup green peas, fresh, frozen or canned*
  • 1/2 cup chopped spring onions, both green & white parts
  • 1/2 cup chopped pickled gherkins OR dill pickles OR pickled jalapeños
  • 1 – 2 hard boiled eggs, peeled & chopped into 1/2″ – 1″ cubes (optional)
  • 1/4 – 1/2 cup good quality mayonnaise**
  • A few tablespoons of fresh lemon juice***
  • Fresh dill / soya OR fresh coriander leaves
  • Salt
  • Fresh ground black pepper


METHOD

  1. Bring a medium sized pan full of water to the boil.
  2. When it reaches the boil, salt it well and add chopped carrots. Let cook uncovered 2  minutes.
  3. Then add the potatoes and cook uncovered 5 – 7 minutes or until the potato cubes are cooked.
  4. Potatoes must be tender but still hold their shape so make sure not to over cook.
  5. If using fresh peas, add them during the last 5 – 7 minutes of cooking. If using frozen, add them during the last 2 – 4 minutes of cooking.
  6. Drain the cooked vegetables well, and cool completely to room temperature.
  7. Remove cooled vegetables to a roomy bowl, cover and refrigerate for 10 – 15 minutes or until cold.
  8. To assemble the salad, add chopped spring onions and chopped gherkins, dill pickles or jalapeños to the cold vegetables. Also add drained canned peas, if using.
  9. Stir in enough mayonnaise to coat the vegetables thoroughly but not heavily. Use a light hand to stir so that the veggie cubes don’t break.
  10. Add lemon juice, salt, pepper and chopped fresh dill / soya or coriander leaves.
  11. Taste the salad and see if it needs more of anything – pickled veggies, mayonnaise, lemon juice, fresh herbs, salt or pepper.
  12. Once satisfied with the taste, remove the salad to an airtight container and chill in the fridge for at least an hour – up to 24 hours is fine too.
  13. Serve the salad cold and store leftovers airtight in the fridge.
  14. Consume within 2 days.


* According to a few Russian and Eastern European food bloggers, canned peas and not fresh or frozen ones, are traditionally used to make Russian Salad.

** I feel that the quality and the quantity of mayonnaise used is what makes or breaks this salad. It is essential not to drown the salad in mayonnaise. I would suggest Best Foods Mayonnaise, Hellmann’s Mayonnaise and American Garden’s U.S. Mayonnaise but obviously feel free to use any local brand that you like.

*** Do not skip fresh lemon juice. The tangy acidity of the lemon cuts through the gloopines of the mayonnaise and keeps the salad tasting fresh, tart and bright.

Filed Under: Recipes, Snack & Starter

Hyderabadi Maash Ki Daal K Dahi Barray

May 22, 2018 by aliceineatland Leave a Comment

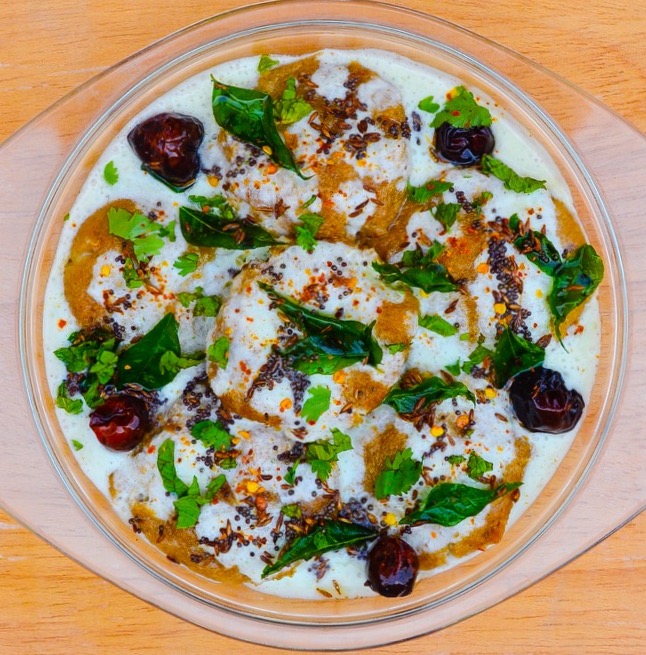
Hyderabadi Maash Ki Daal K Dahi Barray

Hyderabadi Maash Ki Daal K Dahi Barray, an absolute knock out of a dish with its big bold flavours.

As someone who’s not too crazy about regular Dahi Barray, I adore the cooling and fragrantly spicy flavour profile of Hyderabadi Maash Ki Daal K Dahi Barray.

To make these, the barray, which are spongy deep fried discs made of ground split black lentils (maash ki daal / urad daal ) are doused in well seasoned yogurt and finally tempered with fragrant spices.


Hyderabadi Maash Ki Daal K Dahi Barray

Soaked maash daal – blended with seasonings & flavourings


My Mother makes Hyderabadi Dahi Barray pretty much the same way, except that she makes the barray with gram flour or besan. A lot of times, store bought boondi is used instead to save time which then becomes Hyderabadi Dahi Boondi.

Dahi Barray, the cooling yogurt based snack is very popular pretty much all over Pakistan: it is readily available as street food, is almost always a part of desi tea parties and also makes appearances at meals sometimes.


Hyderabadi Maash Ki Daal K Dahi Barray

Dahi barra batter, after fermenting in the fridge for 6 hours – ready to deep fry


Hyderabadi Maash Ki Daal K Dahi Barray are pretty similar to regular Dahi Barray but it’s amazing how the addition of a few everyday spices elevate their taste to another level.

Making barray with maash ki daal does take time and a little advanced planning but the result is really worth the effort.


Make Ahead: How To Freeze Hyderabadi Maash Ki Daal K Dahi Barray:

  • Follow the recipe for making the barray till the deep frying stage.
  • Cool the barray completely, place in a single layer on a plastic wrap covered tray or cookie sheet and freeze overnight till firm.
  • Remove to an airtight container, placing plastic wrap between stacks, if necessary and freeze again.
  • To use, add directly from the freezer to the warm salted water called for in the recipe and let soak until softened.
  • Proceed with the rest of the recipe.

It took me a few tries to get this recipe for these Hyderabadi Maash Ki Daal K Dahi Barray right. Thanks to the folks behind the YouTube channel Hyderabadwala.com for explaining the intricacies behind this Hyderabadi specialty in detail.

Chock full of flavour and heady with spices Hyderabadi Maash Ki Daal K Dahi Barray are what you make when you want regular Dahi Barray but with a sizeable shot of with extra oomph.

Hyderabadi Maash Ki Daal K Dahi Barray

Hyderabadi Maash Ki Daal K Dahi Barray

Recipe Type:    Starter / Snack    Author: Alice In Eatland
Prep Time: 12.5 Hours     Cook Time: 10 – 20 Minutes    Total Time: 13 – 14 Hours
Serves:    4 – 6


Hyderabadi Maash Ki Daal K Dahi Barray – deep fried lentil batter discs, soaked in flavoured yogurt & tempered with fragrant spices. A Hyderabadi specialty!


INGREDIENTS FOR BARRAY

  • 1 cup split black lentils (maash daal / urad daal)
  • 3 – 4 cups water
  • 1 – 2 medium fresh green chillies, roughly chopped
  • 1 teaspoon salt or to taste
  • 1″ piece fresh ginger, peeled
  • 2 large cloves garlic, peeled
  • 1 teaspoon cumin seeds
  • 1 cup water, extra
  • 4 cups warm water from a recently boiled kettle
  • 1 teaspoon salt, extra


INGREDIENTS FOR THE YOGURT SOAK

  • 500 grams thick plain yogurt
  • 1/2 to 1 cup cold drinking water
  • 1 teaspoon cumin seeds
  • 2 – 4 medium fresh green chillies, roughly chopped
  • 1 teaspoon salt or to taste
  • 2 – 4 cloves garlic, peeled


INGREDIENTS FOR TEMPERING

  • 4 tablespoons oil
  • 8 dried red chillies
  • 1 teaspoon cumin seeds
  • 1 teaspoon brown mustard seeds
  • 10 – 15 curry leaves, preferably fresh but dry will do too


INGREDIENTS FOR GARNISH

  • 1 tablespoon finely chopped fresh coriander leaves
  • 1 tablespoon finely chopped fresh mint leaves
  • Red chilli flakes


METHOD

  1. Put the daal in a bowl and rinse a couple of times under running water.
  2. Add water and let sit 6 – 12 hours.
  3. Drain water, reserving about 1/4 cup of it.
  4. Put the drained daal in the jug of a blender along with the green chillies, cumin seeds and salt.
  5. Grate in the ginger and garlic, add a tablespoon or so of the reserved water and blend.
  6. Add the water a tablespoon or so at a time and use as little as possible. The less water used, the better.
  7. When the daal is blended into a fine paste, remove to a bowl, cover and put in the fridge to ferment for 6 hours.
  8. Heat oil for deep frying in a roomy pan.
  9. Add 1/2 cup water to the daal batter and stir until blended.
  10. Put all the ingredients for the yogurt soak in the jug of a blender. Blend until combined. The consistency should be medium-thin. Taste to check the salt and spiciness and adjust if needed.
  11. Pour half the yogurt soak in a flat based serving dish. Set aside.
  12. Pour the warm drinking water into a large dish, like a rectangle Pyrex and stir in the extra salt. Set aside.
  13. When the oil is medium hot, drop tablespoonfuls of the batter into it, making sure not to overcrowd the pan.
  14. Your oil must be the correct temperature. If it is too hot, the barray will brown fast on the outside and the centres will turn out hard and not properly cooked. If oil is not hot enough, the barray will absorb too much oil.
  15. When the barray begin to turn golden underneath and along the sides, flip them over to cook the other side.
  16. Once golden all over, drain them well. These tend to absorb more oil than say, pakorray, but don’t be alarmed – the next step will help get rid of much of their excess oil.
  17. Put the drained barray into the warm salted water. This will draw out the extra oil from them. Let sit 2 – 3 minutes, then flip them. After another 2 – 3 minutes, lift the barray out of the water and gently press them between your palms so that most of the water squeezes out. It’s ok if some of the barray crack in places. Just make sure not to break them.
  18. Arrange all the flattened barray on the yogurt soak in the serving dish.
  19. Pour the remaining yogurt on top of the barray to cover completely.
  20. Make the tempering by heating the oil in a small pan over medium heat.
  21. Add the dried red chillies and stir until they darken. Then add the cumin seeds and the mustard seeds. When the mustard seeds begin to crackle, turn off the heat, stand back and throw in the curry leaves.
  22. Give everything a good stir and pour all over the yogurt soaked barray.
  23. Garnish with the fresh coriander and mint leaves, sprinkle with chilli flakes and let sit in the fridge for at least 30 minutes so that the barray absorb some of the yogurt.
  24. Serve Hyderabadi Maash Ki Daal K Dahi Barray cool. Store refrigerated airtight for up to 2 days.


Filed Under: Budget Friendly, Recipes, Snack & Starter

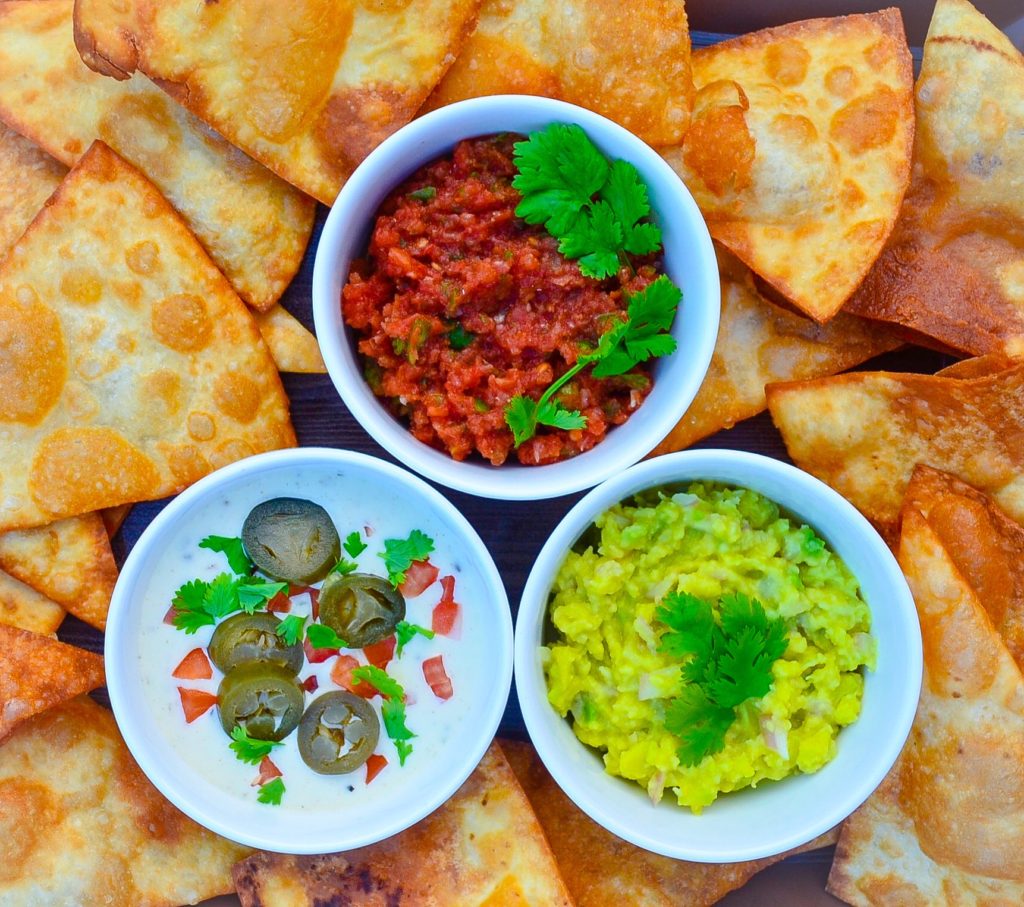
Restaurant Style Salsa, Guacamole and Queso Blanco Dip

May 5, 2018 by aliceineatland Leave a Comment

Restaurant Style Salsa, Guacamole and Queso Blanco Dip

Restaurant Style Salsa, Guacamole and Queso Blanco Dip

There has been no looking back since I started making restaurant style salsa, guacamole and queso blanco dip at home. These taste phenomenal and are unlike anything you’d find in a jar.

I literally had that “Where have you been all my life?” moment the second I took my first taste of each of these dips. To state that this salsa, guacamole and queso blanco dip are all three of them incredibly good is an understatement – at least for me!

The salsa is piquant with the kind of depth that I used to find was hard to replicate outside a restaurant. It is a breeze to put together as I usually have most of the ingredients it requires on hand.

Guacamole is best made right before you plan on eating it and benefits tremendously from generous quantities of salt and lime or lemon juice. Some recipes call for the addition of tomato as well but I choose not to add it.

The queso blanco dip is rich and creamy but the gentle heat and slight tartness from finely chopped pickled jalapeños and seasonings balance it out along with the fresh toppings.

I love enjoying copious amounts of all of these together with tortilla chips hence made a single post about them instead of three separate recipe posts.

Also, by no means do I claim these recipes to be authentic. This is how I like them and have adapted the recipes a little from Laura Vitale‘s lovely recipes keeping the scarcity of some and the unavailability of other Mexican ingredients in Pakistan in mind.

Avocados are, admittedly, not as readily available in Pakistan as the rest of the ingredients required to make the other two dips. I buy firm avocados, wrap them in newspaper and leave them to ripen for a day or two before using.

If you’ve never made guacamole before it may be helpful to Google things like “how to choose an avocado” – and if you’re lucky enough to have come across those black-green Hass avocados in Lahore, please let me know.

Crispy chips like Doritos and Tostitos are obviously amazing for scooping up the salsa, guacamole and queso blanco dip right into your mouth.

Many imported brands of flour and corn tortillas are now available at various stores. So there’s plenty of choice if you want to make your own tortilla chips.

I like the tortillas made by Lahore’s local bakery “Bread & Beyond” that come in two sizes and are available at their stores / bakeries.

To make the chips, I stack a couple of tortillas on a chopping board and slice into eighths with a sharp knife. I then deep fry the tortilla wedges until golden then drain them well.

For a healthier alternative, brush each tortilla on both sides with olive oil while stacking and slice into eighths. Place the cut wedges on a baking sheet and bake in a preheated oven at 350 degrees F / 180 degrees C until golden.

Restaurant Style Salsa, Guacamole and Queso Blanco Dip

Restaurant Style Salsa, Guacamole and Queso Blanco Dip


Recipe Type: Snack & Starter    Author: Alice In Eatland
Prep Time: 20 Minutes    Cook Time: 20 Minutes    Total Time: 40 Minutes
Serves: 2 – 4


Enjoy the bright & bold flavours of homemade restaurant style salsa, guacamole and queso blanco dip right in the comfort of your home!


SALSA

INGREDIENTS

  • 2 large fresh ripe tomatoes
  • 1 cup canned tomatoes (diced or whole)
  • 1/2 – 1 medium red onion, roughly chopped
  • 2 large cloves garlic
  • 2 large green chillies, roughly chopped
  • 1/2 cup fresh coriander leaves
  • 1 teaspoon cumin powder
  • 1 teaspoon dried oregano
  • A few fresh lemons or limes
  • Salt
  • A pinch of fine white sugar


METHOD

  1. Optional: Place whole tomatoes on medium high heat directly onto the stove rings. Keep turning tomatoes with a pair of tongs until the skin is blackened and charred in places all over. Remove roasted tomatoes to a bowl, cover with a plate or plastic wrap for 10 minutes or so and peel the charred skin off and discard. Set aside.
  2. In the bowl of a food processor add onions and green chillies.
  3. Grate in the garlic cloves and process until chunky.
  4. Add fresh tomatoes (cut into quarters if unroasted or halved if using roasted tomatoes as per the optional first step), canned tomatoes, coriander leaves, cumin powder, oregano, lime or lemon juice and salt.
  5. Pulse until mixture is somewhere between very finely chopped and pulpy. Do not over process.
  6. Check salt and adjust lime or lemon juice and seasoning accordingly.
  7. Mix in the pinch of sugar if the salsa tastes too sour and could do with a bit of balancing.
  8. Remove the prepared salsa to a serving bowl, cover and let sit in the fridge for at least 15 – 20 minutes to let the flavours mingle.
  9. Store leftover salsa covered airtight in the fridge.
  10. Best consumed within 1 day.


GUACAMOLE

INGREDIENTS

  • 2 – 4 ripe avocados
  • A few fresh limes or lemons, halved
  • Salt
  • 1 small red onion, chopped OR a few green onions, chopped
  • Chopped fresh coriander

METHOD

  1. Halve the avocados and remove the seed from each. Scoop out the flesh into a bowl.
  2. Immediately sprinkle with salt and squeeze over the juice of 1 or 2 limes or lemon.
  3. Mash with a fork until chunky. Add chopped onion & continue mashing and smooshing with the fork until the consistency is somewhere between creamy and lightly chunky.
  4. Taste to see if the salt and lime / lemon juice are according to your liking. Adjust if needed.
  5. Scrape out into serving bowl, top with a few chopped coriander leaves.
  6. Guacamole can start changing colour with time so make it just before serving, do not let it sit and serve straight away.


QUESO BLANCO DIP

INGREDIENTS

  • 1/2 cup heavy / double cream
  • 1/2 cup whole milk
  • 1 cup cubed cheese (any local cheddar cheese OR American Cheese OR Monterey Jack OR a combination of any of these cheeses)
  • 1/4 cup – 1/2 cup pickled jalapeños, drained and finely chopped
  • 1/2 teaspoon cumin powder plus extra
  • 1/2 teaspoon dried oregano plus extra
  • Fresh milled black pepper
  • Salt
  • 1 small ripe tomato, seeded and chopped
  • A few pickled jalapeño slices, drained
  • Fresh coriander leaves


METHOD

  1. Put the cubed cheese in the bowl of a food processor and pulse until shredded. Do not use pre-shredded cheese.
  2. Combine the cream and milk in a saucepan and whisk together until combined.
  3. Heat until you see small bubbles along the side of the pan and add the shredded  cheese a little at a time, whisking constantly until all the cheese has been added and has melted into the milk and cream.
  4. Add the chopped jalapeños, cumin powder, oregano and black pepper.
  5. Stir well and check for salt. Adjust seasonings accordingly, adding extra cumin and oregano if needed.
  6. Pour the queso blanco dip into a serving bowl. It will thicken as it cools.
  7. At this point you can place the bowl under your oven grill / broiler for half a minute or so or until the top is crusty and golden. This step is totally optional. Just make sure your bowl is oven proof.
  8. Top the dip with chopped tomatoes, jalapeño slices and fresh coriander.
  9. Serve at room temperature and if serving later, warm up gently in a pan over low heat, adding a bit of milk to loosen it if needed and then top with the garnish.
  10. Store in the fridge.

Filed Under: Recipes, Snack & Starter

Spiced Purple Carrot & Coconut Soup

February 28, 2018 by aliceineatland Leave a Comment

Spiced Purple Carrot & Coconut Soup

Spiced Purple Carrot & Coconut Soup

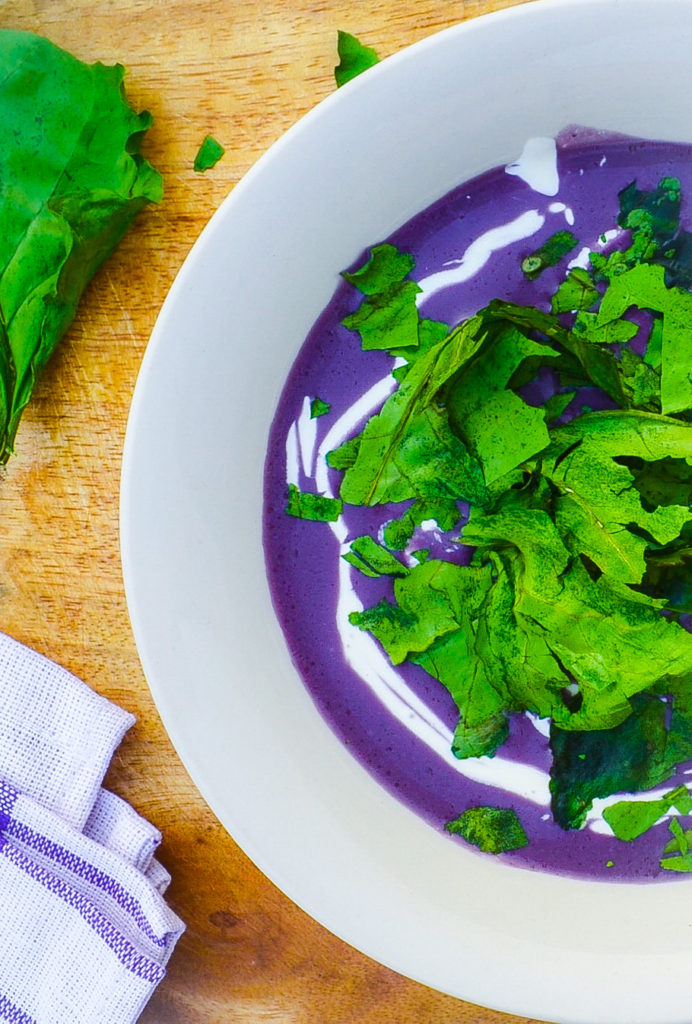
Welcoming spring with one of the most vibrantly beautiful soups I’ve made in a while 💜 – Spiced Purple Carrot & Coconut Soup.

The desi purple-black carrot, called kaali gaajar (that literally means ‘black carrot’ in Urdu) makes a brief yet stunning appearance every winter. This purple carrot is the star of the show here and gives the soup its deep amethyst colour.

Spiced Purple Carrot & Coconut Soup

My Dad brought home some gorgeous purple carrots the other day and I set out to make the traditional digestive drink Kanji with them.

As I was slicing the carrots and staring in awe at their amazing colour and the intricate natural pattern on the inside, I decided I would make something else too with these rare beauties that would show off their colour to perfection.

Spiced Purple Carrot & Coconut Soup

Hence the idea for this pretty Spiced Purple Carrot & Coconut Soup came about. I decided to add coconut milk to the soup for richness and a more rounded flavour. Plus some of my favourite spices give it a pleasing intensity without any heat.

I’ve swirled some heavy cream and crushed a couple of my homemade Crispy Spinach Chips on top for contrast, both in terms of colour and texture. The garnish / toppings are totally optional though; the soup is wonderful on its own too.

Spiced Purple Carrot & Coconut Soup

I still cannot get over the bright hue of this soup. And it tastes pretty great. So I’ve frozen a few servings of my Spiced Purple Carrot & Coconut Soup that I can defrost, reheat and enjoy during the upcoming months.

A regular carrot can be substituted for the purple one when purple carrots are not in season for an equally yummy Spiced Carrot & Coconut Soup.

Spiced Purple Carrot & Coconut Soup


Spiced Purple Carrot & Coconut Soup


Recipe Type: Starter & Snack, Main
Author: Alice In Eatland
Prep Time: 10 Minutes    Cook Time: 20 Minutes    Total Time: 30 Minutes
Serves: 1


Spiced Purple Carrot & Coconut Soup – the flavour & nutrients of purple carrot, fragrant spices & creamy coconut milk make this a winner. Gluten free.


INGREDIENTS

  • 1/2 teaspoon cumin seeds
  • 1/2 teaspoon coriander seeds
  • 1 tablespoon oil
  • 1 small onion, sliced
  • 2 large cloves garlic, sliced
  • 1/2″ piece ginger
  • 1 medium purple carrot, roughly chopped
  • 1/2 cup vegetable stock OR water
  • 1/2 cup coconut milk
  • Salt
  • Fresh milled black pepper
  • A little extra vegetable stock
  • A little extra coconut milk
  • Cream, to garnish (optional)
  • Crispy Spinach Chips, to garnish (optional; recipe here)


METHOD

  1. Put the cumin seeds and coriander seeds in a small pan and place over medium heat.
  2. Tilt the pan and swirl the seeds inside until they darken slightly and smell fragrant. Be careful not to burn.
  3. Remove from heat and crush coarsely, either with the back of a spoon or with a pestle and mortar. Set aside.
  4. Heat the oil in a pan over medium heat and add the onion, and garlic. Stir until soft and fragrant – no need to brown.
  5. Grate in the ginger and stir.
  6. Add the carrot pieces and the coarsely ground cumin and coriander.
  7. Give everything a good stir and pour in the stock or water and the coconut milk.
  8. Increase the heat to high and bring mixture to the boil, uncovered.
  9. When a rolling boil is reached, reduce heat to medium-low and let cook, partially covered, until carrot pieces are tender.
  10. Remove pan from heat, cool mixture to room temperature and then blend either in a blender or with a stick blender until smooth.
  11. Return soup to heat to warm up. Check for salt and add pepper if wished.
  12. Taste the soup. At this point you can add more stock and / or coconut milk depending on how the soup tastes to you – it’s all about personal taste and flavour preference so make adjustments accordingly.
  13. If more liquid is added, bring the soup to a boil, then lower the heat and simmer 5 minutes.
  14. When ready to serve, ladle warm soup into serving bowl.
  15. Drizzle cream on top if wished.
  16. Crush a few Spinach Chips lightly and place in a mound in the centre of the bowl. Enjoy.

Filed Under: Mains, Recipes, Snack & Starter Tagged With: Soup, Starter, Winter

Crispy Spinach Chips

February 22, 2018 by aliceineatland Leave a Comment

Crispy Spinach Chips

Crispy Spinach Chips are pretty cool things. Crunchy, nutrient rich and tasty without the guilt. And very easy to prepare.

Most recipes for spinach chips use baby spinach. If you’d like to use that instead of the regular spinach called for in this recipe, do so by all means. I’ve used ordinary spinach leaves because they are easily available and I usually have them in my fridge.

Crispy Spinach Chips

I once tried making kale chips pretty much the same way and they tasted good too. So you can try this recipe with kale as well. But honestly, I prefer spinach over kale for reasons of availability, cost and flavour. So I like these Crispy Spinach Chips better than the kale ones.

Crispy Spinach Chips

Besides being a much healthier snack overall, these Crispy Spinach Chips are  also a good crunchy treat for those following low carb eating plans.

This is also a keto friendly recipe for folks eating according to that particular meal / diet plan.

Crispy Spinach Chips

Crispy Spinach Chips


Recipe Type: Starter & Snack    Author: Alice In Eatland 
Prep Time: 5 Minutes    Cook Time: 10 Minutes    Total Time: 15 Minutes
Serves: 1


Crispy Spinach Chips – crunchy & delicious without the guilt! These baked nutrient dense chips make a super healthy snack. Gluten free. Low carb.


INGREDIENTS

  • Handful of spinach leaves (can be 1/2 to 1 cup of spinach leaves, depending how many you wish to eat)
  • 1 teaspoon or so of olive oil
  • Sea salt OR regular salt
  • Extra flavourings such as chaat masala, garlic powder etc.


METHOD

  1. Preheat oven to 180 degrees C / 350 degrees F.
  2. Wash the spinach leaves and dry thoroughly with sheets of kitchen paper.
  3. Line a baking sheet with wax paper.
  4. Toss the spinach leaves with a little olive oil. You don’t need a lot; just enough so that the leaves are very lightly coated with the oil. I find it easier to rub the oil onto the leaves with my fingers.
  5. Sprinkle salt and any additional flavouring of choice lightly on both sides of each oiled spinach leaf.
  6. Place the leaves on the prepared baking sheet in a single layer.
  7. Bake 5 – 10 minutes or until the spinach leave edges begin to curl away from the baking sheet. The leaves will darken in places, shrink & curl a bit and look dryish.
  8. Keep an eye on the spinach so that it doesn’t burn. It’s okay if the leaves turn brown in places while baking but don’t let them over brown.
  9. Remove the baked spinach leaves carefully from the baking sheet, preferably to a wire rack or wire colander to minimise surface contact so the chips remain crisp.
  10. These can soften with time so they are best eaten immediately after baking.

Filed Under: Recipes, Snack & Starter

  • Page 1
  • Page 2
  • Go to Next Page »

Primary Sidebar

ABOUT ALICE

Favorite recipes, fun eating out experiences and some wonderful food memories from Lahore, Pakistan.

ALICE’S TOP PICKS

Rose Crème Brûlée

Rose Crème Brûlée

Three Cheese Roasted Chilli Bread Pudding

Patisserie at Mocca Coffee Gulberg

Mocca Coffee Gulberg

The Paloma

The Paloma

Tags

Autumn / Fall Baking Budget-Friendly Cafe Chocolate Christmas Daharki Desi Dessert Dinner Easter Eatery Freezer Friendly Halloween Lunch Pakistani Restaurant Romantic Soup Spring Starter Summer Valentine's Day Vegan Vegetarian Winter

Tags

Autumn / Fall Baking Budget-Friendly Cafe Chocolate Christmas Daharki Desi Dessert Dinner Easter Eatery Freezer Friendly Halloween Lunch Pakistani Restaurant Romantic Soup Spring Starter Summer Valentine's Day Vegan Vegetarian Winter

Categories

  • Breakfast & Brunch
  • Budget Friendly
  • Condiment
  • Desserts
  • Drinks
  • Eateries
  • Homemade Cheese
  • Homemade Cheese
  • Mains
  • Recipes
  • Snack & Starter
  • Uncategorized

ABOUT

Hello! If like me, you too love to cook, bake and eat then you're in the right place. From heartwarming, soul-satisfying comfort food to light, fresh and deliciously healthy meals, everything here is made with the utmost TLC :)

Tags

Autumn / Fall Baking Budget-Friendly Cafe Chocolate Christmas Daharki Desi Dessert Dinner Easter Eatery Freezer Friendly Halloween Lunch Pakistani Restaurant Romantic Soup Spring Starter Summer Valentine's Day Vegan Vegetarian Winter

Copyright © 2025 · Foodie Pro Theme by Shay Bocks · Built on the Genesis Framework · Powered by WordPress