• Skip to primary navigation
  • Skip to main content
  • Skip to primary sidebar

Alice In Eatland

Recipes . Eateries . Inspiration

  • Recipe Index
  • Eateries

Recipes

Funfetti Cake Batter Ice Cream

August 13, 2016 by aliceineatland Leave a Comment

Funfetti Cake Batter Ice Cream

Funfetti Cake Batter Ice Cream

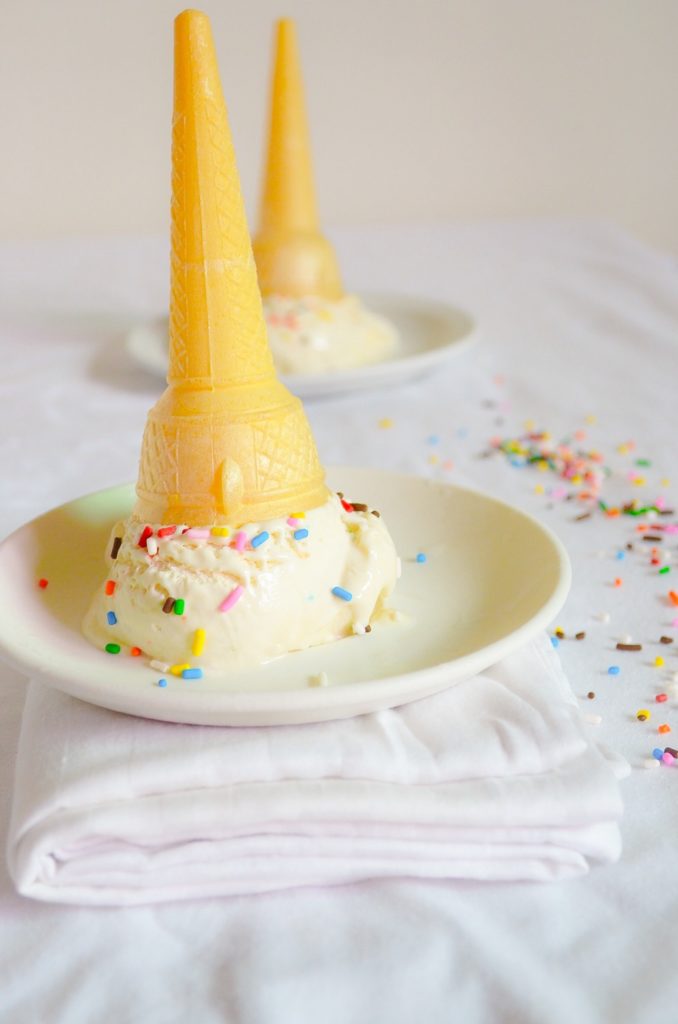
I have something of an obsession with cake batter, cookie dough and funfetti hence this dreamy Funfetti Cake Batter Ice Cream!

The first time I remember seeing a box of cake mix was back in the 80s. It was at the house of one of my Mother’s cousins. Her husband was in the army so they used to live in Malir Cantt. Going to their house was always a treat; I have not been to Malir in decades but I remember it being clean and non-congested with wide open spaces plus our hosts had a beautiful home and the glamorous lady of the house was a great cook.

One time at their home she was putting one of her lovely meals together and we were hanging out in her spacious kitchen as usual. On one of the open shelves built into the wall I remember a seeing a lone box of cake mix. The box was yellow and it was for a yellow cake mix. She had gotten it on a recent trip to London. It was like I could taste that yellow cake just looking at the box of cake mix.

Funfetti Cake Batter Ice Cream

The mind is a strange and beautiful thing. It always amazes me how sometimes you can remember ordinary things like a box of cake mix at somebody’s house from your childhood  with such vivid clarity and yet some recent apparently electrifying moments are all but a blur.

As a child I would lick the cake batter from the mixing spoons every time my Mother would bake a cake. To this day, I am more interested in the cake batter itself than in the actual baked cake! My Mother would scold me that I’d get sick or develop a tummy ache if I ate raw cake batter but I, like every good rebellious child, never listened. Thankfully I have never suffered any ill effects from raw cake batter so when I came across a few ideas for a Funfetti Cake Batter Ice Cream, it was like a dream come true and I was hooked.

image2 (1)

My first encounter with sprinkles was in Daharki. They weren’t available in Pakistan back then and the folks who had them would get them on trips abroad. I remember seeing SuperCook (now Dr Oetker) ads in my Mother’s magazines advertising hundreds and thousands, food color and white icing in a tube. I tore out the page and sent it with my maternal Grandmother who was travelling to the US soon and asked her to bring this kind of cake icing and decorating stuff for me.

I discovered ice cream made with just cream and condensed milk in BBC Good Food Magazine back in 1994. It was a recipe in the kids’ cooking section of the magazine and since it was so easy and utterly delicious, it has since been my go to recipe for a quick and easy ice cream base. No ice crystals, no forking , no churning or ice cream machine required. It is a great base for this Funfetti Cake Batter Ice Cream and quite a few no-churn cake batter ice cream recipes use this base too.

image1 (3)

I have always baked from scratch. For me, baking from scratch versus baking from a boxed cake mix can best be summed up like this: you know what they say about healthy eating that if you stay on track and eat whole, unprocessed nutritious food 80% of the time, you can afford to indulge in tasty but maybe not so healthy treats 20% of the time. That’s how I feel about boxed cake mixes – I will always bake from scratch but on the rare occasion that a boxed mix is required to add a certain flavor to something, then I don’t have a problem using a bit of it, like for this Funfetti Cake Batter Ice Cream.

A few things you might want to consider:

  • If you absolutely do not want to use a boxed cake mix you can leave it out and add a few teaspoons of good vanilla essence or extract. The result will obviously not be Funfetti Cake Batter Ice Cream but you will still have a very delicious Vanilla Funfetti Ice Cream.
  • If you can get hold of cake batter flavored bakery emulsion, that too can be used in place of the cake mix. I have not used bakery emulsions as yet but have read good things about them.
  • Not all brands of sprinkles are the same. I would suggest not to use the local made sprinkle brands as the colors usually start to bleed shortly after contact with moisture – trust me as I speak from experience. I use Cake Mate brand sprinkles that I got from Esajee’s, (DHA, Lahore branch).
  • If you want to make scoops out of the ice cream then freeze the mixture in a rectangle shaped airtight container to facilitate easy scooping.
  • Since this ice cream is very creamy with zero ice crystals it melts fast (as can be seen in the photos!) so it is best to serve it in chilled bowls.

Funfetti Cake Batter Ice Cream


Funfetti Cake Batter Ice Cream

Recipe Type: Dessert    Author: Alice In Eatland
Prep Time: 10 Minutes + Freezing Time    Serves: 6-8


Looking for an easy, delicious & fun dessert? Made with just 3 ingredients, both kids & adults will love creamy no-churn Funfetti Cake Batter Ice Cream!


INGREDIENTS

  • 2 cups heavy cream, well chilled
  • 1 can (around 400 grams or so) sweetened condensed milk, well chilled
  • 1/2  cup vanilla, yellow, white or Funfetti cake mix
  • Sprinkles


METHOD

  1. Whip cream until thick, fluffy and almost double in volume.
  2. Add sweetened condensed milk and beat until thick and increased in volume.
  3. Beat in cake mix. The mixture will thicken.
  4. Taste and see if you like the flavor or if more cake mix is needed. The amount of cake mix called for in the recipe gives a nice but subtle cake batter flavor. Keep in mind that your ice cream mixture will get sweeter if more cake mix is added.
  5. Turn mixture into plastic container, cover airtight and freeze 6-8 hours or until firm.
  6. Scoop out into chilled bowls or into ice cream cones, sprinkle with sprinkles of choice and serve.

Filed Under: Desserts, Recipes

Thai Curry Khao Suey

July 27, 2016 by aliceineatland Leave a Comment

Thai Curry Khao Suey

When both Thai Curry and Khao Suey are at the top of a girl’s comfort food list, she does the natural thing and combines them to make a soupy curry of deliciousness that is the Thai Curry Khao Suey!

I think the first time I had  khao suey was when I made it myself. I had heard of and read about this Burmese dish and it sounded wonderful – delicately spiced soupy coconut gravy spiked with lemon juice and served with boiled noodles or spaghetti and topped with a number of yummy toppings such as crispy fried garlic slices, crunchy chopped spring onion and fresh coriander leaves. Since this dish had never been made in my family and I knew of no restaurants that were serving it at that time, I did what any food lover would do – I made it myself.

Thai Curry Khao Suey

There were a few very nice Thai restaurants in Lahore back in the day. This place called “Lemon Grass” was my perhaps my first introduction to Thai food and my family and I used to love it. I have yet to have a better Pad Thai than the one that used to be served here – flat noodles in a sweet and sour tamarind based sauce topped with crushed peanuts and an over-easy egg. They also did a fantastic Thai green curry with fragrant lemon grass and chunky eggplant slices – I can still taste it! The interior was fairly opulently Thai looking and I was so sad when they closed down – such a pity.

Another Thai restaurant in the city was “Royal Elephant” at the Pearl Continental Hotel. It had good food and regal looking Thai style decor but that closed down too. I guess with the only Thai restaurants I knew of at that time shutting down, this Thai food fan had no choice but to start making it herself.

image2 (4)

I am glad to see khao suey on a few restaurant menus in Lahore now. Only a few people in the city were aware of this coconut curry soup unlike folks in Karachi, where its almost always been popular thanks to the Memon community who brought it to the city from Burma or Myanmar, and often call it khausa.

There are so many regional variations of the soupy noodle khao suey, hence many ways to make it. There’s the Burmese version, the Memoni take on it, the way its made in northern Thailand, the one made in Laos and the variations made in India, to name a few.

Thai Curry Khao Suey

Thailand’s khao suey is called khao soi  and versions of it are sometimes popularly known as as Bangkok curry noodles or Chiang Mai curry noodles in different places. It is a coconut based curry soup served with condiments and both boiled and fried noodles.

Thai curry and khao suey consist of coconut milk and a similar sort of curry-spice base, so it made sense to combine them for a very flavourful “the best of both worlds” soupy noodle outcome.

Thai Curry Khao Suey

Commercial yellow Thai curry paste includes the usual curry spice ingredients such as turmeric, red chilli, cumin and coriander so it makes a good flavouring base for the khao suey part which is made with many of the same spices. I suppose red Thai curry paste can be substituted for the yellow one but I have not tried it and moreover I wanted to stick with the yellow base color of Burmese khao suey. You can also increase the quantity of the mixed vegetables, chicken and prawns up to 1 cup depending on your preference.

Thai Curry Khao Suey is a complete meal. But what makes this fusion curry soup gravy stellar is the variety of the khao suey toppings. Adding boiled noodles or spaghetti to each serving is a must but other than that everyone gets to customize their portion with the rest of the toppings of their choice. Enjoy!

Thai Curry Khao Suey


Thai Curry Khao Suey

Recipe Type: Mains    Author: Alice In Eatland
Prep Time: 10 Minutes    Cook Time: 20 Minutes    Total Time: 30 Minutes


Deliciously aromatic, pleasantly spicy & comfortingly creamy with fresh, crunchy & crispy toppings, this 2-in-1 Thai Curry Khao Suey is a complete meal!


INGREDIENTS

  • 2 tbsp oil
  • 1/4 cup finely chopped onion
  • 1 tsp finely chopped garlic
  • 1 tsp finely chopped ginger
  • 2 tbsp Thai yellow curry paste
  • 2 tbsp gram flour / chickpea flour
  • 2 cups coconut milk
  • 2 cups vegetable or chicken stock (preferably no/low salt variety)
  • 1/2 cup sliced mixed vegetables (I like mushrooms + baby corn + lightly steamed French beans) OR 1/2 cup chicken strips OR 1/2 cup prawns (fresh or defrosted if frozen)
  • 2 tbsp fresh lemon juice
TOPPINGS
  • Boiled noodles / spaghetti
  • Deep fried sliced onions
  • Deep fried sliced garlic
  • Chopped spring onions, both green and white parts
  • Fresh basil leaves
  • Fresh chopped coriander leaves
  • Hard boiled egg halves / quarters
  • Lemon halves / quarters
  • Dried chilli flakes
  • Chilli oil
  • Roasted crushed peanuts


METHOD

  1. Heat oil, add onions, ginger and garlic and saute half a minute or until fragrant.
  2. If using chicken, add it now and saute a few minutes or until chicken changes colour – do not overcook. Remove sauteed chicken to a plate and cover.
  3. Add curry paste to the pan and cook a few minutes until curry paste darkens slightly.
  4. Sprinkle the roasted gram flour, stirring until everything becomes a thickish paste.
  5. Remove from heat and whisk in the coconut milk gradually, making sure all the spice mixture is thoroughly combined with it and no lumps remain.
  6. Add stock, return to heat, bring to the boil while stirring then lower heat.
  7. If using vegetables or the sauteed chicken, add now and simmer 5 – 10 minutes.
  8. If using prawns, add and simmer 1-2 minutes (do not overcook prawns or they’ll become tough and rubbery).
  9. Check salt, stir in lemon juice and remove from heat.
  10. Serve everything separately family style. Every diner helps themselves to the curry soup, noodles and other toppings.

Filed Under: Mains, Recipes

The Paloma

July 11, 2016 by aliceineatland Leave a Comment

The Paloma


How gorgeous is the Paloma! Visually stunning and a treat for the taste buds, I like to think of this lovely drink as the perfect salmon pink sunset on a tropical beach and as an ode to the incomparable Paloma Picasso! Without doubt one of my favorite summer mocktails, the Paloma is sensational in taste and a guaranteed crowd pleaser when entertaining.

My earliest memory of something like a “cocktail” or technically a mocktail, goes way back to the 80s.

I was born in Karachi and my family and I moved to Daharki in 1987. The Exxon Chemical Pakistan Limited (now known as Engro Chemical Pakistan Limited) community in Daharki, which we became a part of, was a like a small family and it had the most amazing culture that involved a lot of activities to keep the residents of Exxon’s small and stunningly pretty colony engaged and occupied.

I have had the good fortune of having been exposed to the best baking I’ve known anywhere right in the middle of a tiny colony in a quaint little town in interior Sindh. The fine desserts, chic cakes and assorted fancy bakes that the larger cities of the country have begun to have access to for the last decade or so, the Exxon community ladies were making these and more back in the 80s – probably since the 70s actually. Like me, most of the girls who grew up in Exxon Daharki learnt to bake years before they learnt to cook.


The Paloma


Cooking and baking classes were a regular feature for the Exxon ladies. I remember the cooking class leaflets (they were called “notices” back in Daharki) that would be delivered to each house a few days in advance, printed with details about the latest upcoming cooking class, plus which recipes would be taught and by whom with the time and venue of the class mentioned. Since the classes were for the community ladies only, kids like me would wait in anticipation for their Moms to return from cooking class with a printout of the recipe and an account of how good it tasted. Good times!

At one of the cooking classes a recipe for a fruit punch was demonstrated. This was a refreshing mix of different flavored fruit squashes and a fizzy drink, usually Sprite, topped with tiny bits of fresh fruit. It quickly became a popular party drink and for many of us, it was the first introduction to something mocktail-like. I used to love it – still do! Now that I think about it, it was like a delicious cross between a punch, a fruit spritzer and a non-alcoholic Sangria. I will share that fruit punch recipe soon along with other timeless recipes from Exxon Daharki’s legendary baking diaries but for now let’s get back to the Paloma.


image1 (5)


The word “paloma” means ‘dove’ in Spanish and contrary to popular belief, the Paloma and not the Margarita, is said to be Mexico’s most popular cocktail. The basic way of preparing the Paloma is to mix silver tequila with grapefruit soda or fresh grapefruit juice. Club soda or soda water is also added to some versions. Believe me when I tell you that my refreshingly zingy alcohol-free version will have you swooning!

Going through the produce section at HKB the other day I came across a gorgeous pile of ruby grapefruit. I knew right away what I was going to make with those beauties – yes, the Paloma.


The Paloma

You can obviously use regular grapefruit to make the Paloma but ruby grapefruit will give you a beautifully rosy drink, perfect for when you’re having your girl friends over for a mocktails-and-canapes-meets-gossip session or at any occasion really – this makes a really awesome “welcome drink” when hosting formal parties, lunches or dinners.

So give the Paloma a try; I know you will adore it!


The Paloma


The Paloma

Recipe Type: Drinks    Author: Alice In Eatland
Prep Time: 2 Minutes    Cook Time: 5 Minutes    Total Time: 7 Minutes    Serves 1


Pretty peach-pink & refreshingly zingy, the Paloma is perfect for a girly get together or for whenever you’re looking for a deliciously impressive mocktail!


INGREDIENTS

  • 1/4 cup sugar
  • 1/4 cup water
  • 1/4 cup fresh grapefruit juice
  • 1/2 cup sparkling soda water / club soda
  • 1/2 – 1 tsp fresh lemon juice
  • Good pinch of salt
  • Quartered lemon
  • Coarse salt
  • Grapefruit slice, quartered
METHOD
  1.  To make the simple syrup, put sugar and water in a small pan and swirl over medium heat until sugar dissolves. Remove from heat, cool to room temperature and chill.
  2. Rub the rim of the serving glass with the quartered lemon. Put the coarse salt in a small plate or bowl and dip the lemoned rim of the glass in the salt.
  3. Make a cut on the quartered grapefruit slice and fix it on the rim of the glass.
  4. Add fresh grapefruit juice to mixing glass, pour in soda water / club soda, 2-4 teaspoons of chilled syrup, lemon juice and pinch of salt.
  5. Stir and taste to see if it needs more syrup or lemon juice depending on how sour the grapefruit juice is and how sweet you like your mocktail.
  6. Pour into serving glass.
  7. Keep any leftover simple syrup tightly bottled in the fridge for up to 1 month.


Filed Under: Drinks, Recipes

Three Cheese Roasted Chilli Bread Pudding

June 23, 2016 by aliceineatland 2 Comments

This three cheese roasted chilli bread pudding is absolute love! Intensely cheesy and deliciously fluffy, it is the absolute perfect accompaniment to a special breakfast or an elegant brunch.

I was never a breakfast person. As a child I found it very hard eating anything when it came to the most important meal of the day. I remember reluctantly downing, tiny sip by tiny sip, a small mug of warm milk flavoured with either Ovaltine, Milo or Horlicks and considering that breakfast. Most days I would have just half a mug of milk. Some days I would valiantly make myself nibble on a toasted slice of bread but that is by far the most I remember eating in the mornings as a school-going child.

Fast forward decades later, and on the rare days that I do have a proper breakfast, it has to be a special one and a long and leisurely meal into the bargain.

My idea of the perfect breakfast consists of a laid back and unhurried meal, mid to late morning, eating what I consider ‘the works’ for myself – a spiced cheesy fluffy omelette, thick rustic looking slices of brown bread, plenty of Lurpak or Nurpur butter, hash browns, maybe some fresh pineapple and banana on the side (thank you beautiful Sri Lanka for spoiling me rotten while I was holidaying there with your deliciously unforgettable breakfasts and getting me to appreciate eating fresh fruit in the morning) accompanied by strong chai or good French press coffee. Add to this the three cheese roasted chilli bread pudding and my breakfast goes from simply “perfect” to downright “spectacular”!

I love watching Nigella Lawson’s “Nigella’s Christmas Kitchen” show, even when it’s not Christmas. There’s something very cozy and cheery about the show and the recipes are wonderful. On one episode Nigella makes what she calls a Triple Cheese Strata, which is essentially a savory bread pudding, golden and toasty on top and fluffy underneath. Nigella, with typical eloquence says “It’s like a toasted cheese sandwich but a celestial one, eaten by angels.” My three cheese roasted chilli bread pudding that has been adapted from it is no less heavenly, if I do say so myself.

I had been wanting to try Nigella’s recipe for years but you know how it is when you really want to make a particular something but never really get around to it. When I did, finally, make my own version of it, I kept wondering why I had not made it much, much earlier. Yes, it is that good.

Nigella’s recipe hardly needs tweaking but I’ve adapted it to my own taste and preferences. I’ve also played around with the quantities of the cheeses and added more liquid along with fire roasted green chillies. The result is a supremely flavorful souffle-like casserole flecked here and there with tiny bits of spicy smokiness.

I use regular bread to make my three cheese roasted chilli bread pudding because that is what I usually have in the house. I change up the types of cheeses frequently depending on what cheeses I have in the freezer at that time and have made this with a combination of different cheeses like pepper jack, Swiss etc. with great results.

This folks, is quintessential breakfast and brunch comfort food. Nigella serves it as a supper dish and frankly, I can eat it for lunch and dinner as well and have done so. But for me, this three cheese roasted chilli bread pudding really shines served as part of a nice breakfast or a lovely brunch. I’ve made it for family and friends and whoever has had it has loved it.

When this three cheese roasted chilli bread pudding is baking in your oven, the inhabitants of your abode will most certainly start salivating as the aroma that emanates from the baking is truly nothing short of  drool-inducing and will make the whole house smell divine! Bliss.

This recipe was featured in the first issue of “My Kisan Kitchen“, a Pakistani food and lifestyle magazine.

Three Cheese Roasted Chilli Bread Pudding

Three Cheese Roasted Chilli Bread Pudding


Three Cheese Roasted Chilli Bread Pudding

Recipe Type: Breakfast & Brunch    Author: Alice In Eatland
Prep Time: 15 Minutes    Cook Time: 20 Minutes    Total Time: 35 Minutes    Serves: 2


Savory three cheese roasted chilli bread pudding. Soufflé-like with a gorgeous puffy golden top, this is guaranteed to take you to comfort food heaven!


INGREDIENTS

  • 2 medium fresh green or red chillies
  • 1 cup grated mozzarella cheese
  • 1 cup grated cheddar cheese
  • 1/4 cup grated Parmesan cheese
  • 1/4 cup cream
  • 1/4 cup milk
  • 2 eggs
  • 2 spring onions, finely chopped (both green and white parts)
  • 2 cups cubed bread, at least a day old (crusts removed)
  • Spring onion green parts, extra, chopped, to garnish

METHOD

  1.  Puncture the chillies in several places with a small sharp knife and with the help of tongs, roast both chillies directly on stove flame, turning frequently until blistered and charred in places.
  2. Remove chillies from heat and cool. Slit from the sides, remove the seeds and chop finely.
  3. Stir together all three cheeses until combined; remove 1/4 cup of the cheese mixture and reserve.
  4. In the jug of a blender or the bowl of a food processor, put the cream, milk, eggs, spring onions and combined cheeses. Blend or process until combined.
  5. Place the bread cubes in a single layer in a lightly buttered ovenproof dish.
  6. Stir the finely chopped roasted chillies into the cheese mixture and pour this mixture all over the bread cubes, covering evenly.
  7. Cover dish tightly with cling film and let sit in the fridge for at least 6-8 hours, preferably overnight.
  8. When ready to bake, preheat oven to 180 degrees C (350 degrees F) and take bread pudding dish out of the fridge 30 minutes before baking to let it come down to room temperature.
  9. Sprinkle the reserved cheese mix evenly all over the surface the the pudding.
  10. Bake 20-30 minutes or until bread pudding puffs up and is golden brown.
  11. Remove from oven and cool 5 minutes.
  12. Garnish with chopped spring onion greens and serve warm with a crisp green salad, if liked.

Filed Under: Breakfast & Brunch, Recipes

Rose Crème Brûlée

June 16, 2016 by aliceineatland 2 Comments

Rose Crème Brûlée

Rose Crème Brûlée

Rose Crème Brûlée: what better way to start things than with this deliciously elegant rose flavoured take on this timeless dessert!

(Post Updated: 25th March ‘23)

The idea for making a rose crème brûlée came while I was living in London a few years ago. I adore watching food channels and that mania started way back in the 90s (the beginning of the ‘dish antenna’ phenomenon in Pakistan) when I was exposed to the utterly delicious channel BBC Food on ‘the dish’.

Sadly BBC Food stopped airing in Pakistan fairly soon, but I was delighted to find it again on tv, years and years later, in London. I was hooked on BBC Good Food and Food Network and one of the shows I’d watch regularly was “Giada at Home” featuring the lovely Giada De Laurentiis.

On an episode of the show, very romantically titled “We’ll Always Have Paris”, Miss De Laurentiis made gorgeous Raspberry Rose Pots de Creme and I knew right away that I would make a similar raspberry rose-ish dessert one day.

Though I still haven’t tried my hand at Giada’s Raspberry Rose Pots de Creme, the recipe on the show in London inspired me to make rose flavoured crème brûlée years later, back in Lahore, Pakistan.

Summer can be brutal in most parts of Pakistan. With temperatures high enough to test the patience of a saint, food that calls for minimum effort and as little time in the kitchen as possible is obviously called for though this dragon fire summer heat usually does little to deter most of us Pakistanis from slaving over elaborate meals in hellishly hot kitchens because we are slaves to our tastebuds.

Rose crème brûlée is a pretty fuss-free dessert. It takes mere minutes to combine the few ingredients called for in the recipe, bake them and then let the fridge do the chilling and final setting. It is the perfect summer dessert. I make it year round.

The Raspberry Rose Pots de Creme recipe uses rose water for flavour; I still haven’t found the kind of rose water that I’d like to put in a dessert. The search continues.

4 Tips For Making A Beautiful Rose Crème Brûlée

  • Red rose syrup, very popular in Pakistan for making cooling summer drinks was a revelation when I added it to the crème brûlée mixture.
    The amount I use in the recipe adds a lovely but subtle rose flavour and pretty pink color.
    It is a very heady syrup and too much of it can be quite overpowering so you have been warned.
  • I’ve used raspberries to garnish the rose crème brûlée because of the Raspberry Rose Pots de Creme inspiration but strawberries look pretty and go well with it too.
    The two-toned rose petals are from a rose bush planted by my Dad in my home garden.
  • You can caramelize the sugar under a hot grill in the oven for a few minutes but I highly recommend getting a kitchen torch for this, which is quite inexpensive and fairly easily available.
  • And in order to get the kind of picture perfect, evenly blistered crème brûlée top that one sees on Pinterest and blogs and in cookbooks and food magazines, use granulated brown sugar or demerara sugar and a kitchen torch.
    I will forever be grateful to Nigella Lawson, the ultimate domestic goddess, for this priceless tip.

This recipe was featured in the first issue of “My Kisan Kitchen” a Pakistani food and lifestyle magazine.


Rose Crème Brûlée

Recipe Type: Dessert    Author: Alice In Eatland
Prep Time: 10 Minutes    Cook Time: 20 Minutes    Total Time: 30 Minutes    Serves: 2


Creamy pink rose flavoured crème brûlée. If you like traditional crème brûlée, you will love this lusciously exotic take on the classic dream dessert.


INGREDIENTS

  • 2 egg yolks
  • 2 tbsp red rose syrup (the kind used to make red summer drinks – I like Rooh Afza)
  • 1 pack (around 200 ml) cream
  • 1/2 a vanilla bean or 1 tsp good vanilla essence or extract
  • A few tablespoons granulated brown sugar or demerara sugar
  • Fresh raspberries, strawberries or any other fruit
  • Fresh rose petals and leaves, thoroughly washed and dried

METHOD

  1. Preheat oven to 180 degrees C (350 degrees F).
  2. Stir yolks and red rose syrup together until combined.
  3. Put the cream in a pan, scrape in the vanilla seeds from the pod or add the vanilla essence or extract, stir and bring to the boil while stirring.
  4. Remove from heat and whisk into the yolk and red rose syrup mixture until well mixed.
  5. Strain this mixture into 2 ramekins or a single ovenproof dish.
  6. Put these in a larger ovenproof pan and carefully pour boiling water inside the larger pan until it comes nearly halfway up the sides of the ramekins/dish.
  7. Place pan in preheated oven.
    Check after 15-20 minutes; shake the ramekins/dish gently – if the sides look set and the centre still wobbles, the custard is ready. If it needs more time, check after 2-5 minute intervals. Do not over-bake.
  8. Remove from oven and cool to room temperature and then chill in the fridge for at least 4-6 hours.
  9. When ready to serve, take out ramekins from fridge, sprinkle enough granulated brown sugar or demerara sugar to form an even layer all over. Tilt and gently shake the ramekins to help the sugar spread evenly. Make sure the entire surface of the custard is covered with sugar.
  10. Caramelize the sugar with a kitchen torch until burnished and dark.
  11. Put back in the fridge for at least 5 minutes to let the custard cool down from the heat.
  12. Garnish with fresh fruit and decorate with fresh rose petals and leaves just before serving.

Filed Under: Desserts, Recipes Tagged With: Baking, Dessert, Romantic, Spring, Summer, Valentine's Day

  • « Go to Previous Page
  • Page 1
  • Interim pages omitted …
  • Page 3
  • Page 4
  • Page 5

Primary Sidebar

ABOUT ALICE

Favorite recipes, fun eating out experiences and some wonderful food memories from Lahore, Pakistan.

ALICE’S TOP PICKS

Patisserie at Mocca Coffee Gulberg

Mocca Coffee Gulberg

Green Goddess Hummus

Green Goddess Hummus

Spicy Sri Lankan Cheese Omelette

Spicy Sri Lankan Cheese Omelette

Chocolate Cobweb Cupcakes

Chocolate Cobweb Cupcakes

Tags

Autumn / Fall Baking Budget-Friendly Cafe Chocolate Christmas Daharki Desi Dessert Dinner Easter Eatery Freezer Friendly Halloween Lunch Pakistani Restaurant Romantic Soup Spring Starter Summer Valentine's Day Vegan Vegetarian Winter

Tags

Autumn / Fall Baking Budget-Friendly Cafe Chocolate Christmas Daharki Desi Dessert Dinner Easter Eatery Freezer Friendly Halloween Lunch Pakistani Restaurant Romantic Soup Spring Starter Summer Valentine's Day Vegan Vegetarian Winter

Categories

  • Breakfast & Brunch
  • Budget Friendly
  • Condiment
  • Desserts
  • Drinks
  • Eateries
  • Homemade Cheese
  • Homemade Cheese
  • Mains
  • Recipes
  • Snack & Starter
  • Uncategorized

ABOUT

Hello! If like me, you too love to cook, bake and eat then you're in the right place. From heartwarming, soul-satisfying comfort food to light, fresh and deliciously healthy meals, everything here is made with the utmost TLC :)

Tags

Autumn / Fall Baking Budget-Friendly Cafe Chocolate Christmas Daharki Desi Dessert Dinner Easter Eatery Freezer Friendly Halloween Lunch Pakistani Restaurant Romantic Soup Spring Starter Summer Valentine's Day Vegan Vegetarian Winter

Copyright © 2025 · Foodie Pro Theme by Shay Bocks · Built on the Genesis Framework · Powered by WordPress