• Skip to primary navigation
  • Skip to main content
  • Skip to primary sidebar

Alice In Eatland

Recipes . Eateries . Inspiration

  • Recipe Index
  • Eateries

Recipes

Cheesy Masala French Toast

May 22, 2017 by aliceineatland Leave a Comment

Cheesy Masala French Toast


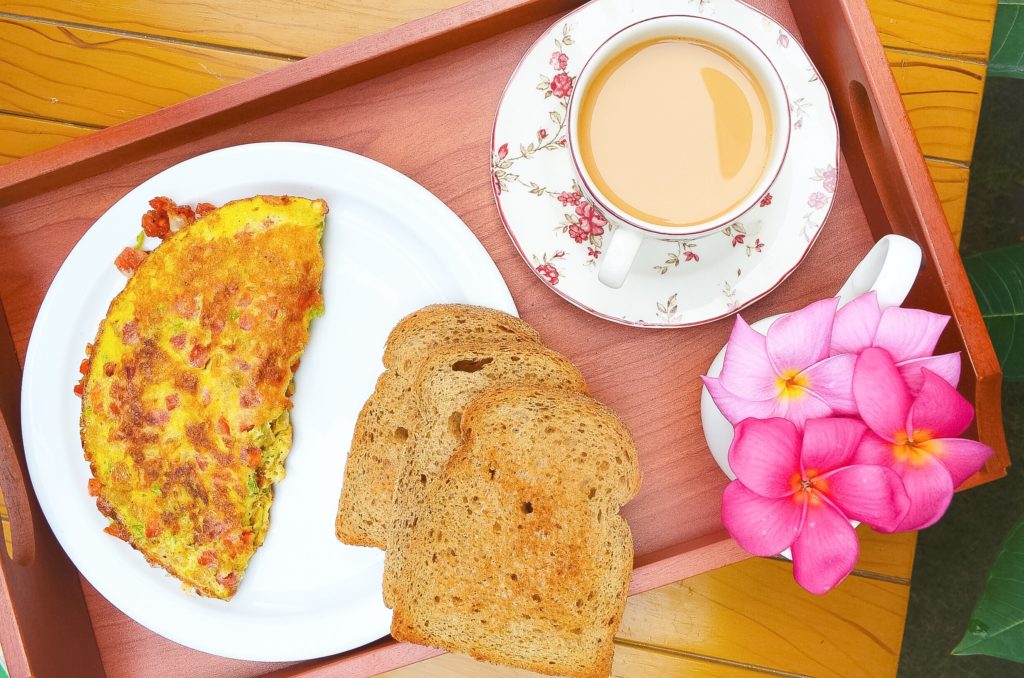
If eggs and toast are the ideal components of an enjoyable breakfast for you, then Cheesy Masala French Toast will become one of your favourite ways to partake of the most important meal of the day.

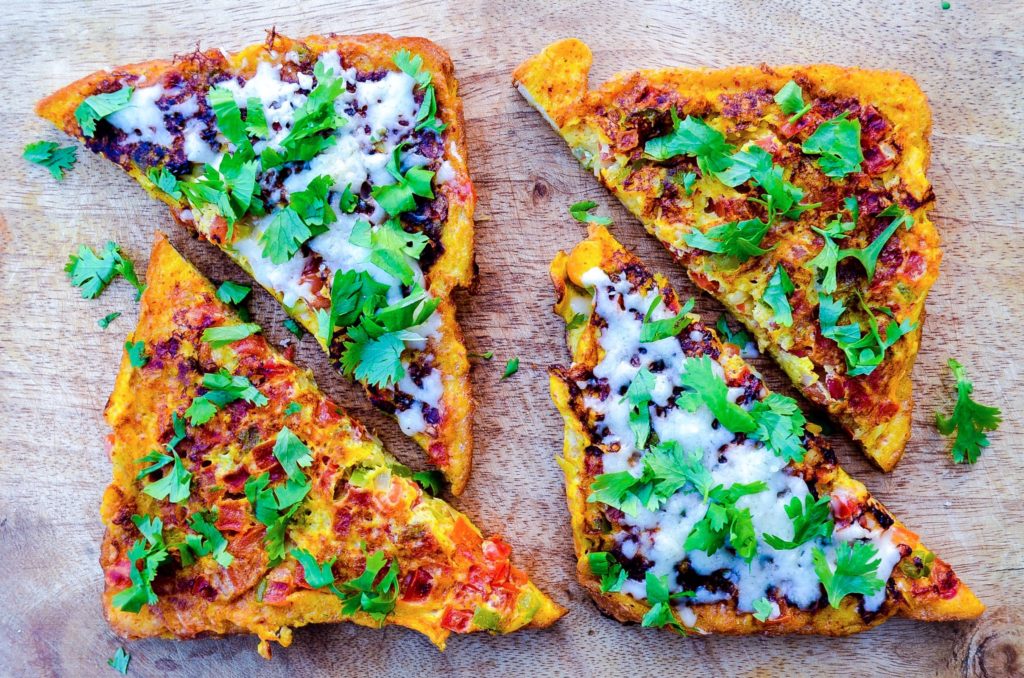
Basically Cheesy Masala French Toast is just what it sounds like – a savoury and spicy desi version of the traditional sweet French toast. It is an ingenious take on the enduring breakfast classic and is fairly simple and also quick to make if you do the little prep work required a bit in advance.

If you get your cheese grated and your vegetables chopped beforehand, by the time you are ready to actually prepare breakfast, your Cheesy Masala French Toast will take just a couple of minutes to put together.

Cheesy Masala French Toast

After going through some great recipes for Masala French Toast on Pinterest, particularly the one by Archana’s Kitchen, I added my own tiny little twist to it by making it a cheesy one because I believe that eggs and cheese are one of those delicious culinary matches made in food heaven.

Masala French Toast is epic enough as it is. But for a cheese fiend like me, grated cheddar in and on it takes things to the next level.

This is obviously a great breakfast and brunch idea and like many of my breakfast favourites, I also love Cheesy Masala French Toast as an occasional breakfast for dinner option too.

This Cheesy Masala French Toast recipe is more or less a guide and the kind of recipe that you make your own by adjusting the spices and flavourings according to your palette. How many toasts you get out of it depends on the size of the eggs and on how big or small the bread slices you use are. Definitely add black pepper before serving and use the red chilli flakes only if you want an extra fiery kick to your savoury French toast.

Cheesy Masala French Toast


Cheesy Masala French Toast


Recipe Type: Breakfast & Brunch    Author: Alice In Eatland
Prep Time: 10 Minutes    Cook Time: 10 Minutes    Total Time: 20 Minutes
Serves: 1 – 2


A savoury and spicy desi take on the classic sweet French Toast, this Cheesy Masala French Toast will become a breakfast favourite once you try it!


INGREDIENTS

  • 2 tablespoons finely chopped spring onion or regular onion
  • 1 large tomato, seeded and finely chopped
  • 1 – 2 green chillies, seeded and finely chopped
  • Oil for frying
  • 2 eggs
  • 4 tablespoons milk
  • Salt
  • 1/4 teaspoon turmeric
  • 1/2 teaspoon red chilli powder
  • 2 – 4 tablespoons grated Cheddar cheese
  • 2 – 4 slices of bread
  • Finely chopped fresh coriander leaves to garnish
  • Extra grated Cheddar cheese for topping
  • Freshly milled black pepper
  • Red chilli flakes


METHOD
1. Combine the chopped onion, tomato and green chillies together.
2. Heat the oil in a non-stick frying pan.
3. Beat the eggs with the milk, salt, turmeric, red chilli powder and grated cheese.
4. Keep in mind that you want the flavours of this egg and milk mixture to be a bit pronounced. If it is not a little strongly spiced, it might make your finished toast taste a tad bland.
5. Dip the bread slices on both sides with the egg mixture and place into the hot frying pan over medium heat.
6. Spread the top of the bread slices with the chopped mixed vegetable mixture and pour a few teaspoons of egg mixture from the mixing bowl onto the vegetables to coat them as evenly as possible.
7. When the bottoms of the toasts seem golden, flip them carefully and quickly onto the other side and cook until golden.
8. Remove to a serving plate and sprinkle a little extra grated cheese, extra coriander, freshly milled black pepper and chilli flakes, if using.
9. Serve with strong hot tea.
10. Enjoy!

Filed Under: Breakfast & Brunch, Recipes

Rajasthani Garlic Chutney

April 25, 2017 by aliceineatland Leave a Comment

…

Read More »

Filed Under: Condiment, Recipes

Instant Green Chilli Pickle

March 4, 2017 by aliceineatland Leave a Comment

Instant Green Chilli Pickle

Instant Green Chilli Pickle is the perfect accompaniment to any desi meal. Delicious with curry, paratha, daal chaawal or almost any other main dish, it packs a mild but pleasant punch and tastes amazing.

Unlike most traditional Pakistani pickles, Instant Green Chilli Pickle is quick and easy to make as you can prepare it on the side while your main meal is cooking or simmering on the stove – yes, it is that instant.

Instant Green Chilli Pickle

I love fresh green chillies and I think my fondness for them stems from the time when I was maybe 6 – 7 years old and happened to watch my Dad munch on a big fresh green chilli.

Dad, seeing me watch him, picked up another green chilli and offered it to me assuring me it wasn’t hot at all but very tasty. I was obviously apprehensive but I trusted my Dad much more than I feared the wrath of green chillies so I went ahead and bit into the chilli.

I was pleasantly surprised at how it was nowhere near hot (this was obviously a milder than mild batch of green chillies otherwise my Dad would’ve never offered me any) and had my first appreciative taste of the actual flavour of fresh green chillies. I have been hooked onto fresh green chillies, both the hot and mild varieties, ever since that day.

Instant Green Chilli Pickle

I have to thank Binjal Pandya of the beautiful blog “Binjal’s Veg Kitchen” for her easy peasy and mouthwatering Instant Green Chilli Pickle recipe. This blog is so gorgeous and it makes me want to cook everything on there!

As a general rule, the smaller the chilli the hotter its strength, though I have come across a few large sized green chillies in life that have literally knocked my socks off with their potent hotness.

…

Read More »

Filed Under: Condiment, Recipes

Persian Love Cake Doughnuts

February 13, 2017 by aliceineatland Leave a Comment

Persian Love Cake Doughnuts

Post Updated: 07.12.23

Persian Love Cake Doughnuts: come fall in love with the dreamiest doughnuts ever!

These romantically named little beauties really do live up to their name: stunning in appearance and a sheer delight taste wise.

Persian Love Cake Doughnuts: The Discovery

I first came across Persian Love Doughnuts in the dreamy party and entertaining book “Celebrate” by the lovely Lauren Conrad and they had me intrigued so much that I decided there and then that these would be my next Valentine’s Day dessert.

Persian Love Cake Doughnuts

Persian Love Cake Doughnuts: The Inspiration

Turns out that these little doughnuts are derived from classic Persian Love Cake, a delicious pistachio and rose water flavored cake.

Add other additional variations to the mix such as cardamoms, saffron etc. and you have what I like to call “Eastern Exoticism” in dessert form. Bliss.

Persian Love Cake Doughnuts: The Recipe

The base recipe for these is by Aimee Twigger of Twigg Studios in which she makes a Persian Love Cake recipe and instead of baking it in a cake pan, pipes it into doughnut molds – genius!

Persian Love Cake Doughnuts

So I adapted the recipe for her Persian Love Cake Doughnuts (which you can find here) very slightly and I am very happy with the results.

The cake part has classic pound cake proportions of equal amounts of butter, sugar and flour that make for a universally pleasing cake.

Persian Love Cake Doughnuts: The Flavours

The combination of pistachios, rose, cardamom and saffron take this simple cake to an entirely different level.

It may sound fanciful but honestly, these ingredients gives these little Persian Love Cake Doughnuts incredible depth and a pleasingly heady scent, both of which, conjure up images of what in my mind, were exotic, far flung places such as Isfahan and Samarkand that I would read about in books as a child.


Persian Love Cake Doughnuts

Persian Love Cake Doughnuts: The Adornment

The Lemon Glacé Icing provides a wonderfully tart contrast and helps the toppings stay in place.

The fresh rose petals on top obviously make things more aromatic and I’ve used homegrown roses from my garden to decorate the doughnuts and as “props” for the photos.

The chopped pistachios that these beauties are topped with give a nice extra nuttiness while providing vivid green adornment.

Savour these Persian Love Cake Doughnuts on Valentine’s Day or any other special occasion.

Make them with love and eat them with joy!

Persian Love Cake Doughnuts

‏

Persian Love Cake Doughnuts

Recipe Type: Dessert    Author: Alice In Eatland
Prep Time: 30 Minutes    Cook Time: 20 Minutes    Total Time: 50 Minutes
Serves: 10 – 12


Persian Love Cake Doughnuts: easy recipe for these incredibly delicious, gloriously fragrant and absolutely stunning beauties.


INGREDIENTS


  • 50 grams pistachios
  • 1 tbsp warm milk
  • A big pinch of saffron strands
  • 100 grams flour
  • 1 tsp baking powder
  • 6-8 pods green cardamom
  • 100 grams salted butter, soft
  • 100 grams caster sugar or superfine sugar
  • 2 eggs
  • 1 tsp rose water OR 1/4 tsp rose essence


METHOD

  1. Preheat oven to 350 degrees F / 180 degrees C.
  2. Butter and flour a 12 hole mini doughnut pan.
  3. Grind the pistachios in a coffee grinder or food processor until finely powdered. Set aside.
  4. Add the saffron to the warm milk in a small cup and set aside.
  5. Combine the flour and baking powder in a bowl.
  6. Grind the cardamom pods in a coffee grinder. Sieve.
  7. Cream the butter and sugar a few minutes until creamy. Add rose water or rose essence and eggs one at a time alternately with flour mixture.
  8. Add remaining flour, powdered pistachios, ground (and sieved) cardamoms and the saffron milk mixture.
  9. Put this mixture into a piping bag snipped at the tip or fitted with a plain round nozzle (I used a large Ateco 809 tip) and pipe the batter into the doughnut molds.
  10. You may have some leftover batter after filling all the mini doughnut molds. I used mine to bake a few Persian Love Cake Cupcakes!
  11. Bake 15 – 20 minutes or until a toothpick inserted in the doughnuts comes out clean.
  12. Remove from oven and cool 5 minutes.
  13. Loosen the edges with a small knife and invert doughnuts onto a wire rack.
  14. Re-invert and cool completely.
  15. Trim any edges if necessary to get a neat round shape.


To decorate with Lemon Glacé Icing:

  1. Stir 100 grams of icing sugar with 1 – 2 tablespoons or more of fresh lemon juice until of pouring consistency.
  2. Place a sheet of wax paper or parchment paper on a cookie sheet, tray or flat work surface.
  3. Place the cooled doughnuts onto the sheet.
  4. Drizzle the Lemon Glacé Icing with a spoon over the doughnuts.
  5. Decorate with fresh snipped or chopped rose petals (thoroughly washed and dried) and finely chopped pistachios.


Filed Under: Desserts, Recipes Tagged With: Baking, Dessert, Romantic, Spring, Valentine's Day

Kaju Butter Masala

January 21, 2017 by aliceineatland Leave a Comment

Kaju Butter Masala

Kaju Butter Masala

Kaju Butter Masala is the kind of dish that is usually made as a side dish but mostly ends up being the star of the show. If you adore cashews, you will fall in love with this regally rich and royally elegant curry.

Butter Masala dishes such as the popular Chicken Butter Masala and Paneer Butter Masala are steadily gaining popularity in Pakistani home and restaurant cooking and rightly so – the rich gravy flavoured with Mughlai style spices truly makes these dishes fit for royalty.

Kaju Butter Masala

I personally feel that Kaju Butter Masala is the most outstanding variation of the Butter Masala genre and makes a particularly fabulous dish when entertaining desi style. Amazing entirely on it’s own as a main, Kaju Butter Masala makes an impressive vegetarian entrée if you are serving a desi menu and looking for veg option ideas.

My family is so crazy about cashews that sometimes we have to hide any cashews in the house from ourselves (if that makes any sense) as we can polish off an alarmingly copious amount of those utterly delish nuts in record time. So if like us, you too adore cashews, then Kaju Butter Masala is the perfect curry for you.

Kaju Butter Masala

Some people prefer a thicker Kaju Butter Masala gravy while those like me prefer a slightly looser gravy to mop up with with garlic naan or lachay daar paratha. So feel free to keep the gravy as thick or thin as you like.

I follow the recipe by Veg Recipes of India to make Kaju Butter Masala with barely any tweaks. This is the place I turn to for the most outstanding desi vegetarian recipes and you can find the original Kaju Butter Masala recipe by the wonderful Dassana Amit  here.

Serve Kaju Butter Masala as part of an elaborate desi meal or simply by itself accompanied by hot parathay, roti or naan.

Kaju Butter Masala


Kaju Butter Masala

Recipe Type: Main    Author: Alice In Eatland
Prep Time: 20 Minutes    Cook Time: 30 Minutes    Total Time: 50 Minutes    Serves: 2 – 4


A sublime cashew curry, gloriously creamy and spectacularly seasoned! This Kaju Butter Masala is surprisingly simple to make and insanely delicious to eat!


INGREDIENTS

  • 4 tbsps butter
  • 4 large tomatoes, seeds removed and chopped
  • 1 bay leaf
  • 1 1/2 cups water
  • 2 large garlic cloves, finely minced, grated or microplaned
  • 1.5 inch piece ginger, peeled and grated or microplaned
  • 20 roasted cashews, powdered in food processor or coffee grinder
  • 2 medium green chillies
  • 1/2 tsp Kashmiri / degi chilli powder or red chilli powder
  • 1 tsp Kasuri methi / dry fenugreek leaves
  • Salt
  • 1/2 tsp garam masala
  • 2 tbsps cream
  • 1/2 – 1 cup roasted cashews
  • Fresh coriander leaves to garnish


METHOD

  1. Heat 1 tablespoon butter and saute the cashews until they begin to change colour, being careful not to burn them. Remove sauteed cashews from pan and set aside.
  2. Heat another tablespoon of butter in the same pan and add the bay leaf. Saute around 10 seconds.
  3. Add the chopped tomatoes, stir and add 1/2 a cup of water. Cover and simmer until the tomatoes are soft and mash easily when pressed with the back of a cooking spoon.
  4. Remove tomato mixture from heat and cool to room temperature. Remove and discard the bay leaf.
  5. Process or blend the cooled tomato mixture until smooth.
  6. Heat the remaining butter over medium heat in the same pan and add the garlic and ginger.
  7. Stir for 10 -15 seconds and add powdered cashews. Stir until the mixture smells nutty and begins to colour slightly. Be careful not to over brown or burn.
  8. Stir in the pureed tomatoes, Kashmiri/degi chilli powder or red chilli powder.
  9.  Then add the water and green chillies. Cover and simmer the gravy, stirring occasionally until it is as thick as you prefer.
  10. Season with salt and add garama masala.
  11. Crush the Kasuri methi/dry fenugreek leaves between your palms and add to the gravy.
  12. Finally stir in the cream until combined and remove from heat.
  13. Stir in most of the sauteed cashews, reserving a few to garnish.
  14. Top with with fresh coriander leaves and reserved cashews.

Filed Under: Mains, Recipes

Christmas Cake Recipe

December 24, 2016 by aliceineatland 2 Comments

Rich Fruit Christmas Cake

christmas cake

Christmas Cake Recipe (updated 18.12.23)

A classic homemade Christmas Cake has to be one of the nicest gifts you can give your family and close friends.

It is the ultimate Christmas present and people are always pleased that you went the extra mile and baked them a Christmas classic.

A rich fruit Christmas Cake is great for gift giving but also great to have on hand at home during the festive season.

Like many families that celebrate Christmas, it is an important part of our festive Christmas table that is especially set up for guests visiting during this very special season.

christmas dessert recipe

Christmas Cake: The Inspiration

Since Christmas time can be crazy hectic for many people, you want a no-fuss recipe that requires minimal effort and delivers maximum results.

For me, a good Christmas Cake recipe is fuss-free and makes a cake that tastes something like a good rich fruit wedding cake or an old-fashioned Plum Cake. Bonus points if it looks like a traditional Dundee Cake.

Rich Fruit Celebration Cake recipe by Mich Turner of the fabulous “Little Venice Cake Company” is the basis of my Christmas Cake recipe.

I discovered Mitch Turner, and a few other skilled wedding cake bakers, on the tv show “The Great Cake Bake” on the now defunct channel Wedding TV UK, over a decade or so ago. What a master of her craft!

Her recipe promised a deep, dark, moist fruit cake with a flattish top ready to be covered in marzipan and that is exactly what it delivered.

Rich Fruit Christmas Cake

I have adapted this Christmas Cake recipe very slightly from Mich Turner’s. A photo of this lovely retro looking Dundee Cake on Pinterest inspired this almond and glacé cherry cake pattern.

Rest assured that this Christmas Cake recipe gives you a deep, spicy and decadent cake that tastes of Christmas itself!

Christmas Cake: When Good Things Come In Small Packages

My reason for making smallish Christmas Cakes is a fairly practical one; a well made rich  fruit cake is a joy to eat, but is best enjoyed in small quantities as it is indeed, quite rich.

I don’t know anyone who eats Christmas Cake in copious quantities.

Moreover, I’ve seen leftover Christmas cake lying around and drying around far too many times and in far too many homes and it literally breaks my heart.

Also with quite a few other delicious Christmas goodies and treats competing for attention at homes celebrating Christmas, I feel small sized cakes are best for gift giving.

However, you do you, so feel free to bake a bigger cake should you wish, adjusting the ingredients, cake pan size and baking time accordingly.

Christmas Cake: Spreading Joy Beyond Christmas

This cake makes a pretty awesome New Year’s celebration cake.

Or any special occasion celebration cake really; a milestone wedding anniversary such as a silver or golden one, calls for a uniquely special cake, such as this one.

Christmas Cake: Where To Buy The Ingredients From

As far as sourcing some of the special ingredients required to bake this Rich Fruit Christmas Cake such as the glacé cherries & the orange peel, online stores are your best bet.

In the US, you may find everything you need on Amazon.

Daraz.pk most probably has every ingredient available to make this cake in Pakistan.

Sethna Store in Empress Market is the place where Karachi folks can find them.

I have vague memories of a few stores in Saddar that stocked these supplies – I will ask my Mother if she remembers the names of those shops and will update the post if she does.

For people wishing to bake this cake in Lahore, head to The Bake Shop or Metro and you will find most ingredients called for in the recipe.
Treacle and molasses can be found at Esajee’s (DHA).

Christmas Cake: Fruit Soak Options

Your choice of the liquid that is used to steep the fruit will give it a slightly different flavour profile and affect the colour of the cake somewhat as well.

Lighter coloured juices will obviously give the cake a lighter tone whereas darker juices, tea and coffee will obviously impart a deeper hue.

However the colour turns out, be assured that your cake will look and taste wonderful.

Christmas Cake: Patience Will Be Rewarded

This is an ingredient heavy (read “chock full of dried fruit”) Christmas Cake recipe.

Hence the cake is pretty delicate when freshly baked so I would suggest that once completely cool, let it sit airtight and uncut for 2-3 days.

That not only makes the cake a bit firm and easier to cut but also gives the many flavours of the different fruits and spices time to harmoniously blend and settle together.

The taste improves and gets far deeper, complex and better after a few days.

Christmas Cake: A Note On The Recipe Update

Originally, I would bake half the recipe in a 6” cake pan. The baked cake, though absolutely delicious, was on the thinner side as can be seen in the photos.

While this was fine with me, and was actually perfect for cutting dainty bite-sized Christmas Cake pieces to serve to guests, I began baking the full recipe in a 6” cake pan for a taller cake (and a more substantial slice when cut).

A taller cake definitely makes for a better presentation and that is my preferred way to bake this cake now.

I have updated the ingredient amounts to reflect that, which is something I regretfully forgot while updating the original post a few days ago, sorry!

Christmas Cake: Video Tutorial

I have very recently uploaded a video of the recipe on YouTube which can be viewed here.

Rich Fruit Christmas Cake


Christmas Cake

Recipe Type: Dessert    Author: Alice In Eatland
Steeping Time: 4 – 12 Hours
Prep Time: 20 Minutes    Cook Time: 60 Minutes    Total Time: 80 Minutes


Dark, moist and fruity – this easy and delicious Christmas Cake is the ultimate traditional holiday classic!


INGREDIENTS

  • 200 grams glacé cherries, chopped
  • 300 grams raisins, stemmed
  • 300 grams black currants, stemmed
  • 20 grams candied orange peel, chopped
  • 1/2 cup fruit juice (apple, orange, pineapple, grape or cranberry) OR black tea
  • 1 tbsp treacle or molasses
  • 160 grams butter
  • 160 grams brown sugar
  • 1/2 tsp vanilla essence or extract
  • 2 large eggs
  • 160 grams plain flour
  • 1/2 tsp baking powder
  • 2 (1/2″) sticks cinnamon (daarcheeni)
  • 1/4 of a whole broken nutmeg (jaiphal)
  • 2 small (1/2″ or so) blades mace (javitri)
  • 4 whole cloves (laung)
  • 1/2 tsp ginger powder
  • Whole blanched almonds, to decorate
  • Halved glacé cherries, to decorate

METHOD

  1. Pour your choice of liquid onto the raisins, glacé cherries, black currants and candied orange peel. Mix well, cover and let stand 6-12 hours or overnight at room temperature, stirring the mixture once half way through.
  2. Preheat oven to 170 degrees C / 338 degrees F.
  3. Line a square 6″ x  2″ pan or a round 6″ x 2″ pan with grease proof paper or foil. Butter and flour the lined pan well. Set aside.
  4. Place the cinnamon stick, nutmeg, mace and cloves in a coffee grinder and grind to a fine powder. Sieve through a fine strainer.
  5. Combine flour with the baking powder, ginger powder and the sieved ground spices and set aside.
  6. Put the butter and brown sugar in a small pan over medium heat and stir until butter melts. The butter and sugar will appear separated at first so keep stirring for a few minutes until they both become uniform.
  7. As soon as you see the mixture beginning to bubble gently in places, remove from the heat and pour into your mixing bowl.
  8. Cool mixture 5 minutes and then beat in the treacle or molasses until combined.
  9. Next beat in the egg and vanilla essence or extract.
  10. Mix in the combined flour, baking powder and spices.
  11. Finally fold in the soaked fruit with any remaining liquid.
  12. Turn mixture into your prepared pan and level the top as much as possible with the back of a tablespoon.
  13. Press the blanched almonds and halved cherries on the surface in flower shapes or any other decorative pattern.
  14. Bake around 40 – 60 minutes or until a wooden pick inserted near the center of the cake comes out clean and the top is brown and set.
  15. Remove cake pan from oven and place on a wire rack to cool to room temperature.
  16. Let cooled cake remain in the pan, cover airtight with foil and let sit overnight at room temperature.
  17. Remove the cake from pan, peel off the paper or foil lining and store airtight.
  18. This cake is best cut and eaten 2 – 3 days after being baked.

Filed Under: Desserts, Recipes Tagged With: Autumn / Fall, Baking, Christmas, Dessert, Winter

Chocolate Fudge Cake

November 5, 2016 by aliceineatland 6 Comments

Chocolate Fudge Cake

Chocolate Fudge Cake
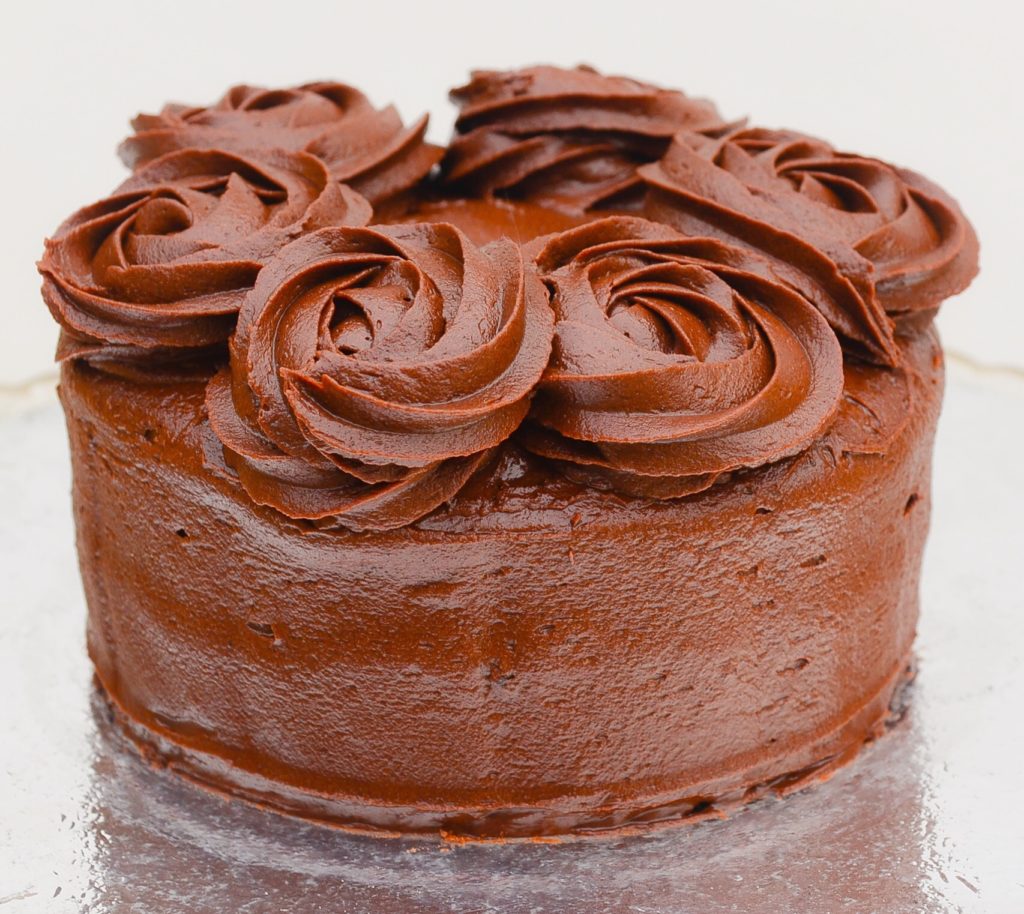
The moistest chocolate cake and the fudgiest chocolate frosting come together to make this super delicious Chocolate Fudge Cake. If you are a chocolate lover, then this cake will take you straight to chocolate heaven!

My previous post was about chocolate cupcakes with vanilla buttercream. I try to vary my posts as in one sweet and then one savoury post and so on and so forth but then this chocolate cake happened and I felt it was too yummy not to be shared. Hence here I am with another “sweet” post and another chocolate post at that which is funny considering what I’m going to reveal about myself in the next paragraph.

Unlike many women, I am, perhaps shockingly, not crazy about chocolate. As a child chocolate was admittedly, the ultimate flavour for me and chocolate bars, chocolate cakes and basically chocolate anything was my first love. Not anymore. I do like chocolatey things once in a while but it’s not something I would have all the time. Unless it is white chocolate, which I hopelessly adore to bits.

This Chocolate Fudge Cake is one of those few chocolatey things that even someone not fond of chocolate would find hard not to like. The cake part is deeply chocolate and moist plus the chocolate fudge icing is like eating a softened bar of milk chocolate; what’s not to love!

Chocolate Fudge Cake

Normally, I like to pair my chocolate cakes with contrasting flavoured frostings such as vanilla or coffee but this cake was requested by a close friend for his Mom’s birthday and the only cake that that particular family eats is chocolate cake. So I made them the one chocolate on chocolate cake that I really like which is this Chocolate Fudge Cake. It did look quite lovely in my humble opinion and I felt I must share it on my blog.

The chocolate cake is made using my all-time favourite moist chocolate cake/cupcake recipe that I wrote about in detail in my previous post. It is an easy, straightforward and foolproof recipe that results in amazingly moist and lusciously chocolatey cakes and cupcakes.

The chocolate fudge frosting is actually a cocoa-based frosting and is a breeze to make plus it tastes wonderful. I have adapted it very slightly from this recipe by “Chocolate, Chocolate and More”. I am not a big fan of ganache type frostings and call my taste buds unsophisticated but my heart still belongs to the basic old-fashioned cocoa frostings of childhood.

Chocolate Fudge Cake

I came across a photo of Pink Cherry Cake with Fudge Frosting by the bake queen “I Am Baker” sometime last year and instantly fell in love with how she had iced her cake. The frosting was done in an elegantly minimalist way with fudge icing rosettes crowning the cake and I knew I was going to try frosting a chocolate cake the same way one day. Well, I got my chance when I baked this Chocolate Fudge Cake; I am working on honing my cake frosting skills so one day I too can ice my cakes as flawlessly as “I Am Baker” does.

The best thing about this Chocolate Fudge Cake is that it reminds me of the chocolate birthday cakes my Mom would bake for my brother and I when we were kids. Since my Mom’s chocolate cake is the best chocolate cake in the world for me, anything that reminds me of it has to be a close second.

Chocolate Fudge Cake


Chocolate Fudge Cake

Recipe Type: Desserts    Author: Alice In Eatland
Prep Time: 10 Minutes    Cook Time: 50 Minutes    Total Time: 60 Minutes    Serves: 6 – 8


Chocoholics, one bite of this sinful Chocolate Fudge Cake will take you straight to chocolate heaven! Moist chocolate cake & fudgy chocolate frosting – yum!


MOIST CHOCOLATE CAKE:

INGREDIENTS

  • 1 cup milk
  • 4 tbsp white vinegar
  • 2 cups caster sugar or superfine sugar
  • 1 cup + 3/4 cup plain flour
  • 3/4 cup cocoa
  • 2 tsp baking soda
  • 1 tsp baking powder
  • 1 tsp salt
  • 2 large eggs
  • 1/2 cup oil
  • 1 tsp vanilla extract or essence
  • 2 tsp instant coffee
  • 1 cup boiling water


METHOD

  1. Preheat oven to 180 degrees C / 350 degrees F.
  2. Grease a deep round cake pan (I use an 8″ by 3.5″ round cake pan) or two 8″ or 9″ round cake pans (cake pans should be a bit deep as this batter rises!) and line with parchment paper. Grease and flour the paper. Or line cake pan(s) with aluminium foil and grease and flour the foil. Set aside.
  3. Stir the milk and vinegar together in a small cup or bowl to make buttermilk. Set aside.
  4. Combine all the dry ingredients, except coffee, in a bowl.
  5. Whisk the eggs. Stir the buttermilk and add to the eggs along with the oil and vanilla.
  6. Add the egg mixture to the dry ingredients and beat until well mixed.
  7. Stir the instant coffee into the boiling water and carefully stir into the cocoa mixture. Batter will be quite thin.
  8. Pour batter into prepared cake pan(s).
  9. Bake 30 – 40 minutes or until the cake has risen and a wooden pick inserted near the center of the cake comes out clean. This can take up to an hour depending on your oven.
  10. Let cake(s) cool in pan(s) for 10 minutes then turn out onto a wire rack. Invert so that the top of the cake(s) is up and cool completely.
  11. Your cake(s) might have a domed top so trim it off carefully with a long serrated knife and discard (by “discard” I mean eat with chai like I do).
  12. Now your flat topped cake is ready to be frosted.


CHOCOLATE FUDGE FROSTING:

INGREDIENTS

  • 1/2 cup salted butter (I use Lurpak’s Slightly Salted Butter)
  • 1 cup + 4 tbsp cocoa
  • 5 cups icing sugar
  • 2 tsp vanilla extract or essence
  • 4 tbsp cream
  • 4 tbsp milk
  • Extra milk


METHOD

  1. Melt butter in a small pan over low heat.
  2. Stir in cocoa so that the mixture forms a thickish paste.
  3. Add the remaining ingredients except extra milk into a mixing bowl and add the cocoa mixture.
  4. Beat well until smooth.
  5. Add extra milk if needed, a teaspoon at a time until frosting is of spreading consistency.
  6. Sandwich the cake(s) with about a third of the frosting and use the rest to frost the top and sides and to pipe out rosettes at the top.
  7. Pipe an additional layer of rosettes directly on top of the first set of rosettes for added height and a gorgeous effect. This is what I did.
  8. Store frosted cake airtight and serve at room temperature – please do not serve it cold straight from the fridge!


Filed Under: Desserts, Recipes Tagged With: Baking, Chocolate, Dessert

Chocolate Cobweb Cupcakes

October 24, 2016 by aliceineatland 2 Comments

Chocolate Cobweb Cupcakes

Chocolate Cobweb Cupcakes

Trick or treat! These chocolate cobweb cupcakes are absolutely delicious and a confirmed crowd pleaser. Make these for Halloween or for any day of the year really – they are as good to eat as they are to look at!

I adore this chocolate cupcake recipe because it is so easy and incredibly delicious plus it gives me the moistest chocolate cupcakes ever – dry cakes and dry cupcakes are one of my pet peeves!

The creamy vanilla frosting that these chocolate cobweb cupcakes are topped with is actually a crusting buttercream that tastes really lovely and is perfect for piping swirls, rosettes etc as it really holds its shape while remaining soft and creamy inside – this has to be my favourite recipe for pipeable frosting.

The fun cobweb toppers that the cupcakes are crowned with are made from melted chocolate and are a breeze to make!

Chocolate Cobweb Cupcakes

Growing up, Halloween was something we’d just read about in books or comics or watch on tv or movies. Thanks in most part to Hollywood, many of us knew of Halloween as the spookiest time of the year when folks don scary costumes and kids dress up in adorably spooky costumes or as their favourite characters from books, cartoons or tv shows and movies and go trick-or-treating for candy.

I am a big fan of all things “horror” be it scary movies, creepy stories, haunted houses – you name it. So you can imagine how the spookiest time of the year makes me feel. The late October autumn/fall weather adds an additional something to the atmosphere; I love it! Even if Halloween isn’t celebrated in Pakistan as such, at least those of us who want to enjoy it can do so in ways that make us happy, be it pumpkin carving, making scary costumes or coming up with cutely creepy food!

Chocolate Cobweb Cupcakes

The only time we actually kind of ‘celebrated’ Halloween was in the early ’90s in Daharki. A few Canadian engineers had been emlpoyed by Engro to help set up its new fertilizer plant that had been shipped from Canada. So they, along with their families, had relocated to the Engro Colony in Daharki from Canada until the new plant was up and running. It was Halloween, and the Canadians thought why not celebrate Halloween with the Pakistani residents of the colony and it was a great idea indeed.

Since there was obviously no “trick-or-treat” culture in the colony, the Canadian families arranged an evening Halloween party at the colony’s Club and everyone was invited. The Halloween celebration was more of a fancy dress party for us non-Canadians and it was a lot of fun.

There were some really nice things to eat at the party, made by the Club and I think some made by the Canadian ladies. As there are none of those huge gorgeous orange pumpkins growing in the middle of Sindh, the Canadians made do with what was available; they carved those classic scary Jack-o’-Lantern pumpkin faces on stocky little roundish green kaddus from the vegetable shop at the local Gulnar Market. Necessity truly is the mother of invention!

Chocolate Cobweb Cupcakes

The party was arranged within a day or so of being decided which left almost no time for anyone to think of or make any elaborate costumes. All the kids were in costume and by costumes I mean all of us more or less improvised with whatever we had lying around at home or could borrow from friends.  I went to the party dressed as a fairy. That decision was based solely on a shimmery green (the hue of green that was known as “bottle green” back then; haven’t heard that color described as such in decades!) dress that I owned and I think we created a makeshift wand for me to hold from a small cane stick with one of those decorative stars that you get at party decoration stores stuck at the top. So I was a fairy and a wingless one into the bargain as there was absolutely no time to make any DIY fairy wings.

Fast forward to the present and with that one Halloween celebrated long ago, there was not much after that and frankly there are still no Halloween celebrations as such apart from a few parties here and there. But in the last few years, social media and Instagram and Pinterest in particular, have literally brought Halloween to the rest of the world with the celebration becoming something exciting to look forward to. There is an amazing array of wonderful Halloween ideas such as for food, decor and makeup shared by bloggers, makeup artists and other insanely creative folks that has made the countdown to Halloween one of the most exciting times of the year, for me at least.

This year, I have decided to do the creepy-cool half skull makeup look made popular by the uber talented makeup artist Chrisspy that she posted on her YouTube channel back in 2014. Though I obviously cannot come even remotely close to matching her finesse and experience as a makeup artist, I think I did a pretty okay job practicing getting the half skull look to look decent enough, haha!  Fingers crossed for the final look on the day! You can watch Chrisspy’s tutorial here as she uses her mastery over makeup to transform her look in minutes.

Chocolate Cobweb Cupcakes

Just like Chrisspy, the sheer scale of talent and creativity of ideas, be it makeup, costume design, baking or anything really, on social platforms such as YouTube, Pinterest etc is nothing short of staggeringly impressive; so many great ideas and the fact that people share them in near microscopic detail to make it as easy as possible for anyone who might want to try them – how amazing is that! Thank you kind, helpful and crazily talented people for sharing your wonderful ideas and techniques so wholeheartedly!

I too wanted to do something in the spirit of Halloween (pun intended, hehe!). I had been wanting to put my go to chocolate cupcake recipe on the blog for a while so thought of making some Halloween-ish cupcakes to accommodate that idea. So I started browsing Pinterest for some spooky cupcake ideas and came across so many amazing Halloween cupcakes! It was hard to choose just one idea but these Pumpkin Chocolate Spiderweb Cupcakes by Bright-Eyed Baker frosted with orange colored frosting and topped with chocolate spiderweb toppers stood out as they were so arrestingly beautiful! So I decided that these would be my food inspiration for Halloween this year and that is how my chocolate cobweb cupcakes came to be.

Chocolate Cobweb Cupcakes

The chocolate cupcake recipe I use most is a chocolate cake recipe that was shared by someone back in Daharki during the late ’90s – early 2000s and was titled “Deep Chocolate Cake.” It is such a flavourful and supermoist recipe that I instantly fell in love with it. Years later I discovered it is actually the recipe for Hershey’s Black Magic Cake. It is pretty much the same recipe that Ina Garten used to make “Beatty’s Chocolate Cake” on an episode of “The Barefoot Contessa” so, if the recipe has her approval, then you know it must be pretty good.

The vanilla frosting recipe is a very slight adaptation of the wonderful Crusting American Buttercream Icing by Peggy Does Cake. It is a very good recipe, not overly sweet or too intensely buttery and the original can be found here.

I used orange coloured frosting for my Chocolate Cobweb Cupcakes plus the classic bewitching purple of Halloween, thanks to a post on Wilton’s Instagram earlier this month of chocolate cupcakes with purple frosting topped with mint green spiderwebs! Wilton has been posting some really fun Halloween ideas this month so you might want to check them out.

Chocolate Cobweb Cupcakes

So before we go on to actually making and decorating the cupcakes let’s keep the following in mind:

  • The first time I made orange icing for these cupcakes by mixing red and yellow gel food colors (both by AmeriColor) I added the red a little too enthusiastically which meant that I had to use A LOT of yellow to bring it to any semblance of orange. I did end up with a very vibrant, heart-stopping orange but also ended up thinning my frosting a bit – yes, even gel food colors, when used in copious amounts, can affect the texture of your frosting so note to self: Practice restraint when using food colors! You can obviously use orange food color for the frosting. AmeriColor’s “Electric Orange” seems to be a popular choice for bright orange frosting.
  • The chocolate cupcake toppers are very delicate. If you live in a place with a warmer climate it would be best to freeze the toppers until ready to serve and add them to complete your chocolate cobweb cupcakes right before serving. They’ll soften to room temperature fairly quickly.  Literally seconds after being placed on the cupcakes, the toppers began bending at the base which is the point where they’d been pushed into the frosting and finally, gently toppled over. The toppled cobwebs then softened and meltingly drooped over the frosting which kind of gave them a fairly cool look in a creepy sort of way, which if less pretty, was actually far more realistic as you can see in the photo above.
  • I discovered, rather very late in the day (after 2 attempts at making the chocolate cobwebs and having them topple over the cupcakes both times) that it is best to use chocolate that contains no cocoa butter to make the toppers as that kind of chocolate sets up firm and is not prone to softening just seconds after being placed on buttercreamed cupcakes. I used Hershey’s semisweet chocolate chips to make the cobwebs, which obviously contain cocoa butter, hence the super quick softening and yes I wish I had researched more before attempting to make the toppers. Candy coating or candy melts might work well too in creating firm toppers. I would still place the toppers atop the cupcakes just before serving to be on the safe side.
  • Serve the frosted chocolate cobweb cupcakes at room temperature. Store them airtight and if they’ve been in the fridge, allow them to come to room temperature before serving. Cold cupcake and cold frosting are not very nice, unless it’s a whipped cream frosted cupcake.

Chocolate Cobweb Cupcakes


Chocolate Cobweb Cupcakes

Recipe Type: Desserts    Author: Alice In Eatland
Prep Time: 30 Minutes    Cook Time: 20 Minutes    Total Time: 50 Minutes    Serves: 10 – 12


Moist chocolate cobweb cupcakes with swirls of creamy vanilla frosting – perfect for the spookiest time of the year or for any time of the year!


CUPCAKES:

INGREDIENTS

  • Around 12 – 14 (1.5″ base) cupcake liners/paper bake cups
  • 1/2 cup milk
  • 2 tbsp white vinegar
  • 1 cup caster sugar or superfine sugar
  • 1/2 cup + 1/4 cup + 1/8 cup plain flour
  • 1/4 cup + 1/8 cup cocoa
  • 1 tsp baking soda
  • 1/2 tsp baking powder
  • 1/2 tsp salt
  • 1 large egg
  • 1/4 cup oil
  • 1/2 tsp vanilla extract or essence
  • 1 tsp instant coffee
  • 1/2 cup boiling water


METHOD

  1. Preheat oven to 180 degrees C / 350 degrees F.
  2. Line cupcake/muffin pans with the cupcake liners/paper bake cups and set aside.
  3. Stir the milk and vinegar together in a small cup or bowl to make buttermilk. Set aside.
  4. Combine all the dry ingredients, except coffee, in a bowl.
  5. Whisk the egg. Stir the buttermilk and add to the egg along with the oil and vanilla.
  6. Add the egg mixture to the dry ingredients and beat until well mixed.
  7. Stir the instant coffee into the boiling water and carefully stir into the cocoa mixture. Batter will be quite thin.
  8. Pour batter into a measuring jug.
  9. Fill cupcake liners/paper bake cups with batter almost 3/4 full. I fill them nearly to the top with less than an 1/8 of an inch to spare at the top as I like my cupcakes to have nice high domed tops but if you’re making these for the first time, fill them 1/2 or 3/4ths full to see how they bake in your oven as every oven is different and you don’t want your cupcake batter spilling out and over while baking.
  10. Bake 18 – 20 minutes or until cupcakes are risen and a wooden pick inserted near the center comes out almost clean. Its okay if a few crumbs are sticking to the wooden pick. Try not to overbake.
  11. Remove baked cupcakes to a wire rack.
  12. Cool completely before frosting.


CREAMY VANILLA FROSTING:

INGREDIENTS

  • 200 grams salted butter (I use Lurpak’s Slightly Salted Butter), soft but cool
  • 1 tbsp water, at room temperature
  • 1 lb (around 450 grams) icing sugar, sifted/sieved
  • 1 tbsp cream
  • 1/2 tbsp vanilla extract or essence
  • Orange food colour (I used “Super Red” and “Electric Yellow” both by AmeriColor to make orange)
  • Purple food colour (I used “Violet” by Wilton)

METHOD

  1. Cream butter until creamy, fluffy and pale in colour.
  2. Add the water and beat until combined.
  3. Add the rest of the ingredients, except the food colours, and beat until smooth, thick and creamy.
  4. Divide the frosting equally into two and colour each half with the food colours.
  5. Pipe onto cooled cupcakes and store airtight.
  6. If storing in the fridge, allow your frosted chocolate cobweb cupcakes to come down to room temperature for 10 or so minutes before serving.


CHOCOLATE COBWEBS:

  1. Print out cobweb templates (I used the one available here by Candiquik – there are some cute bat and cat templates as well and these too would make pretty awesome chocolate toppers).
  2. Tape the cobweb printout on a flat cookie sheet or the backside of a flat tray.
  3. Lay a sheet of greaseproof or wax paper on top of the printout and tape it flat on top of it. You will be able to see the template design below.
  4. Fit a piping bag or a Ziploc bag snipped at one corner with a small plain writing nozzle/icing tip (I used tip number 4 by Ateco).
  5. Put 1 cup of dark or semisweet chocolate chips or chopped chocolate (whichever chocolate you use, make sure it has NO cocoa butter in it) in a bowl and microwave on high for 20 seconds. Stir and microwave again in 10 second increments, stirring every time until the chips are melted and smooth.
  6. Cool the melted chocolate a few minutes and put into the prepared piping bag.
  7. Carefully pipe out the chocolate over the wax paper covered templates, tracing out the pattern beneath. Don’t worry if you’re not super neat, as long as all the lines of each cobweb are connected by the chocolate.
  8. Once all the cobwebs have been piped, put the tray or cookie sheet in the fridge to set for at least half an hour.
  9. To remove cobwebs, carefully slide a thin spatula or thin flat butter knife under the cobwebs to dislodge them and carefully and quickly place them on top of the frosted cupcakes just before serving.

Filed Under: Desserts, Recipes Tagged With: Autumn / Fall, Baking, Chocolate, Daharki, Dessert, Halloween

Spicy Sri Lankan Cheese Omelette

September 29, 2016 by aliceineatland 2 Comments

Spicy Sri Lankan Cheese Omelette

Spicy Sri Lankan Cheese Omelette


Brighten up breakfast time with this deliciously spicy Sri Lankan cheese omelette, perfect for everyday or when you’re looking for a little extra something to spice up the most important meal of the day on a special occasion.

I vacationed in beautiful Sri Lanka in 2013. It is such a lovely country, with scenic beaches, gorgeous greenery and the most hospitable people. Having had such a wonderful time there, I hope to return again someday soon to explore more of its gorgeousness.


Spicy Sri Lankan Cheese Omelette

The bright and airy dining room at Mount Lodge Colombo opening onto a small and serene Zen-like garden area complete with small koi type fish swimming in stone ponds and a variety of green fronds


I have not been able to forget any of the delicious Sri Lankan food I had while there. I was lucky enough to stay at Mount Lodge Colombo which is a charming boutique hotel with a pleasing mix of colonial chic and Ceylonese aesthetic, away from the hustle and bustle of central Colombo.

I’m one of those people who will always prefer small, family run hotels over large chain hotels. Add tropical modernism and a seamless blend of indoor comfort incorporated with natural outside elements into the equation and I’m completely sold. Deciding on this organically stylish yet comfortingly homely boutique hotel was a rewarding decision – a restful stay, excellent food and outstanding hospitality.


Spicy Sri Lankan Cheese Omelette

The congenial caretaker Gamini and his wife Padmini, the fabulous cook


A lovely couple, Gamini and his wife Padmini, occupy one of the rooms on the ground floor of Mount Lodge. Gamini is the resident caretaker of the property while Padmini is the resident cook and prepares all guest meals to order at the hotel.

I fell in love with the scrumptious spicy Sri Lankan cheese omelettes that Padmini would lovingly make. Honestly I think I have had one of the best breakfasts ever at Mount Lodge Colombo; fresh tropical fruit, those amazing omelettes and thick rustic slices of toasted bread served with butter and jam and washed down with strong aromatic Ceylon tea – divine!

After years of coming back from Sri Lanka, I still could not forget Padmini’s cooking and her fabulous spicy cheesy omelettes.

So after trying to replicate her special omelettes without much success, I decided to e-mail Mount Lodge and request Padmini to please share her recipe if possible. I received a reply very promptly from Mr Benjamin Pereira who is the son of the couple that owns the hotel and is also the property’s manager. Within just two days of my e-mailing him he sent the omelette recipe that Padmini had very graciously agreed to share with me.


Spicy Sri Lankan Cheese Omelette

Breakfast time closeup at Mount Lodge Colombo – just look at that beautiful spread!


I’ve been making this spicy Sri Lankan cheese omelette nearly every other day ever since I got the recipe a month or so back. What’s more, it’s great for people like me who follow the “breakfast for dinner” mantra some days.

I have adapted the recipe very slightly from Padmini’s – you’ll see how the simple ingredient list and straightforward cooking instructions elevate the humble omelette into something fairly spectacular.


Spicy Sri Lankan Cheese Omelette

The Mount Lodge Colombo terrace, open to the elements yet perfectly private – a lovely spot to read a good book over a nice cup of tea or coffee


A few tips you might wish to consider before making this omelette:

  • This is a rich omelette so you can reduce the quantity of the butter called for in the recipe but please do not substitute the butter entirely with oil as the result, though still tasty, will just not be the same.
  • Use a good sharp tasting cheese to make your spicy Sri Lankan cheese omelette – I prefer a spicy cheddar. Just make sure you don’t go overboard with the cheese so that you can taste the delicately rich taste of the omelette itself and not just the overpowering taste of the cheese.
  • The butter that you use to cook the omelette in should preferably be the butter that you like to spread on your toast; I like Lurpak Butter for this.
  • Use the correct pan size to cook the omelette so that it does not turn out too thick or too thin. I use a 9″ non-stick pan to make this recipe.
  • Please do use fresh ground black pepper – it does make a difference.


Spicy Sri Lankan Cheese Omelette


Spicy Sri Lankan Cheese Omelette

Recipe Type: Breakfast & Brunch    Cuisine Type: Sri Lankan    Author: Alice In Eatland
Prep Time: 10 Minutes    Cook Time: 10 Minutes    Total Time: 20 Minutes    Serves: 1 – 2


Whip up a deliciously fluffy & incredibly easy Spicy Sri Lankan Cheese Omelette with this very special recipe right from the heart of Sri Lanka!


INGREDIENTS

  • 1 – 2 tbsp butter
  • 1/4 tsp cooking oil
  • 1 medium onion, finely chopped
  • 1 large tomato, seeds removed and cut into small dice
  • 1 – 2 green chillies, seeds removed and chopped finely
  • Salt
  • Fresh ground black pepper
  • 2 eggs
  • Grated cheese of choice
  • Toasted bread to serve


METHOD

  1. Beat the eggs in a bowl.
  2. Heat butter with oil in a small non-stick pan.
  3. Add onion, tomato and half the green chilli.
  4. Season with salt and black pepper.
  5. Saute on medium heat until onion begins to turn golden and the tomato softens.
  6. Stir in the remaining chopped green chilli and remove sauteed vegetable mixture from heat.
  7. Add half of the vegetable mixture to the beaten eggs. Reserve the other half and put the frying pan back on the heat.
  8. Pour the egg and vegetable mixture into the hot frying pan, tilting to help it spread evenly.
  9. Let cook until the omelette edges begin to firm up, then flip to cook the other side.
  10. Spread half of the top cooked side of the omelette with the vegetable mixture and sprinkle with grated cheese.
  11. Lift the other uncovered half of the omelette with a flat frying spoon or spatula and fold on top of the cheese and vegetable covered side.
  12. Remove omelette to serving plate.
  13. Serve your spicy Sri Lankan cheese omelette at once with crusty bread and butter.

Filed Under: Breakfast & Brunch, Recipes

Green Goddess Hummus

August 25, 2016 by aliceineatland Leave a Comment

Green Goddess Hummus

Green Goddess Hummus

Take regular hummus up a notch by making it refreshingly herby and spectacularly green – this delicious Green Goddess Hummus makes a super tasty snack or a super yummy starter!

The first time I had (and made) hummus was years and years ago in Daharki.

Back then hummus was non-existent on local restaurant and café menus unlike now, so people who wanted to have it would make it themselves.

image1 (12)

Prior to life in London, I had no idea what “flavoured” hummus was.

Most people are purists when it comes to hummus and even though I agree that great tasting well-made plain hummus is a joy, there are a few flavor additions that do take it to the next level.

The first hummus I bought in London was a caramelized onion hummus from good ‘ol Sainsbury’s.

It was very good and a staple at my place, since popping over to the Middle Eastern restaurants and cafés along Edgware Road every other day for my hummus fix was not exactly a financially feasible option!

Now back in Lahore, I make it at home and experiment with additional flavors that might add a little extra oomph to the regular version.

Green Goddess Hummus

Hummus is a very personal thing.

Once you start making it yourself, you begin adjusting the ingredients called for in the basic recipe to get it to taste exactly the way you like it.

Regular or flavored, it is always a great idea to have it on hand for an enjoyable snack or as a pleasing party menu item.

I have to thank Cookie and Kate, one of my favorite blogs for fresh and healthy vegetarian recipes, for this Green Goddess Hummus.

This gorgeous blog is also the inspiration behind my wanting to start my own blog – many thanks to adorable little Cookie and to Kate Taylor for being an inspiration and also for her ever so helpful blogger resources and selfless guidance that made setting up the blog so much easier for a technologically challenged person like me!

You can find the original Green Goddess Hummus recipe by Cookie and Kate here.

Green Goddess Hummus

Green Goddess Hummus contains herbs that make up the classic Green Goddess salad dressing, namely parsley, tarragon and chives.

Since the dressing was primarily named for its lovely pale jade color, you can use any combination of fresh green herbs to make your Green Goddess Hummus.

I stuck with the classic Green Goddess salad dressing herbs since I am fond of them.

Use the herbs that you like; there’s no point in making Green Goddess Hummus with say, parsley, if you do not like it.

Fresh basil, coriander, mint etc are some of the many herbs that make a delicious green herby hummus.

I had to wait a long time before I could actually make this Green Goddess Hummus.

First of all, I could not find parsley.

This perennial herb was surprisingly not available anywhere in Lahore which reaffirmed my belief in the fact that I seriously need to start growing my own herbs again.

Green Goddess Hummus

A chance comment by the admin on one of the popular local food forums Pakistan Food Forum helped me discover Isloo Fresh, an Islamabad based supplier of organic herbs, vegetables and fruit.

They also supply other organic foods such as honey, ghee, eggs and chicken.

I was delighted to find that they not only had parsley but the flat leaf variety into the bargain.

I have seen only curly parsley at the local shops here and just adore the fresh grassiness of flat leaf parsley.

So I placed my order with Isloo Fresh and was rewarded with insanely fresh flat leaf parsley and chives shipped from Islamabad to Lahore, 24 hours later.

I got the tarragon from the Lahore stalwart Pioneer Store.

Green Goddess Hummus

I use both my food processor and my blender to make hummus.

I start with the food processor but since it is fairly old and I refuse to part with it for sentimental reasons, it doesn’t process the hummus into the creamy consistency that it should.

So I transfer the slightly chunky hummus to my blender and blend it into cloud-like oblivion, which is exactly how it should be.

The result is a creamy, fresh and gloriously green hummus that I can’t get enough of!

Serve Green Goddess Hummus with grilled pita bread cut into wedges, fresh vegetables crudités or, my favorite way to eat hummus – with Doritos.

Green Goddess Hummus


Green Goddess Hummus


Recipe Type:    Snack & Starter    Author: Alice In Eatland
Prep Time: 5 Minutes    Cook Time: 5 Minutes    Total Time: 10 Minutes    Serves 2 – 4


Jazz up regular hummus for a deliciously creamy and refreshingly herby taste with this light-as-a-cloud, herb specked Green Goddess Hummus!


INGREDIENTS

  • 2 tablespoons fresh parsley
  • 1 tbsp fresh tarragon leaves
  • 1 tbsp chopped fresh chives
  • 1 – 2 tbsp fresh lemon juice
  • 1 tbsp olive oil
  • 1 large clove garlic, finely grated
  • A few tablespoons water
  • 2 tbsp tahini
  • 1 cup canned or boiled chickpeas
  • 1/4 teaspoon ground cumin (optional)
  • Salt
  • Chopped fresh herbs to garnish
  • Extra virgin olive oil to drizzle


METHOD

  1. Put the fresh herbs, lemon juice, olive oil, grated garlic and a tablespoon or so of water in the bowl of a food processor or blender.
  2. Process or blend until the herbs are well chopped.
  3. Add tahini and process or blend again until the mixture looks smooth.
  4. Add the chickpeas (drained and rinsed, if canned), ground cumin (if using) and salt. Continue processing or blending until the hummus looks creamy.
  5. If needed, add a little water, a teaspoon at a time while blending or processing until the desired consistency of hummus is reached.
  6. Taste to check if more lemon juice or salt is needed.
  7. Serve hummus swirled in a bowl with a good drizzle of extra virgin olive oil and some chopped herbs, if liked.

Filed Under: Snack & Starter

  • « Go to Previous Page
  • Page 1
  • Page 2
  • Page 3
  • Page 4
  • Page 5
  • Go to Next Page »

Primary Sidebar

ABOUT ALICE

Favorite recipes, fun eating out experiences and some wonderful food memories from Lahore, Pakistan.

ALICE’S TOP PICKS

Rose Crème Brûlée

Rose Crème Brûlée

Three Cheese Roasted Chilli Bread Pudding

Patisserie at Mocca Coffee Gulberg

Mocca Coffee Gulberg

The Paloma

The Paloma

Tags

Autumn / Fall Baking Budget-Friendly Cafe Chocolate Christmas Daharki Desi Dessert Dinner Easter Eatery Freezer Friendly Halloween Lunch Pakistani Restaurant Romantic Soup Spring Starter Summer Valentine's Day Vegan Vegetarian Winter

Tags

Autumn / Fall Baking Budget-Friendly Cafe Chocolate Christmas Daharki Desi Dessert Dinner Easter Eatery Freezer Friendly Halloween Lunch Pakistani Restaurant Romantic Soup Spring Starter Summer Valentine's Day Vegan Vegetarian Winter

Categories

  • Breakfast & Brunch
  • Budget Friendly
  • Condiment
  • Desserts
  • Drinks
  • Eateries
  • Homemade Cheese
  • Homemade Cheese
  • Mains
  • Recipes
  • Snack & Starter
  • Uncategorized

ABOUT

Hello! If like me, you too love to cook, bake and eat then you're in the right place. From heartwarming, soul-satisfying comfort food to light, fresh and deliciously healthy meals, everything here is made with the utmost TLC :)

Tags

Autumn / Fall Baking Budget-Friendly Cafe Chocolate Christmas Daharki Desi Dessert Dinner Easter Eatery Freezer Friendly Halloween Lunch Pakistani Restaurant Romantic Soup Spring Starter Summer Valentine's Day Vegan Vegetarian Winter

Copyright © 2025 · Foodie Pro Theme by Shay Bocks · Built on the Genesis Framework · Powered by WordPress