• Skip to primary navigation
  • Skip to main content
  • Skip to primary sidebar

Alice In Eatland

Recipes . Eateries . Inspiration

  • Recipe Index
  • Eateries

Recipes

Restaurant Style Salsa, Guacamole and Queso Blanco Dip

May 5, 2018 by aliceineatland Leave a Comment

Restaurant Style Salsa, Guacamole and Queso Blanco Dip

Restaurant Style Salsa, Guacamole and Queso Blanco Dip

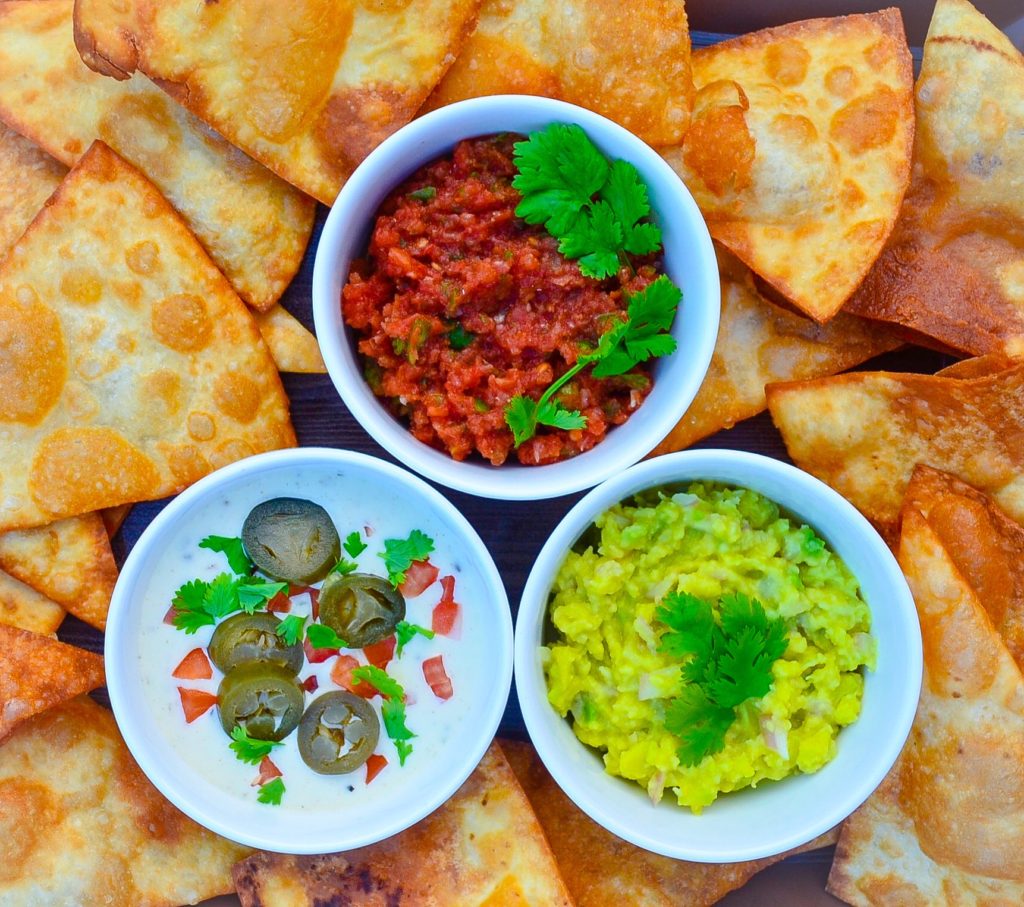
There has been no looking back since I started making restaurant style salsa, guacamole and queso blanco dip at home. These taste phenomenal and are unlike anything you’d find in a jar.

I literally had that “Where have you been all my life?” moment the second I took my first taste of each of these dips. To state that this salsa, guacamole and queso blanco dip are all three of them incredibly good is an understatement – at least for me!

The salsa is piquant with the kind of depth that I used to find was hard to replicate outside a restaurant. It is a breeze to put together as I usually have most of the ingredients it requires on hand.

Guacamole is best made right before you plan on eating it and benefits tremendously from generous quantities of salt and lime or lemon juice. Some recipes call for the addition of tomato as well but I choose not to add it.

The queso blanco dip is rich and creamy but the gentle heat and slight tartness from finely chopped pickled jalapeños and seasonings balance it out along with the fresh toppings.

I love enjoying copious amounts of all of these together with tortilla chips hence made a single post about them instead of three separate recipe posts.

Also, by no means do I claim these recipes to be authentic. This is how I like them and have adapted the recipes a little from Laura Vitale‘s lovely recipes keeping the scarcity of some and the unavailability of other Mexican ingredients in Pakistan in mind.

Avocados are, admittedly, not as readily available in Pakistan as the rest of the ingredients required to make the other two dips. I buy firm avocados, wrap them in newspaper and leave them to ripen for a day or two before using.

If you’ve never made guacamole before it may be helpful to Google things like “how to choose an avocado” – and if you’re lucky enough to have come across those black-green Hass avocados in Lahore, please let me know.

Crispy chips like Doritos and Tostitos are obviously amazing for scooping up the salsa, guacamole and queso blanco dip right into your mouth.

Many imported brands of flour and corn tortillas are now available at various stores. So there’s plenty of choice if you want to make your own tortilla chips.

I like the tortillas made by Lahore’s local bakery “Bread & Beyond” that come in two sizes and are available at their stores / bakeries.

To make the chips, I stack a couple of tortillas on a chopping board and slice into eighths with a sharp knife. I then deep fry the tortilla wedges until golden then drain them well.

For a healthier alternative, brush each tortilla on both sides with olive oil while stacking and slice into eighths. Place the cut wedges on a baking sheet and bake in a preheated oven at 350 degrees F / 180 degrees C until golden.

Restaurant Style Salsa, Guacamole and Queso Blanco Dip

Restaurant Style Salsa, Guacamole and Queso Blanco Dip


Recipe Type: Snack & Starter    Author: Alice In Eatland
Prep Time: 20 Minutes    Cook Time: 20 Minutes    Total Time: 40 Minutes
Serves: 2 – 4


Enjoy the bright & bold flavours of homemade restaurant style salsa, guacamole and queso blanco dip right in the comfort of your home!


SALSA

INGREDIENTS

  • 2 large fresh ripe tomatoes
  • 1 cup canned tomatoes (diced or whole)
  • 1/2 – 1 medium red onion, roughly chopped
  • 2 large cloves garlic
  • 2 large green chillies, roughly chopped
  • 1/2 cup fresh coriander leaves
  • 1 teaspoon cumin powder
  • 1 teaspoon dried oregano
  • A few fresh lemons or limes
  • Salt
  • A pinch of fine white sugar


METHOD

  1. Optional: Place whole tomatoes on medium high heat directly onto the stove rings. Keep turning tomatoes with a pair of tongs until the skin is blackened and charred in places all over. Remove roasted tomatoes to a bowl, cover with a plate or plastic wrap for 10 minutes or so and peel the charred skin off and discard. Set aside.
  2. In the bowl of a food processor add onions and green chillies.
  3. Grate in the garlic cloves and process until chunky.
  4. Add fresh tomatoes (cut into quarters if unroasted or halved if using roasted tomatoes as per the optional first step), canned tomatoes, coriander leaves, cumin powder, oregano, lime or lemon juice and salt.
  5. Pulse until mixture is somewhere between very finely chopped and pulpy. Do not over process.
  6. Check salt and adjust lime or lemon juice and seasoning accordingly.
  7. Mix in the pinch of sugar if the salsa tastes too sour and could do with a bit of balancing.
  8. Remove the prepared salsa to a serving bowl, cover and let sit in the fridge for at least 15 – 20 minutes to let the flavours mingle.
  9. Store leftover salsa covered airtight in the fridge.
  10. Best consumed within 1 day.


GUACAMOLE

INGREDIENTS

  • 2 – 4 ripe avocados
  • A few fresh limes or lemons, halved
  • Salt
  • 1 small red onion, chopped OR a few green onions, chopped
  • Chopped fresh coriander

METHOD

  1. Halve the avocados and remove the seed from each. Scoop out the flesh into a bowl.
  2. Immediately sprinkle with salt and squeeze over the juice of 1 or 2 limes or lemon.
  3. Mash with a fork until chunky. Add chopped onion & continue mashing and smooshing with the fork until the consistency is somewhere between creamy and lightly chunky.
  4. Taste to see if the salt and lime / lemon juice are according to your liking. Adjust if needed.
  5. Scrape out into serving bowl, top with a few chopped coriander leaves.
  6. Guacamole can start changing colour with time so make it just before serving, do not let it sit and serve straight away.


QUESO BLANCO DIP

INGREDIENTS

  • 1/2 cup heavy / double cream
  • 1/2 cup whole milk
  • 1 cup cubed cheese (any local cheddar cheese OR American Cheese OR Monterey Jack OR a combination of any of these cheeses)
  • 1/4 cup – 1/2 cup pickled jalapeños, drained and finely chopped
  • 1/2 teaspoon cumin powder plus extra
  • 1/2 teaspoon dried oregano plus extra
  • Fresh milled black pepper
  • Salt
  • 1 small ripe tomato, seeded and chopped
  • A few pickled jalapeño slices, drained
  • Fresh coriander leaves


METHOD

  1. Put the cubed cheese in the bowl of a food processor and pulse until shredded. Do not use pre-shredded cheese.
  2. Combine the cream and milk in a saucepan and whisk together until combined.
  3. Heat until you see small bubbles along the side of the pan and add the shredded  cheese a little at a time, whisking constantly until all the cheese has been added and has melted into the milk and cream.
  4. Add the chopped jalapeños, cumin powder, oregano and black pepper.
  5. Stir well and check for salt. Adjust seasonings accordingly, adding extra cumin and oregano if needed.
  6. Pour the queso blanco dip into a serving bowl. It will thicken as it cools.
  7. At this point you can place the bowl under your oven grill / broiler for half a minute or so or until the top is crusty and golden. This step is totally optional. Just make sure your bowl is oven proof.
  8. Top the dip with chopped tomatoes, jalapeño slices and fresh coriander.
  9. Serve at room temperature and if serving later, warm up gently in a pan over low heat, adding a bit of milk to loosen it if needed and then top with the garnish.
  10. Store in the fridge.

Filed Under: Recipes, Snack & Starter

Spiced Purple Carrot & Coconut Soup

February 28, 2018 by aliceineatland Leave a Comment

Spiced Purple Carrot & Coconut Soup

Spiced Purple Carrot & Coconut Soup

Welcoming spring with one of the most vibrantly beautiful soups I’ve made in a while 💜 – Spiced Purple Carrot & Coconut Soup.

The desi purple-black carrot, called kaali gaajar (that literally means ‘black carrot’ in Urdu) makes a brief yet stunning appearance every winter. This purple carrot is the star of the show here and gives the soup its deep amethyst colour.

Spiced Purple Carrot & Coconut Soup

My Dad brought home some gorgeous purple carrots the other day and I set out to make the traditional digestive drink Kanji with them.

As I was slicing the carrots and staring in awe at their amazing colour and the intricate natural pattern on the inside, I decided I would make something else too with these rare beauties that would show off their colour to perfection.

Spiced Purple Carrot & Coconut Soup

Hence the idea for this pretty Spiced Purple Carrot & Coconut Soup came about. I decided to add coconut milk to the soup for richness and a more rounded flavour. Plus some of my favourite spices give it a pleasing intensity without any heat.

I’ve swirled some heavy cream and crushed a couple of my homemade Crispy Spinach Chips on top for contrast, both in terms of colour and texture. The garnish / toppings are totally optional though; the soup is wonderful on its own too.

Spiced Purple Carrot & Coconut Soup

I still cannot get over the bright hue of this soup. And it tastes pretty great. So I’ve frozen a few servings of my Spiced Purple Carrot & Coconut Soup that I can defrost, reheat and enjoy during the upcoming months.

A regular carrot can be substituted for the purple one when purple carrots are not in season for an equally yummy Spiced Carrot & Coconut Soup.

Spiced Purple Carrot & Coconut Soup


Spiced Purple Carrot & Coconut Soup


Recipe Type: Starter & Snack, Main
Author: Alice In Eatland
Prep Time: 10 Minutes    Cook Time: 20 Minutes    Total Time: 30 Minutes
Serves: 1


Spiced Purple Carrot & Coconut Soup – the flavour & nutrients of purple carrot, fragrant spices & creamy coconut milk make this a winner. Gluten free.


INGREDIENTS

  • 1/2 teaspoon cumin seeds
  • 1/2 teaspoon coriander seeds
  • 1 tablespoon oil
  • 1 small onion, sliced
  • 2 large cloves garlic, sliced
  • 1/2″ piece ginger
  • 1 medium purple carrot, roughly chopped
  • 1/2 cup vegetable stock OR water
  • 1/2 cup coconut milk
  • Salt
  • Fresh milled black pepper
  • A little extra vegetable stock
  • A little extra coconut milk
  • Cream, to garnish (optional)
  • Crispy Spinach Chips, to garnish (optional; recipe here)


METHOD

  1. Put the cumin seeds and coriander seeds in a small pan and place over medium heat.
  2. Tilt the pan and swirl the seeds inside until they darken slightly and smell fragrant. Be careful not to burn.
  3. Remove from heat and crush coarsely, either with the back of a spoon or with a pestle and mortar. Set aside.
  4. Heat the oil in a pan over medium heat and add the onion, and garlic. Stir until soft and fragrant – no need to brown.
  5. Grate in the ginger and stir.
  6. Add the carrot pieces and the coarsely ground cumin and coriander.
  7. Give everything a good stir and pour in the stock or water and the coconut milk.
  8. Increase the heat to high and bring mixture to the boil, uncovered.
  9. When a rolling boil is reached, reduce heat to medium-low and let cook, partially covered, until carrot pieces are tender.
  10. Remove pan from heat, cool mixture to room temperature and then blend either in a blender or with a stick blender until smooth.
  11. Return soup to heat to warm up. Check for salt and add pepper if wished.
  12. Taste the soup. At this point you can add more stock and / or coconut milk depending on how the soup tastes to you – it’s all about personal taste and flavour preference so make adjustments accordingly.
  13. If more liquid is added, bring the soup to a boil, then lower the heat and simmer 5 minutes.
  14. When ready to serve, ladle warm soup into serving bowl.
  15. Drizzle cream on top if wished.
  16. Crush a few Spinach Chips lightly and place in a mound in the centre of the bowl. Enjoy.

Filed Under: Mains, Recipes, Snack & Starter Tagged With: Soup, Starter, Winter

Crispy Spinach Chips

February 22, 2018 by aliceineatland Leave a Comment

Crispy Spinach Chips

Crispy Spinach Chips are pretty cool things. Crunchy, nutrient rich and tasty without the guilt. And very easy to prepare.

Most recipes for spinach chips use baby spinach. If you’d like to use that instead of the regular spinach called for in this recipe, do so by all means. I’ve used ordinary spinach leaves because they are easily available and I usually have them in my fridge.

Crispy Spinach Chips

I once tried making kale chips pretty much the same way and they tasted good too. So you can try this recipe with kale as well. But honestly, I prefer spinach over kale for reasons of availability, cost and flavour. So I like these Crispy Spinach Chips better than the kale ones.

Crispy Spinach Chips

Besides being a much healthier snack overall, these Crispy Spinach Chips are  also a good crunchy treat for those following low carb eating plans.

This is also a keto friendly recipe for folks eating according to that particular meal / diet plan.

Crispy Spinach Chips

Crispy Spinach Chips


Recipe Type: Starter & Snack    Author: Alice In Eatland 
Prep Time: 5 Minutes    Cook Time: 10 Minutes    Total Time: 15 Minutes
Serves: 1


Crispy Spinach Chips – crunchy & delicious without the guilt! These baked nutrient dense chips make a super healthy snack. Gluten free. Low carb.


INGREDIENTS

  • Handful of spinach leaves (can be 1/2 to 1 cup of spinach leaves, depending how many you wish to eat)
  • 1 teaspoon or so of olive oil
  • Sea salt OR regular salt
  • Extra flavourings such as chaat masala, garlic powder etc.


METHOD

  1. Preheat oven to 180 degrees C / 350 degrees F.
  2. Wash the spinach leaves and dry thoroughly with sheets of kitchen paper.
  3. Line a baking sheet with wax paper.
  4. Toss the spinach leaves with a little olive oil. You don’t need a lot; just enough so that the leaves are very lightly coated with the oil. I find it easier to rub the oil onto the leaves with my fingers.
  5. Sprinkle salt and any additional flavouring of choice lightly on both sides of each oiled spinach leaf.
  6. Place the leaves on the prepared baking sheet in a single layer.
  7. Bake 5 – 10 minutes or until the spinach leave edges begin to curl away from the baking sheet. The leaves will darken in places, shrink & curl a bit and look dryish.
  8. Keep an eye on the spinach so that it doesn’t burn. It’s okay if the leaves turn brown in places while baking but don’t let them over brown.
  9. Remove the baked spinach leaves carefully from the baking sheet, preferably to a wire rack or wire colander to minimise surface contact so the chips remain crisp.
  10. These can soften with time so they are best eaten immediately after baking.

Filed Under: Recipes, Snack & Starter

Mini Flourless Chocolate Cakes

February 14, 2018 by aliceineatland Leave a Comment

Mini Flourless Chocolate Cakes


Mini Flourless Chocolate Cakes

Mini Flourless Chocolate Cakes, small rustic looking discs of pure indulgence – quick to make and usually gone in a flash.

So this is the second Sophie Dahl recipe adaptation in a row on the blog. I know I should’ve posted it at least a few days earlier for folks who might want to make it for Valentine’s Day.

Mini Flourless Chocolate Cakes are fairly easy to put together and don’t require a lot of time to make. However,  these cakes are not picture perfect pretty little rounds – they are very rustic looking, cracked and even broken in places. Their beauty lies in imperfection.

And obviously, no one has to wait for Valentine’s Day to make these Mini Flourless Chocolate Cakes. I make these at times just to brighten up an otherwise regular meal. It’s a lovely dessert to make for gluten intolerant family or friends.

Mini Flourless Chocolate Cakes

I would describe the texture of these cakes somewhere between a fudgy brownie and a softened bar of chocolate. I might try making these with white chocolate one day, which is my favourite type of chocolate.

Good dark chocolate works best here but if you’re not a fan then semisweet is fine. If you must use milk chocolate, do a 50/50 with dark chocolate otherwise your Mini Flourless Chocolate Cakes may become overly sweet and lack the depth that dark chocolate imparts.

Sour cream or crème fraîche provides a slightly tart and refreshing contrast. You can use plain whipped cream to top these as well if you wish plus a bit of fresh fruit or edible flowers to garnish. I used rose petals and leaves from a home grown rose plant to crown my Mini Flourless Chocolate Cakes.

Mini Flourless Chocolate Cakes


Mini Flourless Chocolate Cakes


Recipe Type: Dessert    Author: Alice In Eatland
Prep Time: 10 Minutes    Cook Time: 20 Minutes
Resting Time: 2 – 4 Hours   Total Time: 2 – 4 Hours
Serves: 2


Mini Flourless Chocolate Cakes – discs of deep dark chocolate goodness topped with contrasting tart crème fraîche. A rich & decadent dessert. Gluten free.


INGREDIENTS

  • Butter to grease ramekins
  • Cocoa powder to dust ramekins
  • 75 grams chocolate (dark, semisweet or half dark chocolate + half milk chocolate), broken into pieces
  • 60 grams salted butter
  • 60 grams caster / superfine sugar
  • 1 medium egg
  • 1/4 teaspoon instant coffee powder dissolved in 1/4 teaspoon boiling water
  • 1/4 teaspoon vanilla extract or essence
  • Sour cream, crème fraîche or whipped cream to serve
  • Fresh fruit (strawberries, cherries, blueberries, kiwi etc) or fresh edible unsprayed flowers to decorate


METHOD

  1. Preheat oven to 180 degrees C / 350 degrees F.
  2. Line 2 ramekins (each 4″ in diameter) with foil. Each piece of foil should be big enough to be easily pressed onto the bottom and all the way up the sides of each ramekin.
  3. Butter the foil and sprinkle with cocoa powder, shaking and turning the ramekins round until the bottoms and sides are coated with cocoa. Shake off any excess cocoa.
  4. Place the broken chocolate pieces and butter in a microwave safe bowl. Microwave uncovered, stopping and stirring every 10 seconds until both are almost melted. Stir thoroughly for the final melting of the chocolate. The mixture should be uniform and smooth.
  5. Put the sugar, the egg, the cooled coffee that had been dissolved in the boiling water and the vanilla in a bowl and beat until thick and pale.
  6. Fold in the melted chocolate and butter mixture with a spatula or spoon.
  7. Pour the mixture equally into the prepared ramekins and bake 20-30 minutes.
  8. The tops of the cakes will rise flat and look crusty. Keep an eye on them and the cakes are done as soon as you see the risen tops deflate slightly.
  9. You should also be able to smell a very chocolatey aroma in your kitchen – that’s your Mini Flourless Chocolate Cakes telling you they are ready.
  10. Remove from the oven and place on a wire rack. The centres of the cakes will begin to collapse right after removal from the oven, with a crater forming in the cracked centre. The sides will also cool imperfect. That is the beauty of these.
  11. Let cool to room temperature and then place ramekins in the fridge for 2 – 4 hours or even overnight. You want them to be thoroughly cool.
  12. When ready to serve, carefully lift out the cakes using the foil lining. Gently peel away the foil and place cakes on serving plates. Don’t worry if the sides are cracked or even a bit broken in places.
  13. Top with a few dollops of whipped cream, sour cream or crème fraîche in the craters in the centre.
  14. Decorate with your choice of fresh fruit or edible flowers. Or both.

Filed Under: Desserts, Recipes Tagged With: Chocolate, Romantic, Valentine's Day

Roasted Tomato & Thyme Soup with Fluffy Baked Potatoes

February 5, 2018 by aliceineatland Leave a Comment

Roasted Tomato & Thyme Soup with Fluffy Baked Potatoes

Roasted Tomato & Thyme Soup with Fluffy Baked Potatoes

Roasted Tomato & Thyme Soup with Fluffy Baked Potatoes is a delicious and flexible combination. It can be had as either a light but satisfying snack when you’re feeling peckish but don’t want a full meal. And it also makes a not-too-heavy yet adequately filling entree at meal times as well. Plus it’s gluten free.

I am including this as a Valentine’s Day recipe. Yes. Folks, I understand that tomato soup and baked potatoes usually do not qualify as “special” meals and are certainly not classified as “romantic” by most people. And that’s okay.

Roasted Tomato & Thyme Soup with Fluffy Baked Potatoes

There are those who go the Grilled Oysters with Chilli Herb Butter, Filet Mignon and Chanterelle Duxelles Strudel way on 14th February. And then there are unsophisticated chow hounds like yours truly, that are very happy gobbling down comfort foods at the most romantic of occasions. This recipe will obviously appeal more to the latter on Valentine’s Day. And hopefully to everyone else on all other days of the year, haha!

This rustic soup and potato recipe can actually be a fun starter. In order for it to be that, serve the Roasted Tomato & Thyme Soup in small cups, heatproof glasses or mugs, wide enough so that the eaters can easily dunk their Fluffy Baked Potatoes into the soup before eating.

Roasted Tomato & Thyme Soup with Fluffy Baked Potatoes

Tomato soup and baked potato make a fantastic combination. But obviously both the Roasted Tomato & Thyme Soup and the Fluffy Baked Potatoes can be served on their own as well. I just feel they’re better together.

The recipe is really quite simple. Tomatoes, onions, garlic and thyme are seasoned, roasted in the oven and then blended into the creamiest soup ever. No cream required.

The fluffy baked potatoes have a texture that I can only describe as somewhere between a potato & cheese croquette and a cheesy potato soufflé, if that makes any sense. The addition of creme fraiche or sour cream and a little beaten egg gives the filling a lovely lightness. So, so good.

Roasted Tomato & Thyme Soup with Fluffy Baked Potatoes

The recipe has been loosely adapted from Sophie Dahl’s recipe – the cooking show was “The Delicious Miss Dahl” and I would eagerly await each new episode while living in London. I was totally in love with the series! So pretty – all flowers, vintage utensils and what not. Plus the soft spoken and beautiful Miss Dahl.

Both the Roasted Tomato & Thyme Soup and the Fluffy Baked Potatoes can be made a few days ahead and reheated before serving. Add a crisp green salad and maybe a decadent dessert to follow and you have quite a meal there.

Roasted Tomato & Thyme Soup with Fluffy Baked Potatoes


Roasted Tomato & Thyme Soup with Fluffy Baked Potatoes


Recipe Type:    Starter & Snack, Main Meal
Author:    Alice In Eatland
Prep Time:    30 – 40 Minutes    Cook Time:    40 – 60 Minutes    Total Time: 1.5 Hours
Serves: 1 – 2


Roasted Tomato & Thyme Soup


Roasted tomatoes, onion, garlic & thyme blend to create creamy Roasted Tomato & Thyme Soup!


INGREDIENTS

  •  2-4 medium tomatoes (the ripest you can find), thickly sliced
  • 1 medium onion, peeled and thickly sliced
  • 4-6 garlic cloves, peeled and smashed lightly
  •  1 sprig fresh thyme or a few pinches of dried thyme
  • 2 tablespoons oil
  • Salt
  • Fresh milled pepper
  • A pinch of sugar
  • Water or vegetable stock, at room temperature
  • 1/2 a vegetable stock cube, crumbled (optional)
  • Cream to serve (optional)


METHOD:

  1. Preheat oven to 180 degrees C / 350 degrees F.
  2. Line a baking tray or flat oven proof glass dish with foil.
  3. Lay the tomatoes, onions and garlic onto the foil.
  4. Scatter the thyme all over, drizzle over the oil and season with salt and pepper.
  5. Bake uncovered until the vegetables look roasted and dehydrated and are beginning to darken in places. This can take anywhere from 20 minutes to an hour depending on your oven so keep an eye on your vegetables.
  6. Once done, remove the roasted vegetables from the oven and cool to room temperature.
  7. Put cooled vegetables into the jug of a blender with a little water or vegetable stock and blend until smooth.
  8. Pour the blended mixture out into a pan. Rinse out the blender jug with a little more water or stock and add to the pan.
  9. Add the sugar and also the crumbled vegetable stock cube into your pan, if using.
  10. Let soup come to a boil, stirring frequently. Check the consistency: add more water or stock if you need to thin it down a bit and let reduce if you prefer it thicker.
  11. Taste soup to see if it needs more seasoning.
  12. Pour soup into bowls, cups or a mug.
  13. Swirl a little cream on top before serving, if wished.
  14. Serve soup with Fluffy Baked Potatoes – dunk them into the soup before eating.


Fluffy Baked Potatoes


Twice cooked/baked cheesy & airy Fluffy Baked Potatoes like you’ve never had them before!


INGREDIENTS

  • 2-4 smallish to medium potatoes
  • 1-2 tablespoons butter, at room temperature
  • 2 teaspoons milk, at room temperature
  • 1/2 teaspoon fresh lemon juice or white vinegar
  • 2-4 tablespoons cream
  • 1-2 tablespoons cream cheese OR goat’s cheese OR grated cheddar cheese
  • Salt
  • Fresh milled black pepper
  • 1/2 of a small beaten egg
  • Chopped chives or other fresh herbs of choice


METHOD

  1. Preheat oven to 180 degrees C / 350 degrees F.
  2. Wash the potatoes.
  3. You can either cook the potatoes in plenty of water until soft but not over cooked.
  4. Or you can place the potatoes into your preheated oven and bake until they are cooked through.
  5. Stir the milk and lemon juice or white vinegar together in a small bowl and then stir in the cream. Set aside.
  6. When your potatoes are boiled or baked, slice each potato lengthwise into two.
  7. Carefully scoop out the potato pulp into a bowl, being careful not to let the potato skins/shells break.
  8. Mash the hot potato pulp with the butter until smooth.
  9. Give the sour cream a stir and stir into the potatoes followed by your cheese of choice, salt and black pepper.
  10. Taste the mixture to check if it needs more cheese or seasoning.
  11. Then stir in the beaten egg until smooth.
  12. Lastly stir in the chopped chives or other fresh herbs.
  13. Spoon the mixture equally into the potato skins/shells.
  14. Line a baking sheet or tray with foil and arrange the filled potatoes on it.
  15. Bake in your preheated oven until the filling looks a bit puffy and is browning in places.
  16. You can turn the grill on from above for a couple of minutes to brown the tops of the potatoes more. Keep an eye on them so they don’t burn.
  17. Remove the potatoes from the oven and sprinkle with extra chives or herbs right before serving.
  18. Serve Fluffy Baked Potatoes warm.


Filed Under: Mains, Recipes, Snack & Starter Tagged With: Soup, Starter, Valentine's Day, Vegetarian

Gothic Chic Cupcakes

October 19, 2017 by aliceineatland Leave a Comment

Gothic Chic Cupcakes

Post Updated: 11.03.24

Gothic Chic Cupcakes have been my favourite Halloween dessert idea since 2017! Moist vanilla cupcake base topped with a very chocolatey black cocoa fudge frosting, these are perfect for any special occasion during the year and absolute showstoppers especially at Halloween.

The first cupcake recipe on my blog was for Chocolate Cobweb Cupcakes for Halloween 2016. Check that one out too for a fun but sweetly spooky Halloween cupcake recipe.

The first Halloween cupcake recipe had a chocolate cupcake base topped with vanilla frosting. The Gothic Chic Cupcake recipe is the other way around – my favourite moist vanilla cupcake recipe with a very old fashioned and very delicious cocoa fudge frosting.

As mentioned in my previous Halloween post, I did not grow up celebrating Halloween except for one year in the ’90s. As an adult now, I have been getting more and more excited about Halloween each year.

Gothic Chic Cupcakes

Instagram and Pinterest with their fabulous Halloween related food, decor and craft posts are definitely to be credited for making Halloween popular in parts of the world where it isn’t really celebrated as such.

I had decided that along with food, I would do some sort of Halloween DIY craft or decor project as well this year.

I had a very clear idea of something very chic and very minimalistic Gothic in mind hence the black, gold and silver theme for my Halloween.

Not being very “crafty” as such, I wanted to do something simple but effective so I chose the very aptly titled Creepy Black Twig Wreath – thanks to Earnest Home Co. for the fabulous idea and the easy tutorial.

I collected the branches and twigs off a basil plant and a rose bush – both from my garden and both completely dried up. I then put the twig wreath together bit by bit according to the step by step tutorial.

My brother says the finished wreath looks like something out of the horror movie “The Ring” – target achieved!

Gothic Chic Cupcakes

Pumpkins were next and after trawling through various pumpkin ideas on Pinterest, I decided on simple painted pumpkins for Halloween 2017.

Pinterest has a photo of a large pumpkin painted matte black sitting on a chair and as soon as I saw it I knew I had to have a black pumpkin this Halloween. I was finding gold and silver painted pumpkins on Pinterest quite appealing as well.

So my sister-in-law and I spray painted a few pumpkins black, gold and silver. I could not get hold of perfectly shaped pumpkins but after they were painted and were sitting in all their beautiful painted glory, I felt the irregular shapes, indents and imperfections here and there somehow added to the Gothic appeal that I was after.

And lastly, the Gothic Chic Cupcakes. I adore this moist vanilla cupcake recipe so much and for the life of me I can’t find the link to the original recipe because I wrote the recipe down the old fashioned way in my crumbling old recipe diary.

Like a fool, I completely forgot to write down the name of the blog where I took the recipe from. I am trying to search for that particular blog and hopefully if I find it I will update this blog post with proper credit to the original creator of this wonderful recipe.

Gothic Chic Cupcakes

The frosting recipe comes via My Gluten Free Kitchen with a deep cocoa flavour and dreamy pipeability. The idea was to dye the cocoa fudge  frosting a jet black with food colour.

As I was adding the black food colour to the frosting and mixing it in, I stopped when the icing reached a deep dark charcoal gray. It looked incredible and very broodingly sexy – so much cooler than the flat black I had intended to achieve.

I used gold and silver cupcake liners / paper bake cups for my Gothic Chic Cupcakes.

I wanted the vanilla part of the cupcake to show very clearly so instead of covering almost the entire top of the cupcakes with frosting, I opted to pipe rosettes that would leave room for the vanilla part to show.

I have been ‘piping partially’ this way lately and liking it. You can obviously cover the entire tops of your Gothic Chic Cupcakes in frosting like it is usually done.

Happy baking and frosting and a very happy Halloween to all!

Gothic Chic Cupcakes

Gothic Chic Cupcakes


Recipe Type: Dessert    Author: Alice In Eatland
Prep Time: 30 Minutes    Cook Time: 20 Minutes    Total Time: 50 Minutes
Serves: 8 – 10
Keyword: Gothic Cupcakes Recipe, Goth Cupcakes Recipe, Halloween Cupcakes,


These moist & fluffy Gothic Chic Cupcakes are perfumed with vanilla & frosted with a dark & intensely chocolate cocoa fudge frosting – so tasty & so chic!


INGREDIENTS FOR MOIST VANILLA CUPCAKES

  • 2 tablespoons milk
  • 1 tablespoon white vinegar
  • 1/4 cup + 1/8 cup cream
  • 1/2 cup + 1 tablespoon flour
  • 1/8 cup cornflour or cornstarch
  • 1/2 teaspoon + 1/4 teaspoon baking powder
  • 1/4 teaspoon salt
  • 1/4 cup + 1 tablespoon oil
  • 1/4 cup + 1/8 cup + 1 tablespoon caster sugar or superfine sugar
  • 1 medium egg
  • 1 teaspoon vanilla extract or essence
  • 1/8 teaspoon almond extract or essence (optional)


METHOD

  1. Preheat oven to 180 degrees C / 350 degrees F.
  2. Line a standard size muffin pan / cupcake pan with gold and silver paper baking cups / cupcake liners. Set aside.
  3. Stir the milk and vinegar together to make buttermilk.
  4. Add prepared buttermilk to the cream and stir together to make sour cream. Set aside.
  5. Combine the flour, cornflour or cornstarch, baking powder and salt in a bowl. Set aside.
  6. Beat the oil and sugar together for 30 – 60 seconds.
  7. Add the egg and extracts and beat until combined.
  8. Beat in the combined dry ingredients until smooth.
  9. Lastly beat in prepared sour cream until just mixed.
  10. Pour batter into a glass measuring jug.
  11. Fill the paper baking cups in the muffin pan between 1/2 – 3/4 full.
  12. Bake 18 – 20 minutes or until the cupcakes turn slightly golden and a wooden pick inserted into the centre of cupcakes comes out nearly clean. Do not overbake.
  13. Remove baked cupcakes onto a wire rack. Cool completely before frosting.
  14. Store cool unfrosted cupcakes airtight until ready to frost.


INGREDIENTS FOR COCOA FUDGE FROSTING

  • 1/4 cup butter
  • 1/4 cup cocoa
  • 1 1/2 cups + 1/3 cup icing sugar or confectioner’s sugar
  • 3 tablespoons milk
  • 1/2 teaspoon vanilla extract or essence
  • Black gel food colour (prefereably from Wilton or AmeriColor)


METHOD

  1. Put butter in a microwave safe bowl and microwave uncovered on high 10 – 20 seconds or until almost melted.
  2. Remove bowl from microwave and stir until butter is completely melted.
  3. Whisk in the cocoa and then microwave uncovered again on high for 30 seconds.
  4. Remove from microwave and beat in icing sugar and milk alternately until creamy.
  5. Beat in vanilla.
  6. Lastly add the black food colour, a little at a time while beating until desired colour is achieved.
  7. Frosting dyed with black food colour deepens in hue as the frosting sits, so wait 10 or so minutes after adding food colour to see how much the colour of the frosting darkens before adding more.
  8. Make sure the frosting is completely cool before piping onto cupcakes.
  9. Use a Wilton 1M tip to pipe rosettes of cocoa fudge frosting onto the cupcakes.
  10. Store your Gothic Chic Cupcakes airtight. These can be refrigerated but make sure you bring the cupcakes completely down to room temperature before serving.

Filed Under: Desserts, Recipes Tagged With: Autumn / Fall, Baking, Budget-Friendly, Cafe, Chocolate, Dessert, Halloween

Spicy Coconut Karrhi

October 1, 2017 by aliceineatland Leave a Comment

Spicy Coconut Karrhi One of my favourite comfort foods is karrhi or kadhi. This thick tangy yoghurt and gram flour based curry is such a mood lifter for me and ever since I started making my Spicy Coconut Karrhi, I rarely make karrhi any other way. Karrhi is usually considered a summer dish because of the cooling properties of the yoghurt in it. But when you’re a karrhi fiend like me, you make it the entire year. So when the weather is warm, I turn to karrhi for a cooling meal. And when the weather is cold, I turn to karrhi to warm up the cockles. This is how I feel about this utterly delicious and comforting curry. Spicy Coconut Karrhi Karrhi is mostly eaten with rice but also with roti in some places. My preferred way of devouring Spicy Coconut Karrhi is to grab a spoon and slurp it like a soup entirely by itself. I can enjoy it with or without pakorray. Making a Spicy Coconut Karrhi has been nothing short of a revelation and a variation of karrhi that I proudly pat myself on the back for each time I make it. Because of my love for karrhi and for coconut based curries in general, it seemed only natural to combine both of them. This experiment resulted in my Spicy Coconut Karrhi and if you like savoury coconuty things, you will adore this. Spicy Coconut Karrhi I recently discovered that coconut and gram flour based curries are in fact, not as uncommon as I thought. There seem to be a number of variants of this type of curry, from the starkly simple to the more elaborate. Although I have always loved karrhi, making karrhi myself wasn’t always a big success for me. The gram flour to yoghurt ratio has to be correct for a decent karrhi. Some days I’d get that ratio right and many times not. Sometimes the quantity of the yoghurt was too much and at other times I would add the gram flour a bit over enthusiastically; basically eyeballing the ingredients did not always result in consistently perfect karrhi for me. Spicy Coconut Karrhi Now, thanks to a book titled “Vegetarian Delights” that helped me figure out the correct ingredient ratio for regular pakorra karrhi, I came up with the gram flour to yoghurt and coconut milk ratio that I find results in the best Spicy Coconut Karrhi for me. I believe most karrhi recipes that we in Pakistan are used to usually require long cooking times, even hours. Those slow cooked karrhis taste great, no doubt about that. But this Spicy Coconut Karrhi that takes a maximum of just 20 – 30 minutes of total cooking time tastes pretty awesome too. Here is my humble version of my favourite karrhi. I love karrhi of all types, but this Spicy Coconut Karrhi tops that list for me. Spicy Coconut Karrhi   Spicy Coconut Karrhi
Recipe Type: Main    Author: Alice In Eatland
Prep Time: 20 Minutes    Cook Time: 30 Minutes Total Time: 50 Minutes
Serves: 2

Quick to make, creamy & tangy Spicy Coconut Karrhi! A gram flour & yoghurt based curry with deep fried gram flour dumplings & aromatic tempering – yum!


INGREDIENTS FOR KARRHI

  • 1 cup yogurt
  • 1 cup coconut milk
  • 1/2 – 1 cup water
  • 1/4 cup gram flour
  • Salt
  • 1/4 – 1/2 teaspoon red chilli powder
  • 1/4 – 1/2 teaspoon Kashmiri red chilli powder or regular red chilli powder
  • 1 teaspoon turmeric
  • 2 tablespoons oil
  • A few tablespoons lemon juice (optional)
  • Extra water


METHOD

  1. Whisk all ingredients, except oil, lemon juice and extra water, well together.
  2. Heat oil in a pan and whisk in the yoghurt, gram flour and spice mixture.
  3. Increase heat to high and bring to the boil, whisking or stirring constantly.
  4. When it reaches the boil, lower the heat and simmer gently 10 minutes, whisking or stirring frequently.
  5. Add extra water, little by little, if you feel the karrhi is too thick. Bring back to the boil, and let simmer 5 minutes.
  6. Taste for salt and adjust accordingly.
  7. Stir in lemon juice if you feel the karrhi isn’t tangy enough.
  8. Remove from heat and set aside.


INGREDIENTS FOR PAKORRAY

  • 1/2 cup gram flour
  • Small pinch of baking soda
  • 1 small onion, peeled & finely chopped
  • 2 – 4 fresh green chillies, finely chopped
  • Small pinch of carom seeds or ajwain (optional)
  • Salt
  • Water to mix
  • Oil to deep fry


METHOD

  1. Stir together the gram flour, baking soda, ajwain (if using) and salt.
  2. Add water, a little at a time, mixing well until the mixture becomes a thick paste of dropping consistency. It should not be thin or runny because that will result in your pakorray turning out flat shaped.
  3. Let mixture sit at least 10 – 15 minutes.
  4. Heat oil in a small wok or deep frying pan to medium high heat.
  5. When oil is hot, stir the chopped onions and green chillies into the prepared gram flour mixture and depending on how small or big you prefer your pakorras, drop either teaspoonfuls or tablespoonfuls of the batter into the hot oil.
  6. Be careful not to overcrowd the pan.
  7. Also make sure the oil isn’t too hot or the pakorray will brown fast on the outside but stay uncooked on the inside.
  8. Fry pakorray until golden brown all over, turning to help brown evenly.
  9. Remove fried pakorray from oil onto a plate lined with kitchen paper or onto a drainage rack.
  10. When well drained, add to the karrhi and simmer gently for 5 minutes.


INGREDIENTS FOR TEMPERING

  • 2 tablespoons oil
  • A pinch of asafoetida (heeng)
  • 2 – 4 dried whole red chillies
  • 1/2 teaspoon cumin seeds
  • 1/2 teaspoon brown mustard seeds
  • Pinch nigella seeds
  • 1 small onion, peeled and chopped (optional)
  • 2 large cloves garlic, peeled and thinly sliced
  • 6 – 8 curry leaves, either fresh or dried
  • 2 medium fresh green chillies, sliced lengthwise
  • Small pinch Kashmiri red chilli powder or regular red chilli powder (optional)
  • Fresh coriander leaves to garnish
  • Chilli oil to drizzle (optional)


METHOD

  1. When ready to serve Spicy Coconut Karrhi, carefully pour the karrhi and pakorray out into a serving bowl.
  2. Heat oil and add asafoetida and dried red chillies. Stir 30 seconds or so until chillies darken a bit.
  3. Add the cumin, mustard and nigella seeds.
  4. Stir 10 – 30 seconds or so until they begin to sputter, change colour a bit and smell fragrant.
  5. Add chopped or sliced onion and sauté until it starts turning golden.
  6. Add sliced garlic and sauté a few more seconds until it begins to colour. Be careful not to over brown.
  7. Then add the curry leaves. Be careful if using fresh curry leaves, as they sputter immediately on contact with the hot oil.
  8. Stir a few seconds until the curry leaves darken in places.
  9. Carefully add the sliced green chillies, stir again a few seconds.
  10. If using red chilli powder, add it to the oil, remove immediately from heat, give the pan a quick swirl and pour the oil and spice mixture all over the surface of the karrhi in the serving bowl.
  11. Garnish with fresh coriander leaves.
  12. Drizzle a bit of chilli oil on the surface of the karrhi in places, if using. No need to use it if adding red chilli powder to the tempering.
  13. Serve Spicy Coconut Karrhi with steaming hot boiled white rice.
  14. Karrhi thickens on standing and cooling so stir in a splash of water from a recently boiled kettle if needed, when warming it up.

Filed Under: Mains, Recipes

Karrak Masala Chai

August 13, 2017 by aliceineatland Leave a Comment

Karrak Masala Chai

Chai is something that most of us Pakistani folks love with our very souls. It is our national beverage – we can have chai literally all the time.

From chai first thing in the morning, to a strong brew for curing a headache – there’s a cup of chai for nearly every facet of Pakistani life, be it a mundane part of daily life, a glittering social event, a sad occasion or a happy instance.

There’s a popular quote about coffee that I’ve seen on Instagram and Facebook which says “Coffee Doesn’t Ask Silly Questions. Coffee Understands.”

Replace coffee with chai in that quote and you’ll get an idea of how most Pakistanis feel about tea. And by tea I mean traditional South Asian style Pakistani chai – medium to strong in strength, with milk and with or without sugar.

And because it is the country’s 70th Independence Day today, I am sharing a chai recipe that I am extremely fond of – Karrak Masala Chai!

A combination of two of my favourite types of chai, Masala Chai and Karrak Chai, the strong aromatic fragrance that engulfs the entire kitchen as this chai brews is nothing short of amazing!

My earliest memories of drinking chai are of summer vacations in Lahore while I was growing up. We would travel from Daharki to stay with my paternal grandmother in Lahore most summers when school would be off from June to August.

Karrak Masala Chai

Both of my Dad’s brothers were in Lahore as were members of his considerably large family consisting of his aunts, uncles, cousins, nieces and nephews so staying in Lahore also brought with it plenty of happy socialising with his loving and lively relatives.

June was mostly dry and hot and then July would bring with it monsoon rains and some much needed respite from the heat.

Neither my brother nor I really drank tea until we’d finished high school and started college, but these rainy days during our Lahore holidays would be the exception for me and the only times I would have chai.

The family room of my paternal grandparents’ house has doors that open onto an airy balcony from where foliage in the form of trees and some of old Lahore’s original red brick buildings are visible.

I would sit in one of my Grandmother’s easy chairs (which we still have) right in one of those doorways, sip on a cup of sweet milky chai and watch the summer rain bathe and hydrate the potted plants in the balcony to a vibrant green.

I can still smell the blissful fragrance of wet soil as it rained, the sweet earthy aroma of rainfall that is peculiar to that particular house in New Anarkali.

Karrak Masala Chai

Certain fond memories of childhood can make one ramble on and on at times just like I seem to be doing right now!

So let’s get back to the present in general and to Karrak Masala Chai in particular.

The first time I came to know of masala chai was sometime back in the ’90s when my maternal grandmother brought back, along with the mandatory chocolate and cheeses, a packet of Indian chai masala from a trip to the US.

And there I go again, delving back into the past, haha!

That chai masala was lovely and I found the idea of masala chai so fascinating that I even made an exception to my “I-only-have-chai-when-it-rains-in-Lahore-during-summer-vacation” rule just so I could have masala chai.

Obviously it was too strong for my kiddie tastebuds so fast forward to the present and this Karrak Masala Chai is one of my most enjoyable ways to indulge in strong, fragrant milky chai.

I’m happy to see proper chai make a comeback on many of our local restaurant and cafe menus.

It is heartening to see a lot of dhaaba style eateries and desi truck stop style tea shops spring up all over the major cities in the country lately.

Many of these places offer a quite a decent variety of chai – everything from teabag style mildish tea to strong doodh patti.

Karrak Masala Chai

After decades of a plethora of coffee shops and the ubiquitous cafe culture, we are reclaiming the chai, the chai khaana and the chai wala in all their desi glory.

This recipe makes, as its name suggests, a strong Karrak Masala Chai because that is how I like it. Which is why in the recipe I’ve specified when to reduce certain ingredients if one requires a milder chai.

If you’re making this for the first time I would recommend erring on the side of caution and trying the milder version of Karrak Masala Chai.

Adding a bit of evaporated milk gives the chai a welcome richness which I feel is necessary to balance out the strong masala. You can replace it with regular milk if wished.

Ginger powder can be replaced with a 1/4 inch piece of sliced fresh ginger. I have not tried Karrak Masala Chai with fresh ginger. I believe dry ginger powder gives a deep warmth while fresh ginger provides a zingier sprightliness. So choose the kind of flavour profile that appeals more.

My Karrak Masala Chai has been adapted from this lovely recipe.

Here’s wishing Pakistan and all Pakistanis everywhere a very happy 70th Independence Day – let’s drink chai and be merry!

Karrak Masala Chai


Recipe Type: Drinks    Author: Alice In Eatland
Prep Time: 5 Minutes    Cook Time: 5 Minutes    Total Time: 10 Minutes
Serves: 2


Strong, milky and fragrant with aromatic spices, Karrak Masala Chai is just what you need when nothing but a deliciously satisfying cup of tea will do!


INGREDIENTS FOR CHAI MASALA

  • 1/2 inch stick cinnamon
  • 4 whole black peppercorns
  • 2 whole cloves
  • 4 whole green cardamoms
  • 1/8 teaspoon ginger powder


METHOD

  1. Place all the spices in a pestle and mortar and pound until coarsely ground.
  2. Or put all the spices into a small coffee grinder and grind to a coarse powder.


INGREDIENTS FOR KARRAK MASALA CHAI

  • 1 1/4 cups water
  • 3/4 cup milk
  • 2 tablespoons evaporated milk (or regular milk)
  • 1/2 teaspoon sugar
  • 2 teaspoons loose black tea leaves or granules (any Pakistani, Indian or Sri Lankan brand)
  • Chai Masala (recipe above)


METHOD

  1. Bring water to the boil, add 1/2 the chai masala for mild tea or all of it for stronger tasting tea.
  2. Let boil 1 minute.
  3. Add 1 teaspoon loose tea leaves or granules and sugar and boil 1 minute.
  4. Pour in milk and evaporated milk (or regular milk). Increase heat and bring to the boil. When it reaches the boil, reduce heat and boil gently for 1 – 2 minutes.
  5. If you have used evaporated milk, add 1 teaspoon tea leaves or granules. In case you have used regular milk instead of evaporated milk, add just 1/2 a teaspoon of the tea leaves or granules. Boil 1 minute.
  6. Strain chai into teacups and serve immediately with extra sugar for those who want a sweeter chai.

Filed Under: Drinks, Recipes

Kurkuri Masala Bhindi

August 6, 2017 by aliceineatland Leave a Comment

Kurkuri Masala Bhindi

Ladies and gentlemen, please say hello to my new favourite side dish that I’ve been enjoying a lot lately with a number of desi main dishes.

Kurkuri Masala Bhindi is a new discovery for me and an absolutely delicious one into the bargain. Crispy, spicy and ever so slightly tangy – yum!

Okra has always featured fairly frequently on the everyday home cooked meals roster at my home.

However, it has almost always been prepared as a stir fried dryish sort of curry – the usual Pakistani way of making bhindi ki sabzi.

Kurkuri Masala Bhindi

I had heard of folks making fried bhindi but since I’d never had it, I had no idea what I was missing out on.

The first time that fried okra really caught my attention was when I watched legendary Pakistani food expert Mrs Zubaida Tariq make what she called “Crispy Bhindi” on a show on Masala TV a year or so ago maybe.

Kurkuri Masala Bhindi

I loved how crunchy the deep fried okra slices looked and the fact that Mrs Tariq mixed in roasted slivered almonds into the fried okra just before serving made things seem even more enticing.

So here is my take on this fried okra phenomenon, inspired by a recipe titled “Crunchy Okra” in this recipe book called ‘Vegetarian Fiesta’ which is said to be complied by Indian Master Chefs.

Kurkuri Masala Bhindi

I find that Kurkuri Masala Bhindi goes very well as a side dish with desi main dishes such as daal chaawal and karrhi chaawal.

I also find it very hard to keep myself from finishing Kurkuri Masala Bhindi before it makes its way from the kitchen to the dining table.

If you have a fondness for delicious deep fried foods, you will find this  Kurkuri Masala Bhindi a delightful treat.

Kurkuri Masala Bhindi

Kurkuri Masala Bhindi


Recipe Type: Starter & Side    Author: Alice In Eatland
Prep Time: 10 Minutes    Cook Time: 5 Minutes    Total Time: 15 Minutes
Serves: 2 – 4


Crispy, spicy shards of deep fried okra! Kurkuri Masala Bhindi is an excellent desi side dish and equally wonderful as a crunchy snack on its own!


INGREDIENTS

  • 250 grams – 300 grams okra
  • Salt
  • 1/4 teaspoon red chilli powder
  • 1/4 teaspoon Kashmiri red chilli powder
  • 1/2 teaspoon chaat masala
  • 1/2 teaspoon garam masala
  • 1/2 teaspoon aamchoor (optional)
  • 1 tablespoon gram flour
  • Oil for deep frying


METHOD

  1. Wash the okra and dry thoroughly between sheets of kitchen paper.
  2. When completely dry, top and tail the okra.
  3. Slice each okra lengthwise into four pieces so that you have long shards of cut okra. Place okra slices on a flat plate or tray.
  4. Combine salt, red chilli powder, Kashmiri red chilli powder, chaat masala, garam masala and aamchoor, if using.
  5. Sprinkle this spice mix all over the okra slices and mix gently but thoroughly with your fingers until combined. Set aside.
  6. Over a medium highish flame, heat enough oil for deep frying in a pan.
  7. When the oil is fairly hot, sprinkle the gram flour over the okra. Mix gently by hand and then add the okra carefully into the hot oil.
  8. Make sure you do not overcrowd or overfill the pan – fry okra in batches if your pan isn’t big enough.
  9. If your oil is the right temperature, the surface will start bubbling with small bubbles as soon as the okra is added and then after a couple of seconds, the okra will rise up to the surface of the oil.
  10. Separate the frying okra lightly with a fork to keep from sticking together. When it looks golden brown and feels crisp, remove, preferably with a metal spider skimmer, onto plates lined with kitchen paper. I usually remove the bhindi from the oil directly into a wiry metal colander to minimise surface contact – this ensures that the fried bhindi does not become soggy and remains crisp.
  11. Serve Kurkuri Masala Bhindi hot or at room temperature.
  12. This makes an excellent side dish for both vegetarian and meaty mains. Very good on its own as a crunchy snack to munch on.


Filed Under: Recipes, Snack & Starter, Uncategorized

Lemon Lime Mousse

July 24, 2017 by aliceineatland Leave a Comment

Lemon Lime Mousse

In my humble opinion, refreshingly creamy clouds of this Lemon Lime Mousse are probably one of the best summer dessert ideas I’ve tried recently.

Fluffy and tart with just the right amount of sweetness, this is fast becoming one of my go to desserts. And the fact that unlike many traditional mousse recipes, this one has no gelatin or raw egg whites and yet it still sets to a lovely moussey fluffiness.

To be entirely truthful, I’m on something of a Lemon Lime Mousse binge marathon these days. I seem to make it alarmingly frequently because it is easy to put together and because I adore lemon based desserts.

Lemon Lime Mousse

I’ve used near-equal amounts of lemon juice and lime juice to flavour my Lemon Lime Mousse since these citrus siblings (or cousins maybe?) obviously have pretty much the same flavour profile. The restrained sweetness of the lemon juice pairs very well with the outright tartness of the lime juice and makes for a fairly good combination.

We have a lovely lime tree in our garden so making Lemon Lime Mousse gives me a good excuse to use up some of our fresh limes. Zesting just picked limes is a refreshingly heady experience; the citrusy fragrance that emanates during the process is something else altogether and hard to replicate while zesting store bought limes.

Lemon Lime Mousse

I absolutely love lemon curd and could be more than satisfied just happily eating it with a spoon. The base of this Lemon Lime Mousse consists of an easy and yummy lemon & lime curd which gives it that lusciously creamy pleasant tartness.

I peel off the zest from the lemons and limes with a vegetable peeler, put the flat coils of peeled zest (no need to chop it or anything) and all the ingredients required for making the curd into my blender and then blend, cook, sieve and cool.

Lemon Lime Mousse

I usually make the lemon lime curd one day before putting the mousse finally together as I believe chilling the curd overnight gives a fluffier mousse and also because I prefer doing half the work in advance when it comes to making food that involves a couple of steps of preparation.

If you cannot find limes, just double the quantity of lemon juice called for in the recipe. My Lemon Lime Mousse has been adapted from this recipe.

Lemon Lime Mousse


Lemon Lime Mousse


Recipe Type: Dessert    Author: Alice In Eatland
Prep Time: 15 Minutes    Cook Time: 5 Minutes    Total Time: 2o Minutes + Chilling Time
Serves: 4 – 6


Creamy, sweet & tangy Lemon Lime Mousse made with an easy made from scratch lemon curd base. A beautiful dessert that’s a breeze to make & a dream to eat!


INGREDIENTS

  • 1/4 cup butter (preferably salted), melted and cooled to room temperature
  • 2 – 3 tablespoons fresh lemon juice
  • 2 – 3 tablespoons fresh lime juice
  • 1/2 tablespoon fresh lemon zest / rind
  • 1/2 tablespoon fresh lime zest / rind
  • 2 large eggs
  • 2 large egg yolks
  • 3/4 cup granulated sugar
  • 1 cup heavy whipping cream (in Pakistan I would recommend Olpers Cream)
  • 1/2 teaspoon vanilla extract or essence


METHOD

  1. Put the butter, juices, zests, eggs, yolks and sugar in a blender. Blend until everything is uniform, slightly thick and light yellow in colour – this should take less than a minute.
  2.  Have a fine mesh sieve over a heatproof bowl ready.
  3.  Pour the blended lemon mixture into a non-corrosive pan and whisk the mixture constantly over medium-low heat until the mixture comes to the boil. Keep whisking for 1 – 2 minutes – the mixture will be thick and bubbly.
  4. Remove mixture from heat and pour through the fine mesh sieve waiting over the heatproof bowl, pressing the mixture with the back of a large spoon until you’re left with just the zest and bits of cooked egg in the sieve.
  5. Cover the surface of the sieved lemon curd immediately with cling film. Make sure that the cling film is in direct contact all over with the lemon curd – this will prevent a skin from forming on the surface of the curd.
  6. Cool to room temperature and then place in the fridge for 2 – 4 hours or until quite cold. Overnight works great.
  7. Whip cream and vanilla until thick and fluffy. Fold into cold lemon curd lightly with a spatula.
  8. Pour or pipe the Lemon & Lime Mousse into individual serving bowls or ramekins or into one large family style serving bowl.
  9. Chill 2 – 4 hours. This can be made in advance and does well from chilling overnight in the fridge. The colder the better.
  10. If wished, decorate mousse with whipped cream and fresh lemon and lime slices or wedges right before serving.
  11. Serve cold straight from the fridge.
  12. Keep refrigerated.

Filed Under: Desserts, Recipes

  • « Go to Previous Page
  • Page 1
  • Page 2
  • Page 3
  • Page 4
  • Page 5
  • Go to Next Page »

Primary Sidebar

ABOUT ALICE

Favorite recipes, fun eating out experiences and some wonderful food memories from Lahore, Pakistan.

ALICE’S TOP PICKS

Rose Crème Brûlée

Rose Crème Brûlée

Three Cheese Roasted Chilli Bread Pudding

Patisserie at Mocca Coffee Gulberg

Mocca Coffee Gulberg

The Paloma

The Paloma

Tags

Autumn / Fall Baking Budget-Friendly Cafe Chocolate Christmas Daharki Desi Dessert Dinner Easter Eatery Freezer Friendly Halloween Lunch Pakistani Restaurant Romantic Soup Spring Starter Summer Valentine's Day Vegan Vegetarian Winter

Tags

Autumn / Fall Baking Budget-Friendly Cafe Chocolate Christmas Daharki Desi Dessert Dinner Easter Eatery Freezer Friendly Halloween Lunch Pakistani Restaurant Romantic Soup Spring Starter Summer Valentine's Day Vegan Vegetarian Winter

Categories

  • Breakfast & Brunch
  • Budget Friendly
  • Condiment
  • Desserts
  • Drinks
  • Eateries
  • Homemade Cheese
  • Homemade Cheese
  • Mains
  • Recipes
  • Snack & Starter
  • Uncategorized

ABOUT

Hello! If like me, you too love to cook, bake and eat then you're in the right place. From heartwarming, soul-satisfying comfort food to light, fresh and deliciously healthy meals, everything here is made with the utmost TLC :)

Tags

Autumn / Fall Baking Budget-Friendly Cafe Chocolate Christmas Daharki Desi Dessert Dinner Easter Eatery Freezer Friendly Halloween Lunch Pakistani Restaurant Romantic Soup Spring Starter Summer Valentine's Day Vegan Vegetarian Winter

Copyright © 2025 · Foodie Pro Theme by Shay Bocks · Built on the Genesis Framework · Powered by WordPress