• Skip to primary navigation
  • Skip to main content
  • Skip to primary sidebar

Alice In Eatland

Recipes . Eateries . Inspiration

  • Recipe Index
  • Eateries

Recipes

Chocolate Custard Cream Cake

September 26, 2020 by aliceineatland Leave a Comment


Moist cake layers & fluffy custard cream – Chocolate Custard Cream Cake is an elegant cocoa-based take on the classic vanilla custard cake of yesteryear.

A WhatsApp conversation with some of my school friends got us all dreaming of a certain custard cake that used to be a popular thing to bake when we were growing up in Daharki back in the ‘80s and ‘90s.

The confection in question was a simple sponge-style cake filled and covered with vanilla custard made from Rafhan Custard Powder – in truth, the sort of homely, old-fashioned baking one rarely comes across that often now.

Chocolate Custard Cream Cake

Luckily, one of my friends still has the recipe and inspired by that, I made this cocoa version with a slightly different take on the custard filling & frosting.

The cake is my basic go-to chocolate cake recipe and you will find more ideas based around this recipe on the blog.

The custard here is made from scratch and “lightened” (in the textural sense only obviously) with a little whipped cream that gives it an airier, fluffier quality.

Try it.

Chocolate Custard Cream Cake


CHOCOLATE CUSTARD CREAM CAKE


RECIPE TYPE: DESSERT    AUTHOR: ALICE IN EATLAND
PREP TIME: 60 Minutes    COOK TIME: 60    TOTAL TIME: 2 HOURS
SERVES: 6 – 8


Moist cake layers & fluffy custard cream – Chocolate Custard Cream Cake is an elegant cocoa based take on the classic vanilla custard cake of yesteryear.


MOIST CHOCOLATE CAKE


INGREDIENTS

  • 1 cup milk
  • 4 tbsp white vinegar
  • 2 cups caster sugar or superfine sugar
  • 1 cup + 3/4 cup plain flour
  • 3/4 cup cocoa
  • 2 tsp baking soda
  • 1 tsp baking powder
  • 1 tsp salt
  • 2 large eggs
  • 1/2 cup oil
  • 1 tsp vanilla extract or essence
  • 2 tsp instant coffee
  • 1 cup boiling water


METHOD

  1. Preheat oven to 180 degrees C / 350 degrees F.
  2. Grease two 6.5” x 2.5” round cake pans and line with parchment paper.
    Grease and flour the paper.
    Or do what I usually do: line cake pans with aluminium foil and grease and flour the foil. Set aside.
  3. Stir the milk and vinegar together in a small cup or bowl to make buttermilk. Set aside.
  4. Combine all the dry ingredients, except coffee, in a bowl.
  5. Whisk the eggs. Stir the buttermilk and add to the eggs along with the oil and vanilla.
  6. Add the egg mixture to the dry ingredients and beat until well mixed.
  7. Stir the instant coffee into the boiling water and carefully stir into the cocoa mixture. Batter will be quite thin.
  8. Divide the batter into two and pour into the prepared cake pans.
  9. Bake 30 – 40 minutes or until the cakes have risen and a wooden pick inserted near the center comes out clean.
    This can take up to an hour depending on your oven.
  10. Let cakes cool in pans for 10 minutes then turn out onto a wire rack.
    Invert so that the top of the cakes is up and cool completely.
  11. Your cakes may have domed tops so trim off carefully with a long serrated knife and discard (by “discard” I mean eat with chai like I do).
  12. Slice each cake horizontally into two so you have 4 layers.


CUSTARD CREAM FILLING & TOPPING


INGREDIENTS

  • 4 egg yolks
  • 4 – 6 tablespoons sugar
  • 1 cup milk
  • 2 tablespoons butter
  • 1/2 – 1 teaspoon vanilla extract or essence
  • 1/2 cup heavy whipping cream, well chilled
  • A few tablespoons of icing sugar, sifted


METHOD

  1. Whip the cream till thick & fluffy. Cover & keep in the fridge.
  2. Whisk together the egg yolks, sugar & milk in a pan until combined.
  3. Place the pan on a medium-ish heat and keep whisking or stirring the mixture thickens and coats the back of a spoon thickly.
  4. Keep stirring and remove from the heat just as the custard begins to reach a gentle simmer. Do not let the custard boil as it may split or curdle.
  5. Once off the heat, stir in the butter and vanilla.
  6. Cover the entire surface of the hot custard with plastic wrap and cool completely.
  7. Push the cooled custard through a sieve so that you have a smooth custard & no tiny eggy lumps. Chill covered.
  8. When cold, fold in 2 tablespoons of the whipped cream.
  9. Sandwich the cake layers generously with this custard cream.
  10. Chill the cake in the fridge for at least 30 minutes.
  11. You may need to insert a long wooden skewer or satay stick into the centre to stabilise the cake layers.
  12. Fold any leftover custard cream into the remaining whipped cream and taste to see if it’s sweet enough. If not, beat in enough of the icing sugar till desired sweetness is reached.
  13. Frost the cake with the custard cream.
  14. Keep filled & frosted cake refrigerated.


Filed Under: Desserts, Recipes Tagged With: Autumn / Fall, Chocolate, Daharki, Dessert, Summer, Vegetarian

White Haleem

June 13, 2019 by aliceineatland Leave a Comment

White Haleem

White Haleem

White Haleem is a delicately flavoured grain and lentil based stew that makes for a delicious, nourishing and satisfying meal.

Dubai based food blogger Tasneem Rajkotwala, and her beautiful blog “Thoughts Over Chai” introduced me to the wonders of White Haleem.

She refers to this haleem as her “Dadijaan’s Morning Haleem” and you can head to her blog for the original recipe and accompanying post here.

Tasneem’s blog is a treat and a great place to check out if you’re looking for traditional Bohra recipes.

I am always on the lookout for a good meatless Haleem recipe and this is a lovely vegetarian and vegan friendly version.

White Haleem is kind of like a milder sibling of traditional Haleem, the spicy meat, lentil and grain stew popular in Pakistan and parts of India.

White Haleem

Regular Haleem is meat based and generally packs quite a punch whereas White Haleem is meatless and fairly mild.

The lack of fire in this delicious stew however, by no means denotes any lack of flavour.

The absence of strong spices means that the actual flavour of the lentils and grains themselves really shines through.

The final damm of ground spices infuses the haleem with the pleasingly heady aromas of caraway seeds, nutmeg, mace and green cardamoms.

I love White Haleem and honestly, it reminds me more of Shorba, a light non-spicy Yemeni Haleem than of Pakistani Haleem.

I had Shorba over a decade ago at a school friend’s home in Sana’a, Yemen. It was made by her Mother and I have never been able to forget it’s tastiness.

White Haleem

I am hopelessly addicted to spicy food. But there are some recipes that work so well without being fiery that I don’t miss the bite of spices at all.

With White Haleem, I feel that an inclusion of heavy flavours would actually intrude on its deliciously soothing taste.

Traditional haleem toppings such as fresh herbs, green chillies, caramelised onions and roasted nuts provide a pleasant textural contrast to the creaminess of the haleem, the ghee or oil and garam masala add additional flavour and the lemon juice imparts subtle tartness.

To make this vegan, simply substitute the ghee called for in the recipe with oil.

Perfect for any meal or any time of the year really.

White Haleem

WHITE HALEEM


Recipe Type: Main    Author: Alice In Eatland
Prep Time: 15 Minutes (plus 2 – 4 hours soaking time)    Cook Time: 60 Minutes    Total Time: 2 – 3 Hours
Serves: 2 – 4


White Haleem, a satisfying, aromatic  grain & lentil stew. The topping of fresh herbs, ginger, cashews & caramelised onions add additional flavour & textural contrast.


INGREDIENTS

  • 1/4 cup white basmati rice
  • 1/4 cup barley porridge / barley cereal (jau ka dalia)
  • 1/2 cup split black gram (maash daal / urad daal)
  • 1/4 cup split yellow mung (moong daal)
  • 1/4 cup split Bengal gram (channa daal)
  • 1/2 teaspoon black cumin seeds / caraway seeds (kaala zeera / shah zeera)
  • 1/4 of an inch or so piece of nutmeg (jaiphal)
  • 1 – 2 blades of mace (javitri)
  • 2 – 4 green cardamoms (hari elachi)
  • 2 medium onions, peeled & thinly sliced
  • Oil to deep fry
  • 2 – 4 medium fresh green chillies, roughly chopped
  •  1 medium onion, peeled & roughly chopped
  • 1 MSG free vegetable stock cube / vegetable bouillon cube (optional but recommended)
  • Salt
  • A few tablespoons of desi ghee (omit if making the haleem vegan)
  • Fresh ginger, peeled & cut into thin batons
  • Fresh coriander leaves, chopped
  • Fresh mint leaves, chopped
  • Fresh mild green chillies, seeded & chopped
  • Lemons, cut into quarters
  • Roasted cashews
  • Garam Masala


METHOD

  1. Place the rice, barley porridge and lentils in a large bowl and wash in several changes of water until it runs almost clear.
  2. Finally fill the bowl with enough water to come a couple of inches up the sides and let the grains and lentils soak for 4 – 6 hours or overnight.
  3. Grind the black cumin seeds, nutmeg, mace and green cardamoms to a fine powder in a small spice / coffee grinder. Set aside.
  4. Heat oil for deep frying and when hot, fry the sliced onions until golden. Remove fried onions to a plate lined with kitchen paper. Set aside.
  5. Reserve about 4 – 6 tablespoons of oil after deep frying.
  6. Boil a kettle of water and set aside to simmer on a very low heat.
  7. Drain the soaked grains and lentils and rinse one more time with fresh water. Place into a pan along with 2 tablespoons of the reserved oil, stock cube (if using), chopped onion, chopped green chillies and around 4 – 6 cups of water.
  8. Bring to the boil on a high heat, then lower the heat to low and let cook partially covered, stirring occasionally until the grains and lentils are completely soft and mushy.
  9. The mixture can take anywhere from 1 hour to more to soften to a mush. If you feel the haleem is getting too thick, add more water from the simmering kettle to thin it down.
  10. When cooked, the haleem will be thick but the consistency should also be slightly on the looser side.
  11. Sieve in the reserved ground spice mixture, cover and simmer on a very low heat for 10 minutes.
  12. Remove from heat, cool to room temperature and blend in a blender or with a stick blender until somewhere between smooth and grainy.
  13. It is best not to overblend because you want some of that grainy texture to remain.
  14. Check salt and adjust if needed.
  15. White Haleem can be frozen airtight at this point, if wished.
  16. When ready to serve, ladle out hot haleem into serving bowl (or individual serving bowls, if wished).
  17. Heat ghee if using or the leftover reserved oil until hot and pour all over the surface of the haleem.
  18. Garnish with ginger, coriander, mint, green chillies, cashews and reserved fried onion.
  19. Sprinkle garam masala and squeeze lemon juice on top.
  20. Eat.

Filed Under: Mains, Recipes Tagged With: Autumn / Fall, Dinner, Lunch, Spring, Summer, Vegan, Vegetarian, Winter

AUTUMN APPLE CARAMEL CAKE

October 18, 2018 by aliceineatland Leave a Comment

Autumn Apple Caramel Cake

Autumn/fall is well and truly here and as the temperatures fall, for me nothing feels cosier than pottering about the kitchen in general and some good old-fashioned baking in particular.

So here’s my Autumn Apple Caramel Cake, which can obviously be made any time of the year but is special particularly during the beautiful season it has been named in honour of.

And with classic autumnal things like pumpkins, caramel apples, falling leaves and Halloween in the air, I feel this is one of the most perfect cakes to celebrate the fall season with.

Autumn Apple Caramel Cake

A classic bundt cake is as old-fashioned as it gets. Add a retro style apple cake into the equation and you have all the makings of my ideal way to spend an autumn/fall afternoon.

I will admit that I am a bit obsessed with bundt pans which is frankly, a rather tragic obsession as at the moment I own just two bundt pans in total. Boo hoo!

I would love to get my hands on a couple of those intricately sexy Nordic Ware bundt pans but in the meantime, my trusty old and much less intricate no-brand-in-particular bundt pans will have to suffice. And honestly, they don’t do a bad job at all.

Autumn Apple Caramel Cake

This Autumn Apple Caramel Cake is moist, fragrant and nutty and can actually hold its own without the caramel drizzle.

My family loves this cake either with or without the caramel drizzle and we enjoy it cut into generous slices with cups of hot tea.

There is a subtle hint of cinnamon in there too – you can tell it’s somewhere in the background but just enough so as not to overpower the delicate apple taste and fragrance.

Autumn Apple Caramel Cake

And of course, the dehydrated apple wheels on top transform this simple cake into a stunning masterpiece.

This Autumn Apple Caramel Cake is also a fond reminder of two food related memories from my childhood.

One is of a cookbook brought from London by my eldest maternal Aunt back in the ’80s that had, amongst some rather imaginatively named recipes such as “Lightning Cake” (with the tag line ‘Made in a moment, gone in a flash!’), an old-fashioned “Farmhouse Apple Cake”.

Autumn Apple Caramel Cake

I loved imagining myself in a rustic English farmhouse and munching on slices of that apple cake with a thick caramel icing atop.

The other memory this cake triggers is that of a cooking class in Daharki during the early ’90s.

A group of French engineers were on a visit to the Engro (Exxon back then) plant and their wives held a cooking class for the colony ladies, teaching them some French recipes.

Autumn Apple Caramel Cake

There were two types of quiches, a basic quiche and a mushroom quiche and two kinds of rustic cakes – an almond cake and an apple cake.

I still have those recipe printouts somewhere and this apple cake reminds me of that time.

I hope you enjoy making this Autumn Apple Caramel Cake as much as I do. Thanks to STL Cooks for the apple cake recipe, Cooking With Ruthie for the recipe that I based the caramel drizzle on and to Entertaining With Beth for the decorating idea.

Autumn Apple Caramel Cake

AUTUMN APPLE CARAMEL CAKE


Recipe Type: Dessert    Author: Alice In Eatland
Prep Time: 20 Minutes    Cook Time: 40 Minutes    Total Time: 60 Minutes
Serves: 6


Autumn Apple Caramel Cake – moist, fragrant & nutty with a hint of cinnamon & a beautiful caramel drizzle. Perfect for autumn / fall!


INGREDIENTS

  • 1/2 cup vegetable oil
  • 1 cup caster sugar / superfine sugar
  • 1 large egg (or 2 small eggs)
  • 1 teaspoon vanilla extract or essence
  • 1 1/2 cups plain flour
  • 1/4 teaspoon salt
  • 1/2 teaspoon baking soda
  • 1/4 – 1/2 teaspoon ground cinnamon
  • 1 1/2 cups grated apples*
  • 1/2 cup chopped walnuts or pecans


METHOD

  1. Preheat oven to 180 degrees C / 350 degrees F.
  2. If using a small bundt pan (around 5″ or so in diameter) please refer to the note** below in which I also detail the pan size and shape I used to bake the cake in these photos.
  3. If using an 8″ round pan, a 7″ square pan or any other similar sized pan of your choice, oil it evenly.
  4. Sprinkle some plain flour and shake and tilt the pan until it is evenly coated. Tap off any excess flour.
  5. Now on to the cake batter. Toss the nuts in a few teaspoons of the flour until well coated***. Set aside.
  6. Beat the oil, sugar, egg(s) and vanilla until thick and pale.
  7. Stir the flour, salt, baking soda and ground cinnamon together and fold into the wet mixture.
  8. Stir in the grated apple followed by the flour dusted walnuts or pecans.
  9. Pour mixture into your prepared pan.
  10. Bake 30 – 40 minutes or until skewer or toothpick inserted near the centre of the cake comes out clean.
  11. Remove baked cake from oven and cool on a wire rack for 10 – 15 minutes.
  12. Loosen the edges of the cake slightly with a knife, turn upside down onto the cooling rack, gently removing the pan as the cake inverts out onto the rack.
  13. Cool cake completely to room temperature.
  14. Store airtight.


DEHYDRATED APPLE CHIPS


  1. Preheat oven to 180 degrees C / 350 degrees F.
  2. Line a baking sheet with parchment paper or aluminium foil.
  3. Place 1 medium or large apple on its side on a chopping board.
  4. Using a sharp knife, slice the apple as thinly as possible into wheels.
  5. Place the apple wheels in a single layer on the prepared baking sheet.
  6. Place in preheated oven.
  7. Keep an eye on the apple chips. They should begin to turn a pale brown, look dryish and the edges should begin to curl up in places.
  8. Make sure they don’t over brown or burn!
  9. Once this stage is reached, flip them over with a pair of tongs.
  10. Continue baking until the other side is also brownish, dry and curling up.
  11. Remove from oven, transfer the apple chips to a wire rack and cool completely to room temperature.
  12. Store in an airtight jar if not using right away.


CARAMEL DRIZZLE


INGREDIENTS

  • 1/4 cup light or dark soft brown sugar, packed
  • 2 tablespoons butter
  • 1 tablespoon milk
  • 1/2 teaspoon vanilla extract or essence
  • 1/4 cup icing sugar, sifted


METHOD

  1. Place the brown sugar, butter and milk in a pan and stir over medium heat.
  2. When the butter and sugar have melted and the mixture reaches the boil, remove from heat.
  3. Stir in the vanilla.
  4. Whisk in the icing sugar until smooth.
  5. Place cake on a wire rack with a parchment paper lined tray underneath to catch icing drips.
  6. Spoon the warm caramel drizzle all over the top of the cake so that it runs down over and drips down the sides.
  7. I pour the warm caramel drizzle in a Pyrex measuring cup and pour it all over the cake. I find this much easier and quicker than the spoon method.
  8. If using dehydrated apple chips / wheels or any other decoration (such as nuts), place them into position immediately after pouring the glaze so that they adhere to the cake before the icing sets, which it does rather quickly.


NOTES


*I used two kinds of apples to make this cake – one and a half each of Granny Smith apples (my favourite) and local red apples.

I did not peel the apples and used a box grater to grate them.

Peeling the apples before grating makes the process easier so it is definitely recommended.


**Oil your bundt pan very well, using a pastry brush if you have it, making sure you reach and coat all crevices, nooks and crannies evenly.

Place your well greased pan upside down on a rack with a parchment paper lined tray underneath to catch excess oil.

Oil begins to pool inside bundt pans once they’re greased so this step will prevent it from doing that while you finish preparing your batter.

You can spray your bundt pan with a cooking spray containing flour instead of oiling it.

I do not flour my bundt pans because I find that the baked cakes seem to crust in places if flour is used.

I have used a 10″ silicone bundt pan and double the recipe to make the cake in the photos.

This particular bundt shape is known as The Cathedral.

A cake baked in a silicone bundt can take longer to bake compared to a metal pan.

If using a silicone bundt, place the prepared pan on a baking sheet before pouring in the batter and place it in the oven on top of the baking sheet.

The baking sheet will provide stability to your silicone bundt pan which can sometimes be a bit wobbly and unsteady.


***This step of tossing the nuts in a little flour will prevent them from sinking to the bottom of the pan while baking.

Filed Under: Desserts, Recipes Tagged With: Autumn / Fall, Baking, Dessert

Zafrani Shahi Tukray

August 21, 2018 by aliceineatland Leave a Comment

Zafrani Shahi Tukray 
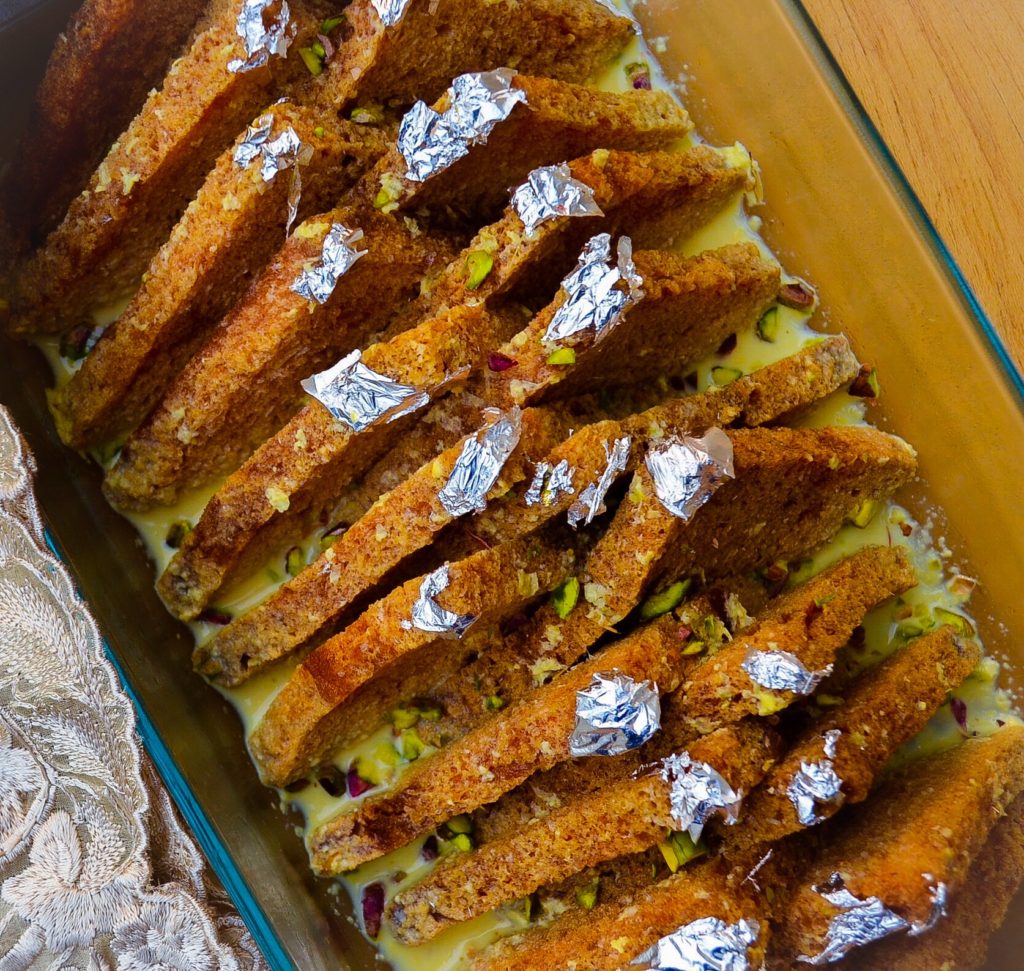
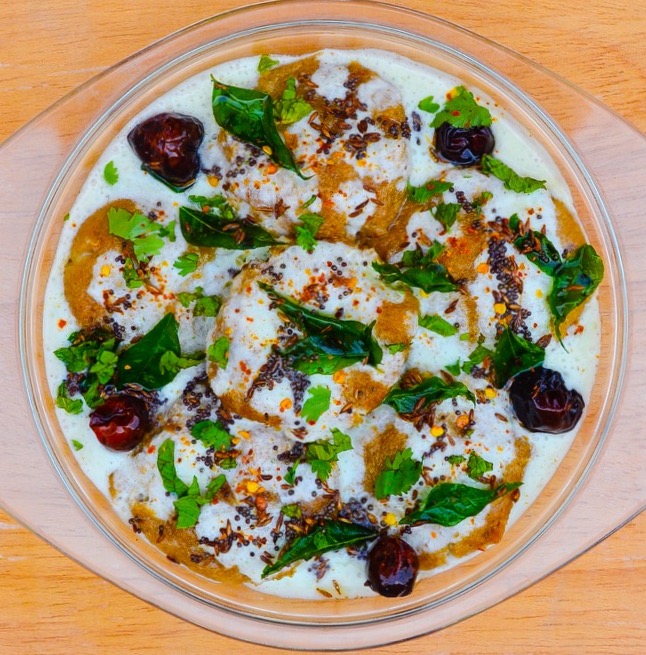
My absolute favourite traditional Pakistani dessert has to be Zafrani Shahi Tukray!

Golden deep fried bread, soaked in a saffron flavoured and cardamom scented milk base, garnished with edible silver warq and chopped nuts – what’s not to love about this comforting desi style bread pudding?

I almost always get a recipe request whenever I serve this at a dinner, party etc.

If you’re serving a traditional desi menu and thinking of a really smashing dessert to go with it, Zafrani Shahi Tukray are a pretty great choice. Zafrani Shahi Tukray Pakistani desserts and sweets are lovely but I’ve noticed that not everyone likes every traditional meetha.

For example, I’m not a fan of Kheer but love Firni. I know people who absolutely adore Gajar Ka Halwa and there are others who don’t care for it at all.

As far as I know, Shahi Tukray are one of those traditional desserts enjoyed by almost everyone – both kids and adults alike.

Everyone seems to love my Zafrani Shahi Tukray so here’s the easy recipe that I initially found on FoodViva. Zafrani Shahi Tukray


Recipe Type: Dessert    Author: Alice In Eatland
Prep Time: 30 Minutes   Cook Time: 30 Minutes    Total Time: 60 Minutes
Serves: 4


Zafrani Shahi Tukray, a traditional Pakistani bread pudding made of golden fried bread soaked in thick saffron flavoured & cardamom scented milk.


INGREDIENTS

  • 2 1/2 cups whole milk
  • 1/4 cup sweetened condensed milk
  • 1 tablespoon granulated sugar
  • 4 – 6 green cardamoms
  • Good pinch saffron strands
  • Oil for deep frying*
  • 4 – 6 white bread slices**
  • Chopped pistachios & almonds
  • Edible silver leaf / warq


METHOD

  1. In a stainless steel pan, stir together the whole milk, sweetened condensed milk, sugar, cardamoms and saffron strands.
  2. Place over medium heat and bring to the boil, stirring frequently.
  3. When milk mixture reaches the boil, reduce the heat to medium-low.
  4. Let mixture cook uncovered until almost reduced by half – this can take anywhere from 10 – 20 minutes.
  5. When mixture has reduced and seems a bit thick, remove from heat.
  6. Cool completely to room temperature.
  7. Either pick out the cardamoms or strain the mixture to get rid of any seeds that may be lurking in the milk.
  8. Get oil ready for deep frying in a roomy pan.
  9. Line a couple of trays or flat plates with paper towels / kitchen paper.
  10. Trim the crusts from all four sides of the bread slices and then cut each slice into quarters so that you have 4 triangles.
  11. When the oil is hot enough, deep fry bread triangles on both sides a few minutes in batches, until golden all over.
  12. Remove golden fried bread triangles to lined trays / plates.
  13. After about 5 minutes, when the paper towels have absorbed as much oil as possible, remove fried bread to another tray or plate lined with fresh paper towels / kitchen paper, placing bread triangles the other side down.
  14. This step ensures that you remove as much excess oil as possible from the deep fried bread.
  15. When ready to assemble Zafrani Shahi Tukray, using tongs, dunk each bread triangle in the cooled milk mixture, making sure both sides are soaked thoroughly and arrange in serving dish.
  16. Pour about 3/4ths of the remaining milk all over the arranged bread, reserving the rest.
  17. Place edible silver leaf / warq over the bread triangle points.
  18. Sprinkle with the chopped nuts, cover with cling film and chill at least 30 minutes to an hour – the longer it chills, the better.
  19. Let Zafrani Shahi Tukray come to room temperature 5 – 10 minutes and drizzle over the remaining milk before serving.
  20. Store leftovers covered with cling film in the fridge for up to 2 days.


NOTES

*I’ve come across recipes that recommend shallow frying the bread in very little oil or even toasting it to cut down on the fat.

I deep fry my bread because it is not possible to get an overall golden crust without it, plus I feel deep fried bread holds up better when it comes to absorbing the milk and doesn’t get too mushy.

Since this is usually a special treat and not made on a daily basis, I don’t feel too guilty about deep frying the bread.

You can try the shallow frying or toasting method but I cannot guarantee if the results will be the same because I’ve never tried those methods with my Zafrani Shahi Tukray.


**The number of white bread slices you will need for this recipe depends on the size of your slices and that of your serving dish.

In these photos, I have made double this recipe and used 11 bread slices to fill up my rectangle Pyrex dish.

The bread slices I’ve used here measure about 3.5″ x 3″ (with crusts) and the dish measures around 9″ x  5.5″.

Filed Under: Desserts, Recipes

Grilled Peach, Feta & Walnut Salad

August 16, 2018 by aliceineatland Leave a Comment

Grilled Peach, Feta & Walnut Salad

Grilled Peach, Feta & Walnut Salad 
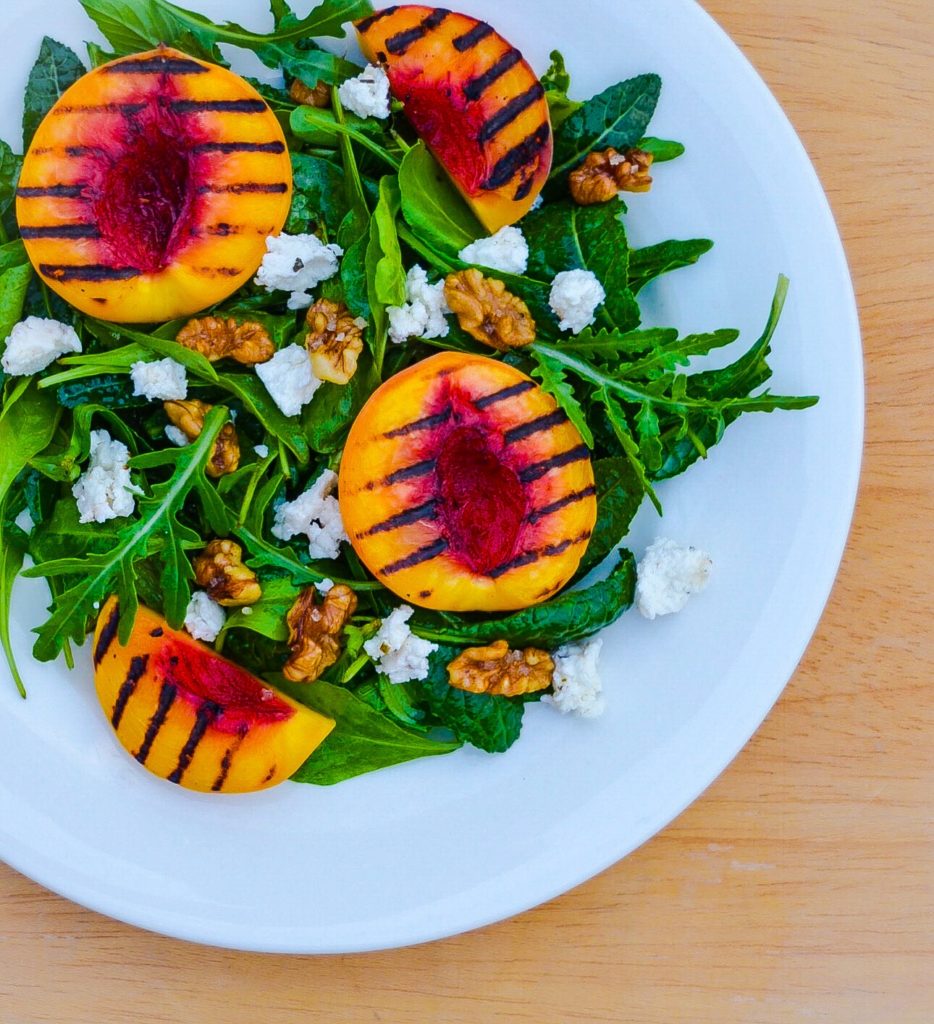
There is autumn / fall in the air. Yes, the temperatures will not really fall enough to be classified as autumn / fall weather until October, but there is a definite change in the air.

We are in the mid – late stages of summer 2018.

Summer in most parts of Pakistan generally means soaring temperatures and unending bouts of severe humidity followed by much welcome monsoon rain. Grilled Peach, Feta & Walnut Salad 
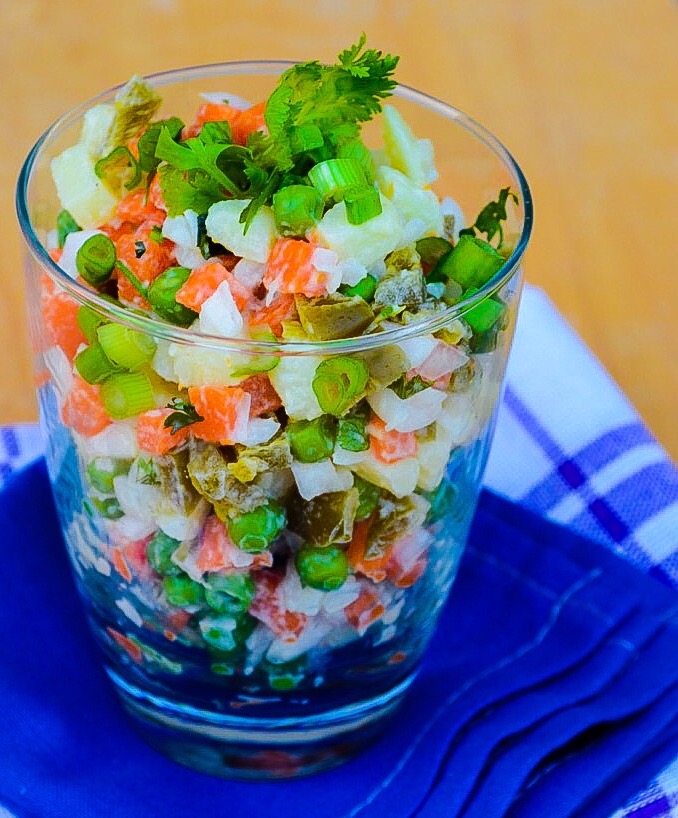
Summer for us also means an abundance of glorious sun ripened fruit such as mangoes, faalsa (rather unromantically classified as Grewia Asiatica in English) watermelons and peaches.

This simple yet beautiful Grilled Peach, Feta & Walnut Salad is an elegant tribute to summer fruit – an easy, delicious and restaurant worthy salad that comes together in no time. Grilled Peach, Feta & Walnut Salad Ripe peaches, juicy and slightly smoky from being grilled contrast wonderfully atop a bed of fresh crisp salad greens doused in a sweet and tart Honey Citrus Dressing and topped with salty feta and earthy toasted walnuts – how gorgeous and refreshing is that?

This salad does well at being served at room temperature but I like it best cold. Grilled Peach, Feta & Walnut Salad Grilled Peach, Feta & Walnut Salad

Recipe Type: Starters & Sides    Author: Alice In Eatland
Prep Time: 15 Minutes    Cook Time: 10 Minutes    Total Time: 25 Minutes
Serves: 1 – 2


Smoky peaches, crisp salad greens, Honey Citrus Dressing, feta & toasted walnuts contrast perfectly in this lovely Grilled Peach, Feta & Walnut Salad.


INGREDIENTS

  • 1 – 2 medium sized peaches (ripe but firm)*
  • Olive oil
  • Salt
  • 2 tablespoons good extra virgin olive oil
  • 1 tablespoon honey + extra
  • 1/2 – 1 tablespoon fresh lemon or lime juice + extra
  • Salt
  • Fresh milled black pepper
  • 1 – 2 cups salad greens / mesclun mix**
  • Feta cheese, crumbled
  • Toasted or caramelised walnuts
  • Balsamic glaze (optional)


METHOD

  1. Preheat a cast iron grill or a grill pan over medium heat.
  2. Halve peaches, remove the pits / stones and slice into thick rounds.
  3. Brush / coat both sides of peach slices evenly with olive oil and sprinkle with salt.
  4. Grill sliced peaches on both sides, 2-5 minutes per side, or until good dark char marks appear.
  5. Cool on wire rack & cool completely.
  6. When peaches have cooled to room temperature, transfer them to a flat plate and place in the fridge to chill.
  7. Prepare the Honey Citrus Dressing by whisking together the extra virgin olive oil, honey, fresh lime or lemon juice with a pinch each of salt and black pepper.
  8. When the dressing emulsifies and thickens, taste it.
  9. It should be sweet, tart and zingy. Add more lemon / lime juice, honey, salt or pepper if needed. Set aside.
  10. When ready to serve, toss your washed and dried salad greens in  the dressing and place on serving plate.
  11. Place cold grilled peach slices on top, crumble over some salty feta and scatter toasted walnuts all over.
  12. If wanted, give the salad a final drizzle of balsamic glaze – the salad will taste great without it as well.


NOTES

*Mangoes, pears and apricots also grill well and make good substitutes for / alternatives to peaches in this kind of salad.

**Here I’ve used a 50 gram packet of salad mix by Origi Nature available at Haryali Store. It is a mix of rocket (arugula), baby spinach, baby kale and tender basil.

Filed Under: Recipes, Snack & Starter

Momofuku Ginger Scallion Noodles

August 7, 2018 by aliceineatland 2 Comments

Momofuku Ginger Scallion Noodles

Post Updated: 04.12.23

The one and only Momofuku Ginger Scallion Noodles – I am salivating while updating this post.

Also, I am mentally going through the contents of my fridge and pantry, hoping I have all the ingredients to make these noodles after I’m done with this post.

Momofuku Ginger Scallion Noodles: The Legend

Restaurateur David Chang, creator of Netflix cult favourite “Ugly Delicious” and founder of the Momofuku Group of Restaurants writes in his book “Momofuku” (written with Peter Meehan) that “Our ginger scallion noodles are an homage to / out-and-out-rip-off of one of the greatest dishes in New York City: the $4.95 plate of ginger scallion noodles at Great New York Noodle Town down on the Bowery in Chinatown.”

I agree with Chang when he says, “You need ginger scallion sauce on your noodles, in your fridge and in your life. For real.”

Momofuku Ginger Scallion Noodles

Momofuku Ginger Scallion Noodles: The Real Star Of The Show

The real star of this Momofuku Ginger Scallion Noodle dish is the Ginger Scallion Sauce. There is absolutely nothing like it.

Also, the sauce in question is more solid than liquid, more like a chunky condiment or a chutney than a pourable flavouring concoction.

This Ginger Scallion Sauce is also a perfect demonstration of how the correct combination of just a few simple ingredients can result in astoundingly astonishing flavours.

I use it not just for this noodle recipe but also to top fried rice, mashed potatoes and soups. The possibilities are quite literally, endless.

Momofuku Ginger Scallion Noodles: How Do You Serve Them?

The Ginger Scallion Noodles at Momofuku are served with things like bamboo shoots, pickled cucumbers, pan roasted cauliflower, sliced scallions and toasted nori.

I eat mine unadorned, except for a few fresh spring onions tops chopped into bits sometimes. But mostly with nothing else.

These noodles taste great at room temperature but somehow I love them cold straight from the fridge more. Cold buckwheat soba noodles would also go pretty well with this sauce.

Thanks to fellow foodie blogger friend Monita Sen for introducing me to these incredible Momofuku Ginger Scallion Noodles – check out Monita’s luscious Instagram feed; it is insanely gorgeous!

Momofuku Ginger Scallion Noodles

Momofuku Ginger Scallion Noodles


Recipe Type: Main, Snack
Author: Alice In Eatland
Prep Time: 10 Minutes   Cook Time: 10 Minutes    Total Time: 20 Minutes
Serves: 1
Keyword: 10 Minute Recipe, Asian Noodles, Asian Recipe Easy, Dinner Ideas, Easy Recipes, Healthy Asian Recipes, Noodles, Quick And Easy Recipe, Vegetarian Recipes, Quick Recipes


Momofuku Ginger Scallion Noodles:

7 everyday ingredients & 10 minutes of your time are all you need to make David Chang’s ultimate ramen noodle recipe.


INGREDIENTS

  • 100 grams (4 oz) cooked ramen or egg noodles
  • 1 1/4 cups finely chopped spring onions / green onions / scallions (both white and green parts)
  • 1/8 cup peeled, grated ginger
  • 1/4 cup – 1/2 cup oil*
  • Salt
  • A few teaspoons of white vinegar
  • A few teaspoons of soy sauce


METHOD

  1. Place the chopped spring onions / green onions / scallions and the grated ginger in a heatproof bowl.
  2. Pour the oil into a small saucepan and place over medium heat until the surface of the oil is shimmering slightly.
  3. Put a piece of chopped spring onion in to test the oil. If it sizzles immediately upon contact with the oil, your oil is hot enough.
  4. Remove pan from heat and pour the hot oil straight onto the chopped onions and grated ginger.
  5. Stir in salt, vinegar and soy sauce to taste.
  6. Let sit 10-15 minutes.
  7. Place noodles in a bowl and stir in a couple of tablespoons of your ginger scallion sauce.
  8. Top with some fresh spring onion green bits if liked.
  9. Store any leftover ginger scallion sauce airtight in the fridge for up to 2 – 4 days.


*David Chang recommends either grapeseed or any other neutral oil for this recipe.

I just use regular cooking oil from my kitchen.

Any oil would work alright except a strong tasting one like olive oil.

Filed Under: Budget Friendly, Mains, Recipes Tagged With: Budget-Friendly, Dinner, Lunch, Spring, Summer, Vegan, Vegetarian, Winter

Quick Pita Pizzas

July 24, 2018 by aliceineatland Leave a Comment

Quick Pita Pizzas

Quick Pita Pizzas

Pita pizzas are a pretty kickass idea when you’re looking to make versatile pizza style snacks or appetisers fast.

These good looking crispy discs are perfect for times when:

* You don’t want to bake your own pizza crust.

* You want to experiment with toppings other than the ones offered by commercial pizza places.

* You don’t own things like a pizza stone, a pizza steel, a pizza peel or a cool kiln-like brick oven.

* Baking pizza on an upturned baking sheet hasn’t helped much because your oven doesn’t operate at the kind of furnace-like temperatures required to make a really awesome pizza crust.

* All of the above.

You can use any of your favourite pizza toppings to make these. The possibilities are endless and consider these 3 types of pita pizzas as guides and build your own favourites.

Use your favourite pizza sauce, mushrooms, olives, caramelised onions, feta cheese or anything your heart desires and that you like to top your pizzas with.

It is hard to give exact quantities for the ingredients here because it will all depend on the size of the pita breads you use and how generous or stingy you are with the toppings.

Quick Pita Pizzas

The pita breads I used to make these pita pizzas were roughly maybe 6″ in diameter so use that as a guide.

I used a homemade Parsley Walnut Pesto to top one of the pizzas. That is what I had in the fridge so that is what I used. The pesto recipe below is flexible; if you want to make a traditional pesto, use sweet basil and pine nuts.

I had roasted pumpkin pieces in the freezer so I defrosted some of those and added to one of the pizzas and topped it with some leftover baby spinach from a salad that I had made the previous evening.

The pita breads I’ve used here were purchased a few weeks before and had been sitting in my deep freezer. I put them to defrost on the kitchen counter while I got the pizza toppings ready.

I’m all about what’s available and making life easy. So work with what you have and what you like.

Also, these pita pizzas look best when they’re not perfectly prettified. The more rustic looking, the better, in my humble opinion.

It is ok to be generous when topping your pita pizzas but remember not to overload them with the toppings. It is pita bread after all, hence not as sturdy as thick crust pizza dough so keep that in mind.

Quick Pita Pizzas


QUICK PITA PIZZAS


Recipe Type: Starter & Snack    Author: Alice In Eatland
Prep Time: 10 Minutes    Cook Time: 10 Minutes    Total Time: 20 Minutes
Serves: 2 – 3


Crispy quick pita pizzas – easy, fast & fun to put together thanks to readymade pita breads & a myriad of topping possibilities – yum!


PIZZA MARGHERITA

INGREDIENTS

  • Pita bread*
  • Olive oil
  • 4 – 6 canned whole peeled tomatoes, preferably Italian style
  • Dried oregano
  • Dried basil
  • Garlic powder
  • Onion powder
  • Salt
  • Fresh ground black pepper
  • Mozzarella cheese, sliced into squares or rectangles
  • Fresh sweet basil leaves


METHOD

  1. Preheat oven to 200 degrees C / 400 degrees F.
  2. Brush pita bread evenly with olive oil.
  3. Cut or tear tomatoes roughly into quarters and drain as well as possible.
  4. Add a good pinch each of oregano, basil, garlic powder and onion powder.
  5. Pour in a teaspoon or so of olive oil, add salt & pepper to taste and toss lightly to combine, being careful not to break tomatoes.
  6. Arrange seasoned tomatoes randomly all over the pita.
  7. Top with squares or rectangles of sliced mozzarella.
  8. Drizzle a little olive oil all over.
  9. Place directly onto your oven’s wire rack.
  10. Bake 10 minutes or until cheese is well melted.
  11. Remove from oven, top with fresh sweet basil leaves.
  12. Slice into wedges & serve.


PESTO & SUNDRIED TOMATO PIZZA


INGREDIENTS

  • Pita bread*
  • Olive oil
  • Pesto, store / deli bought or homemade (recipe below)
  • Mozzarella cheese, sliced into squares or rectangles
  • Sundried tomatoes in oil, drained
  • Fresh sweet basil leaves, chiffonaded


METHOD

  1. Preheat oven to 200 degrees C / 400 degrees F.
  2. Spread pita bread evenly with pesto leaving a 1/2″ – 1″ border.
  3. Place mozzarella randomly over the top.
  4. Top with sundried tomatoes.
  5. Drizzle a bit of olive oil all over.
  6. Place directly onto your oven’s wire rack.
  7. Bake 5 – 10 minutes or until cheese has melted.
  8. Remove from oven, top with chiffonaded sweet basil, cut into wedges and serve.


BLUE CHEESE, ROASTED PUMPKIN & WALNUT PIZZA


INGREDIENTS

  • Pita bread*
  • Olive oil
  • Mozzarella cheese, sliced into squares or rectangles
  • Blue cheese, crumbled
  • Roasted Pumpkin bits (recipe below)
  • Walnuts
  • Arugula / Rocket leaves or baby spinach


METHOD

  1. Preheat oven to 200 degrees C / 400 degrees F.
  2. Brush pita bread evenly with olive oil, leaving a 1/2″ – 1″ border.
  3. Place mozzarella randomly on top & scatter blue cheese over it.
  4. Place roasted pumpkin pieces on top and add walnuts.
  5. Drizzle olive oil all over.
  6. Place directly onto your oven’s wire rack.
  7. Bake 5 – 10 minutes or until mozzarella has melted.
  8. Remove from oven and top with fresh arugula/ rocket or baby spinach leaves.
  9. Drizzle a little extra virgin olive oil on top of the leaves if wished.
  10. Cut into wedges and serve.


PESTO 2 WAYS


INGREDIENTS

  • 1/2 cup fresh sweet basil leaves OR flat leaf parsley
  • 1/2 tablespoon pine nuts OR walnuts, ground
  • 1 clove garlic, peeled & grated
  • 2 tablespoons extra virgin olive oil + extra
  • 1 tablespoon grated Parmesan cheese
  • Salt


METHOD

  1. Put all ingredients together in a small blender or in the small bowl of a food processor.
  2. Blend or process until combined and a thick paste forms.
  3. If not using straight away, put in an airtight container and cover with a layer of extra virgin olive oil.
  4. Store pesto airtight in the fridge for up to a week.


ROASTED PUMPKIN


INGREDIENTS

  • Pumpkin, peeled & cut into 1″ pieces
  • Olive oil
  • Salt
  • Fresh ground pepper
  • Dried herbs such as thyme, Italian herb mix, fines herbes, herbes de Provence etc (optional)


METHOD

  1. Preheat oven to 180 degrees C / 350 degrees F.
  2. Line a roasting tin or baking sheet with foil.
  3. Add the pumpkin cubes and drizzle with a few tablespoons of olive oil.
  4. Season with salt, pepper and herbs if using.
  5. Give everything a good mix with your fingers so that the pumpkin in thoroughly coated with the oil and seasonings.
  6. Bake 15 – 30 minutes, stirring pumpkin pieces halfway through baking or until fully cooked. Plus points if any light charring occurs in places.
  7. Remove roasted pumpkin from oven and cool completely to room temperature.
  8. Store airtight in the fridge up to 1 day and a few weeks in the freezer.


* You can use any type of pita bread to make these pita pizzas such as whole wheat, gluten free etc.

The ones I’ve used here are multi grain pita breads from La Patisserie.

Filed Under: Recipes, Snack & Starter

Russian Salad Olivier

July 21, 2018 by aliceineatland Leave a Comment

Russian Salad Olivier

Russian Salad Olivier

Up until the ’90s, the most popular salad in Pakistan (second only to our local Kachumer Salad) used to be Russian Salad.

Basically any combination of salad ingredients, such as shredded cabbage,
boiled potato cubes, hard boiled egg bits, with or without chopped apples and / or pomegranate seeds doused in a ton of mayonnaise was loosely referred to as Russian Salad.

Because of my childhood aversion to most things containing mayonnaise, I wasn’t exactly in love with any form of this salad.

Fast forward to early – mid 2000s and I happened to taste a Russian Salad so incredible that I was an instant convert. It was as authentic as it can get because it was made by a Russian family friend, a Moscow native, living in Daharki.

Olga, the Russian lady in question, was happy to share with me the list of simple ingredients that go into making a traditional Russian Salad.

I told her that that was the first time I had actually enjoyed eating a Russian Salad at which she told us of her annoyance at people who combine things like cubes of tinned pineapple with mayonnaise and present that as Russian Salad 😁.

Russian Salad Olivier

Post-Soviet countries such as Ukraine and other countries like Bulgaria love Russian Salad or Salad Olivier. This salad is also pretty popular in Iran where it is known as Salad Olivieh.

In an age where superstars of the modern salad world such as heirloom tomatoes, burrata and dried cranberries rule, I feel classic salads such as Waldorf Salad, Salad Niçoise, Russian Salad etc also need to be revisited and savoured from time to time.

Except for a few of the older eateries and clubs in Pakistan that have been around for a couple of decades, Russian Salad has sadly been relegated to the “Forgotten Classics” list.

I call my take on this classic salad Russian Salad Olivier. This is a salad that I can happily have in place of a regular meal.

Sprightly, fresh tasting & filling without being stodgy, this is usually the first salad (& many times the only salad when entertaining carnivorous relatives who sadly consider anything with potatoes as the only vegetable dish worth eating 😁) that gets finished when I do an assortment of salads as part of a family daawat / party.

Russian Salad Olivier

Russian Salad Oliver


Recipe Type: Starter & Snack    Author: Alice In Eatland
Prep Time: 20 Minutes + Chilling Time    Cook Time: 10 Minutes    Total Time: 30 Minutes
Serves: 2 – 4


Cooked, raw & pickled vegetables make up this classic Russian Salad Olivier. Tangy citrus & fresh herbs add sprightliness to the salad’s satisfying flavour.


INGREDIENTS

  • 2 medium potatoes, peeled & cut into 1/2″ – 1″ cubes
  • 2 medium carrots, peeled & cut into 1/2″ – 1″ cubes
  • 1 cup green peas, fresh, frozen or canned*
  • 1/2 cup chopped spring onions, both green & white parts
  • 1/2 cup chopped pickled gherkins OR dill pickles OR pickled jalapeños
  • 1 – 2 hard boiled eggs, peeled & chopped into 1/2″ – 1″ cubes (optional)
  • 1/4 – 1/2 cup good quality mayonnaise**
  • A few tablespoons of fresh lemon juice***
  • Fresh dill / soya OR fresh coriander leaves
  • Salt
  • Fresh ground black pepper


METHOD

  1. Bring a medium sized pan full of water to the boil.
  2. When it reaches the boil, salt it well and add chopped carrots. Let cook uncovered 2  minutes.
  3. Then add the potatoes and cook uncovered 5 – 7 minutes or until the potato cubes are cooked.
  4. Potatoes must be tender but still hold their shape so make sure not to over cook.
  5. If using fresh peas, add them during the last 5 – 7 minutes of cooking. If using frozen, add them during the last 2 – 4 minutes of cooking.
  6. Drain the cooked vegetables well, and cool completely to room temperature.
  7. Remove cooled vegetables to a roomy bowl, cover and refrigerate for 10 – 15 minutes or until cold.
  8. To assemble the salad, add chopped spring onions and chopped gherkins, dill pickles or jalapeños to the cold vegetables. Also add drained canned peas, if using.
  9. Stir in enough mayonnaise to coat the vegetables thoroughly but not heavily. Use a light hand to stir so that the veggie cubes don’t break.
  10. Add lemon juice, salt, pepper and chopped fresh dill / soya or coriander leaves.
  11. Taste the salad and see if it needs more of anything – pickled veggies, mayonnaise, lemon juice, fresh herbs, salt or pepper.
  12. Once satisfied with the taste, remove the salad to an airtight container and chill in the fridge for at least an hour – up to 24 hours is fine too.
  13. Serve the salad cold and store leftovers airtight in the fridge.
  14. Consume within 2 days.


* According to a few Russian and Eastern European food bloggers, canned peas and not fresh or frozen ones, are traditionally used to make Russian Salad.

** I feel that the quality and the quantity of mayonnaise used is what makes or breaks this salad. It is essential not to drown the salad in mayonnaise. I would suggest Best Foods Mayonnaise, Hellmann’s Mayonnaise and American Garden’s U.S. Mayonnaise but obviously feel free to use any local brand that you like.

*** Do not skip fresh lemon juice. The tangy acidity of the lemon cuts through the gloopines of the mayonnaise and keeps the salad tasting fresh, tart and bright.

Filed Under: Recipes, Snack & Starter

Spicy Garden Burger

June 26, 2018 by aliceineatland Leave a Comment

Spicy Garden Burger 
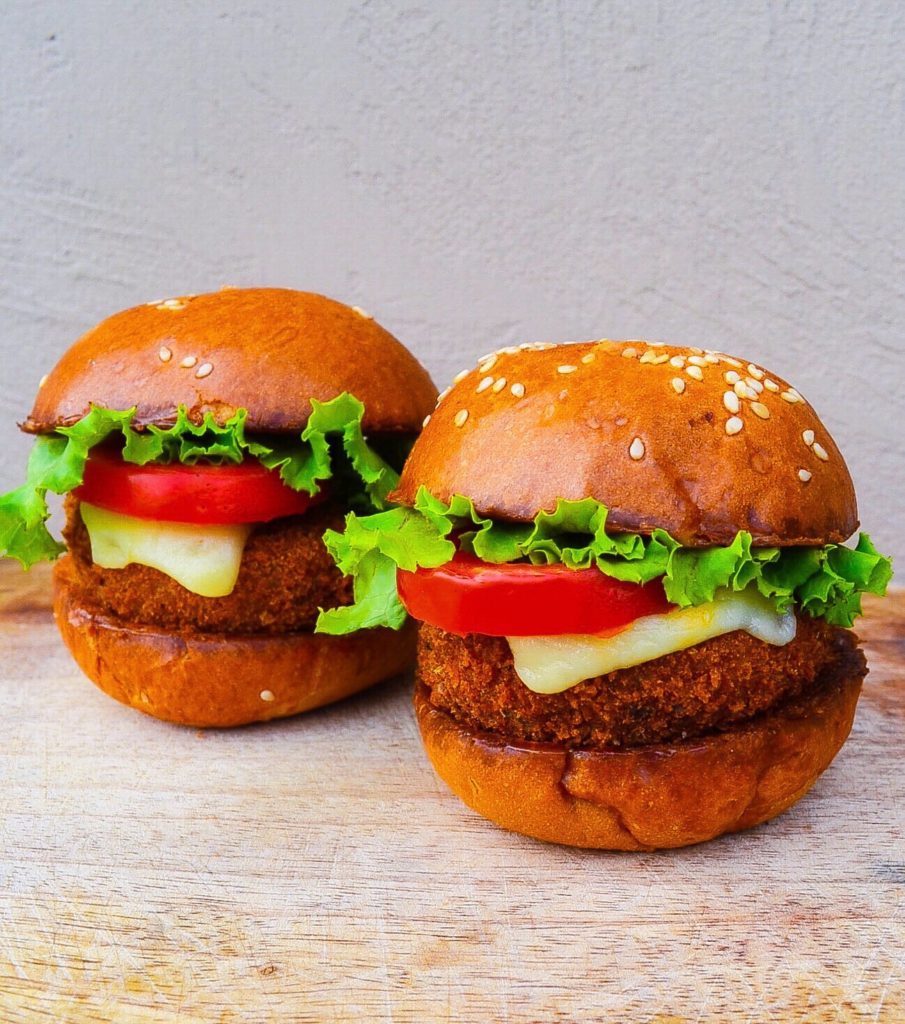
A convenient batch of these delicious homemade veggie burger patties in my freezer (along with burger buns plus butter, mayonnaise and cheese in the fridge, of course) means that I’m never more than 10 – 15 minutes away from a great Spicy Garden Burger meal.  

Spicy Garden Burger

Vegetable mixture ready to be formed into patties


There is nothing “gourmet burger” about this Spicy Garden Burger. Its base is made up of the humblest of vegetables, the good ‘ol potato. The “garden” trio of vegetables that are added to the potato base provide added flavour, contrast and texture. It may not be haute cuisine, but it definitely hits the spot every time.


Spicy Garden Burger

Patty mixture shaped into a cylinder and placed on plastic wrap


This is the kind of meal you reach for on days when nothing but straightforward fast food will do. These boldly flavoured Spicy Garden Burger patties have a crusty exterior that withstands moisture from mayonnaise, raw vegetables etc quite beautifully and doesn’t get soggy.


Patty cylinder wrapped in plastic wrap & ready to chill in the freezer before cutting


This Spicy Garden Burger may taste as addictive as a fast food burger but the upside is that it is homemade and you know exactly what went into your burger patty. Chain restaurant flavour with homemade goodness and without most of the guilt. What more can one ask for?


Spicy Garden Burger

Slicing the burger patties


I’ve experimented with several veggie burgers recipes, some successful and others not so much. I think for me, this Spicy Garden Burger comes pretty close to what I feel a good old school fast food style plant based burger should taste like. I know of just one eatery in Lahore that has a veggie burger on its menu. GreenHouse, a healthy fast food joint, has a pretty tasty moong lentil based Daal Burger.


Spicy Garden Burger

Burger patties sliced & ready to be chilled before breading


The city has a plethora of burger places  and not even one of them has any kind of non-meat burger. Neither do any of the many, many other restaurants and cafes in Lahore. I do understand up to a point because ours is a primarily meat eating nation. Very few people would order a veggie burger.


Spicy Garden Burger

Done! Breaded & ready to fry or freeze for later


But it is 2018 after all, and if local eateries can offer expensive to source delicacies like Black Cod and Wagyu Beef on their menus, its about time burger joints started working on something as simple, inexpensive and sustainable as a decent veggie burger.

In the meantime, I will continue my experiments making different vegetarian and vegan burger patties. And hopefully share the more successful experiments here on the blog. My Spicy Garden Burger recipe is based on BharatzKitchen’s take on India’s popular McAloo Tikki Burger.  


Spicy Garden Burger Spicy Garden Burger

 
Recipe Type: Main    Author: Alice In Eatland
Prep Time: 30 Minutes    Cook Time: 10 Minutes    Total Time: 40 Minutes
Serves: 2 – 4

Boldly flavoured, soft inside & crusty outside Spicy Garden Burger. Create that “fast food” flavour at home with wholesome vegetables & simple spices!   BURGER PATTIES INGREDIENTS

  • 2 medium unpeeled potatoes, washed
  • 1/4 teaspoon turmeric
  • 1/4 – 1/2 teaspoon red chilli powder
  • 1/2 teaspoon coriander powder
  • 1/2 teaspoon cumin powder
  • 1/2 teaspoon garlic powder
  • Salt
  • 1 tablespoon rice flour
  • 1 tablespoon butter
  • 2 tablespoons peas (fresh or frozen)
  • 2 tablespoons finely chopped carrot
  • 2 tablespoons sweet corn, well drained

METHOD

  1. Boil potatoes in plenty of water until tender. Remove from pan, cool to room temperature and put in the fridge for at least 4 – 6 hours. Overnight works great too.
  2. Peel cold potatoes and grate using a box grater. Do not mash.
  3. Add turmeric, red chilli powder, coriander powder, cumin powder, garlic powder and salt.
  4. Mix lightly with a fork until the flour and spices are combined with the grated potatoes. Taste for seasoning and adjust the salt and spices if needed.
  5. Stir in the rice flour lightly with a fork.
  6. Heat butter in a pan on medium heat until melted. Add the peas, finely chopped carrot and sweet corn. Sauté 2 – 5 minutes or until the peas and carrots are tender.
  7. Add the potato mixture and stir and mash together until combined.
  8. Remove from heat and cool to room temperature.
  9. Lay a sheet of plastic wrap on a work surface with one of the narrow ends towards you.
  10. Scoop the potato mixture in your hands and press and knead a little between your palms so that the mixture is uniform and smooth. Do not over knead.
  11. Place mixture in a log shape on the plastic wrap and roll and shape with your hands until a smooth cylinder forms.
  12. Roll the vegetable cylinder in the plastic wrap, using your palms to flatten the sides.
  13. Place vegetable roll in the freezer for 20 minutes.
  14. Line a tray with a sheet of plastic wrap and set aside.
  15. Remove the vegetable roll from the freezer and place, still wrapped in plastic, on a chopping board.
  16. Using a very sharp knife, slice the roll through the plastic wrap at equal intervals into discs.
  17. The width of the discs depends on how big or small you want your burger patties to be so cut accordingly.
  18. Place the cut burger patties on the plastic wrap lined tray and return to the freezer for 10 – 15 minutes.
  19. Meanwhile, prepare both the dry and wet coatings, get your breadcrumbs ready and set up a breading station.

DRY COATING INGREDIENTS

  • 1/4 cup corn flour / corn starch
  • 1/4 teaspoon baking powder

METHOD

  1. Stir corn flour and baking powder together until combined.
  2. Set aside.

WET COATING INGREDIENTS

  • 2 tablespoons plain flour
  • 1 tablespoon corn flour / corn starch
  • 1 tablespoon corn meal (makki ka aata)
  • 1 teaspoon oil
  • Pinch of salt
  • 1/4 cup + 1 tablespoon cold water

METHOD

  1. Place plain flour, corn flour, corn meal, oil, salt and water in a bowl.
  2. Whisk until smooth. Set aside.

TO FINISH THE BURGER PATTIES

  • Breadcrumbs
  • Dry herbs such as oregano, basil, thyme etc (optional)
  1. Season your breadcrumbs with the dry herbs if you like – this is optional so use plain unseasoned breadcrumbs if you prefer.
  2. After the sliced burger patties have chilled and firmed up in the freezer for 10 – 15 minutes, take them out and remove the ring of plastic wrap encircling each patty.
  3. With your breading station set up, dust the patties thoroughly in the dry coating, then dip them well in the wet coating, making sure they are coated evenly.
  4. Finally dunk the coated patties in the breadcrumbs, turning and pressing the crumbs gently until all sides are well coated.
  5. Place breaded patties back on the plastic wrap lined tray and place back into the freezer for 10 – 15 minutes to firm up a bit.
  6. At this point you can also freeze the patties for later (freeze flat, lightly covered with plastic wrap several hours until firm and then remove to an airtight container and freeze for up to a month).
  7. Deep fry patties in oil until crisp and golden. You can shallow fry them as well but deep frying will ensure that the patties turn a beautiful golden brown evenly all over.
  8. Drain thoroughly on kitchen towels before using.

TO ASSEMBLE THE BURGERS

  • Burger buns (the ones in the photos are mini buns from La Patisserie)
  • Soft, spreadable butter (I prefer Lurpak Slightly Salted Butter, Emborg Salted Butter or Nurpur Butter)
  • Cheddar Cheese slices (Kraft’s American Cheese Slices work best but any local cheese brand can obviously be used)
  • Lettuce
  • Tomatoes
  • Ketchup, Chilli Garlic Sauce or Sriracha
  • French fries, to serve


  1. Place a flat based frying pan over medium heat.
  2. Mix in some ketchup, chilli garlic sauce or Sriracha into your mayonnaise – this step is optional so feel free to use mayonnaise without adding any of these additional flavourings.
  3. Slice burger buns horizontally. Spread both cut sides of each bun evenly with softened butter and place buttered sides down in the hot frying pan.
  4. Press the buns lightly down to ensure even surface contact with the hot pan. Remove after a few minutes once the cut sides are golden.
  5. Spread browned buns with mayonnaise, place a whole or half a slice of cheese on top if you prefer your burgers cheesier.
  6. Next place a fried burger patty on top. Add another slice of cheese over it.
  7. Add your choice of sliced tomato and lettuce if using and place the upper bun half (spread with mayonnaise) over.
  8. Secure with toothpick to keep the patty from sliding. Serve with ketchup and fries.
  9. Make sure whoever you serve the burgers to doesn’t accidentally bite into the toothpick!
  10. Enjoy your Spicy Garden Burgers.

Filed Under: Mains, Recipes

Hyderabadi Maash Ki Daal K Dahi Barray

May 22, 2018 by aliceineatland Leave a Comment

Hyderabadi Maash Ki Daal K Dahi Barray

Hyderabadi Maash Ki Daal K Dahi Barray, an absolute knock out of a dish with its big bold flavours.

As someone who’s not too crazy about regular Dahi Barray, I adore the cooling and fragrantly spicy flavour profile of Hyderabadi Maash Ki Daal K Dahi Barray.

To make these, the barray, which are spongy deep fried discs made of ground split black lentils (maash ki daal / urad daal ) are doused in well seasoned yogurt and finally tempered with fragrant spices.


Hyderabadi Maash Ki Daal K Dahi Barray

Soaked maash daal – blended with seasonings & flavourings


My Mother makes Hyderabadi Dahi Barray pretty much the same way, except that she makes the barray with gram flour or besan. A lot of times, store bought boondi is used instead to save time which then becomes Hyderabadi Dahi Boondi.

Dahi Barray, the cooling yogurt based snack is very popular pretty much all over Pakistan: it is readily available as street food, is almost always a part of desi tea parties and also makes appearances at meals sometimes.


Hyderabadi Maash Ki Daal K Dahi Barray

Dahi barra batter, after fermenting in the fridge for 6 hours – ready to deep fry


Hyderabadi Maash Ki Daal K Dahi Barray are pretty similar to regular Dahi Barray but it’s amazing how the addition of a few everyday spices elevate their taste to another level.

Making barray with maash ki daal does take time and a little advanced planning but the result is really worth the effort.


Make Ahead: How To Freeze Hyderabadi Maash Ki Daal K Dahi Barray:

  • Follow the recipe for making the barray till the deep frying stage.
  • Cool the barray completely, place in a single layer on a plastic wrap covered tray or cookie sheet and freeze overnight till firm.
  • Remove to an airtight container, placing plastic wrap between stacks, if necessary and freeze again.
  • To use, add directly from the freezer to the warm salted water called for in the recipe and let soak until softened.
  • Proceed with the rest of the recipe.

It took me a few tries to get this recipe for these Hyderabadi Maash Ki Daal K Dahi Barray right. Thanks to the folks behind the YouTube channel Hyderabadwala.com for explaining the intricacies behind this Hyderabadi specialty in detail.

Chock full of flavour and heady with spices Hyderabadi Maash Ki Daal K Dahi Barray are what you make when you want regular Dahi Barray but with a sizeable shot of with extra oomph.

Hyderabadi Maash Ki Daal K Dahi Barray

Hyderabadi Maash Ki Daal K Dahi Barray

Recipe Type:    Starter / Snack    Author: Alice In Eatland
Prep Time: 12.5 Hours     Cook Time: 10 – 20 Minutes    Total Time: 13 – 14 Hours
Serves:    4 – 6


Hyderabadi Maash Ki Daal K Dahi Barray – deep fried lentil batter discs, soaked in flavoured yogurt & tempered with fragrant spices. A Hyderabadi specialty!


INGREDIENTS FOR BARRAY

  • 1 cup split black lentils (maash daal / urad daal)
  • 3 – 4 cups water
  • 1 – 2 medium fresh green chillies, roughly chopped
  • 1 teaspoon salt or to taste
  • 1″ piece fresh ginger, peeled
  • 2 large cloves garlic, peeled
  • 1 teaspoon cumin seeds
  • 1 cup water, extra
  • 4 cups warm water from a recently boiled kettle
  • 1 teaspoon salt, extra


INGREDIENTS FOR THE YOGURT SOAK

  • 500 grams thick plain yogurt
  • 1/2 to 1 cup cold drinking water
  • 1 teaspoon cumin seeds
  • 2 – 4 medium fresh green chillies, roughly chopped
  • 1 teaspoon salt or to taste
  • 2 – 4 cloves garlic, peeled


INGREDIENTS FOR TEMPERING

  • 4 tablespoons oil
  • 8 dried red chillies
  • 1 teaspoon cumin seeds
  • 1 teaspoon brown mustard seeds
  • 10 – 15 curry leaves, preferably fresh but dry will do too


INGREDIENTS FOR GARNISH

  • 1 tablespoon finely chopped fresh coriander leaves
  • 1 tablespoon finely chopped fresh mint leaves
  • Red chilli flakes


METHOD

  1. Put the daal in a bowl and rinse a couple of times under running water.
  2. Add water and let sit 6 – 12 hours.
  3. Drain water, reserving about 1/4 cup of it.
  4. Put the drained daal in the jug of a blender along with the green chillies, cumin seeds and salt.
  5. Grate in the ginger and garlic, add a tablespoon or so of the reserved water and blend.
  6. Add the water a tablespoon or so at a time and use as little as possible. The less water used, the better.
  7. When the daal is blended into a fine paste, remove to a bowl, cover and put in the fridge to ferment for 6 hours.
  8. Heat oil for deep frying in a roomy pan.
  9. Add 1/2 cup water to the daal batter and stir until blended.
  10. Put all the ingredients for the yogurt soak in the jug of a blender. Blend until combined. The consistency should be medium-thin. Taste to check the salt and spiciness and adjust if needed.
  11. Pour half the yogurt soak in a flat based serving dish. Set aside.
  12. Pour the warm drinking water into a large dish, like a rectangle Pyrex and stir in the extra salt. Set aside.
  13. When the oil is medium hot, drop tablespoonfuls of the batter into it, making sure not to overcrowd the pan.
  14. Your oil must be the correct temperature. If it is too hot, the barray will brown fast on the outside and the centres will turn out hard and not properly cooked. If oil is not hot enough, the barray will absorb too much oil.
  15. When the barray begin to turn golden underneath and along the sides, flip them over to cook the other side.
  16. Once golden all over, drain them well. These tend to absorb more oil than say, pakorray, but don’t be alarmed – the next step will help get rid of much of their excess oil.
  17. Put the drained barray into the warm salted water. This will draw out the extra oil from them. Let sit 2 – 3 minutes, then flip them. After another 2 – 3 minutes, lift the barray out of the water and gently press them between your palms so that most of the water squeezes out. It’s ok if some of the barray crack in places. Just make sure not to break them.
  18. Arrange all the flattened barray on the yogurt soak in the serving dish.
  19. Pour the remaining yogurt on top of the barray to cover completely.
  20. Make the tempering by heating the oil in a small pan over medium heat.
  21. Add the dried red chillies and stir until they darken. Then add the cumin seeds and the mustard seeds. When the mustard seeds begin to crackle, turn off the heat, stand back and throw in the curry leaves.
  22. Give everything a good stir and pour all over the yogurt soaked barray.
  23. Garnish with the fresh coriander and mint leaves, sprinkle with chilli flakes and let sit in the fridge for at least 30 minutes so that the barray absorb some of the yogurt.
  24. Serve Hyderabadi Maash Ki Daal K Dahi Barray cool. Store refrigerated airtight for up to 2 days.


Filed Under: Budget Friendly, Recipes, Snack & Starter

  • « Go to Previous Page
  • Page 1
  • Page 2
  • Page 3
  • Page 4
  • Page 5
  • Go to Next Page »

Primary Sidebar

ABOUT ALICE

Favorite recipes, fun eating out experiences and some wonderful food memories from Lahore, Pakistan.

ALICE’S TOP PICKS

Rose Crème Brûlée

Rose Crème Brûlée

Three Cheese Roasted Chilli Bread Pudding

Patisserie at Mocca Coffee Gulberg

Mocca Coffee Gulberg

The Paloma

The Paloma

Tags

Autumn / Fall Baking Budget-Friendly Cafe Chocolate Christmas Daharki Desi Dessert Dinner Easter Eatery Freezer Friendly Halloween Lunch Pakistani Restaurant Romantic Soup Spring Starter Summer Valentine's Day Vegan Vegetarian Winter

Tags

Autumn / Fall Baking Budget-Friendly Cafe Chocolate Christmas Daharki Desi Dessert Dinner Easter Eatery Freezer Friendly Halloween Lunch Pakistani Restaurant Romantic Soup Spring Starter Summer Valentine's Day Vegan Vegetarian Winter

Categories

  • Breakfast & Brunch
  • Budget Friendly
  • Condiment
  • Desserts
  • Drinks
  • Eateries
  • Homemade Cheese
  • Homemade Cheese
  • Mains
  • Recipes
  • Snack & Starter
  • Uncategorized

ABOUT

Hello! If like me, you too love to cook, bake and eat then you're in the right place. From heartwarming, soul-satisfying comfort food to light, fresh and deliciously healthy meals, everything here is made with the utmost TLC :)

Tags

Autumn / Fall Baking Budget-Friendly Cafe Chocolate Christmas Daharki Desi Dessert Dinner Easter Eatery Freezer Friendly Halloween Lunch Pakistani Restaurant Romantic Soup Spring Starter Summer Valentine's Day Vegan Vegetarian Winter

Copyright © 2025 · Foodie Pro Theme by Shay Bocks · Built on the Genesis Framework · Powered by WordPress