• Skip to primary navigation
  • Skip to main content
  • Skip to primary sidebar

Alice In Eatland

Recipes . Eateries . Inspiration

  • Recipe Index
  • Eateries

Budget Friendly

Tamatar Paneer Recipe

March 18, 2023 by aliceineatland Leave a Comment

Tamatar Paneer

Tamatar Paneer
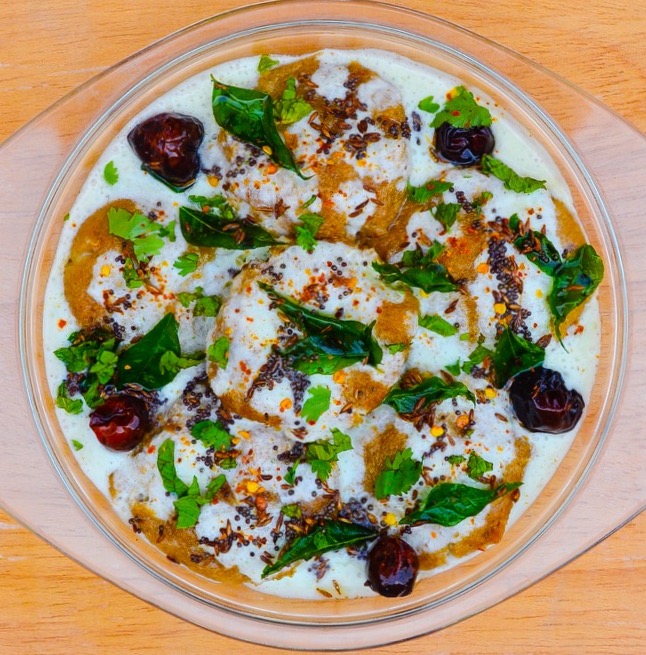
Tamatar Paneer, a vibrantly spiced Hyderabadi-style tomato curry with “crisp-on-the-outside-creamy-on-the-inside” grilled homemade paneer wedges.

A spring-summer favourite, ideal for cooking when tomatoes are in seasonal abundance and one of my top favourite ways to enjoy paneer.

This recipe has been inspired by the Tamatar Paneer on the menu of Patli Galli, a desi restaurant that I am very, very fond of.

During Lockdown 2020, the restaurant started offering takeaway vegetarian and non-vegetarian thalis and Tamatar Paneer was one of the veg thali offerings. Notable mention: the Mirchi Ka Saalan from the veg thali was quite possibly, the best I’ve ever had.

The thalis have been discontinued but the delicious vegetarian options such as the ubiquitous Daal Maash and Palak Paneer are still available (both very good, actually). Thankfully, Tamatar Paneer is also still being offered and I believe, Patli Galli is the only restaurant in Lahore that has it on the menu. I hope they bring the Mirchi Ka Saalan back.

Tamatar Paneer Recipe

The phenomenal takeaway Vegetarian Thali (Tamatar Paneer in the centre) from Patli Galli Restaurant, during Lockdown 2020. They need to bring this back!

6 Tips For Making The Best Tamatar Paneer

  • Use ripe tomatoes for best results.
  • Tomato Paste adds great depth of flavour so please try not to omit it.
  • A small amount of sugar (preferably soft brown sugar, but regular white sugar is fine)  is essential to balance out the acidity of the tomatoes.
  • Please use the best quality paneer you can find for this recipe.
    Search for home-based vendors or small scale artisanal cheese makers. Commercially available cottage cheese is no substitute for paneer and is “highly NOT recommended” here!
  • I have used homemade paneer and would encourage you to do the same to make a really standout Tamatar Paneer. The recipe for homemade paneer is linked in the ingredients list (or just type in the search bar above).
    If you follow the recipe correctly, your paneer will turn out rich and creamy and will stay moist and velvety inside even after being grilled to a crisp outside.
  • Try Tamatar Tofu for a delicious vegan spin on this dish.
    Simply replace the paneer with firm or extra firm tofu.
    Slice tofu slab in half horizontally and  microwave 2 minutes on high. Much of of the liquid will get released.
    Drain and place tofu between heavy duty paper towels or a kitchen towel with a cutting board and a weight on top to press out as much moisture as possible.
    After 30 minutes, cut the pressed tofu into cubes or wedges and proceed with the grilling part of the recipe.

Tamatar Paneer is best served with garlic naan but a simple roti or a paratha will do in a pinch. Good with boiled white rice too. Surprisingly decent cold, straight out of the fridge as well.

Tamatar Paneer Recipe


How To Make Tamatar Paneer


Tamatar Paneer, a vibrantly spiced Hyderabadi style tomato curry with “crisp-on-the-outside-creamy-on-the-inside” grilled homemade paneer wedges.


Recipe Type: Main

Author: Alice In Eatland

Cook Time: 20 Minutes

Total Time: 30 Minutes

Serves: 2


INGREDIENTS


TOMATO CURRY

  • 2 tablespoons oil
  • 1 dried red chilli
  • 1/4 teaspoon cumin seeds
  • 1/4 teaspoon brown mustard seeds
  • 1/4 teaspoon nigella seeds
  • Salt
  • 6 – 8 fresh or dried curry leaves
  • 1/2 tablespoon crushed garlic
  • 1/2 tablespoon grated ginger
  • 2 teaspoons gram flour
  • 1 tablespoon tomato paste
  • 1/4 teaspoon turmeric powder
  • 1/4 teaspoon red chilli powder
  • 1/4 teaspoon Kashmiri chilli powder (optional)
  • 1/2 teaspoon cumin powder
  • 1/2 teaspoon coriander powder
  • Good pinch brown sugar or white sugar
  • 500 grams ripe tomatoes, blended to a coarse purée
  • 3/4 cup hot water


GRILLED PANEER

  • 100 – 200 grams paneer wedges or cubes (find the recipe to make your own paneer at home here
  • 1 tablespoon oil


TEMPERING & GARNISH

  • 1 tablespoon oil
  • 1 dried red chilli
  • 1/4 teaspoon cumin seeds
  • 1/4 teaspoon brown mustard seeds
  • 1/4 teaspoon nigella seeds
  • 2 cloves garlic, peeled & thinly sliced
  • 2 fresh green chillies, quartered
  • 6  – 8 fresh or dried curry leaves
  • Fresh mint leaves
  • Fresh coriander leaves
  • Fresh red chillies (optional)


METHOD


TOMATO CURRY

  1. Heat oil.
  2. Add dried red chilli, cumin seeds, brown mustard seeds and nigella seeds.
  3. Sauté until the seeds start crackling.
  4. Add curry leaves, followed by crushed garlic and grated ginger.
  5. Stir until fragrant and add the gram flour.
  6. Sauté until the gram flour doesn’t smell raw anymore and the colour deepens slightly, about 2 – 4 minutes.
  7. Add tomato paste, salt, turmeric powder, red chilli powder, Kashmiri chilli powder (if using, cumin powder, coriander powder and sugar.
  8. Cook, stirring and adding a splash of water if needed, till the masala thickens and the oil begins to separate from it.
  9. Pour in the coarsely blended tomato purée and bring to the boil, stirring constantly.
  10. Cover partially and cook on medium heat, stirring frequently, until the liquid evaporates and the tomato mixture thickens and begins to come together.
  11. Add water at this stage, stir and bring to a simmer.
  12. Let cook 5 – 10 minutes, stirring occasionally, until the oil begins to float on top in places and the curry is as thick as your preference.


GRILLED PANEER

  1. Heat a grill pan or heavy bottomed frying pan (non-stick works better here) on high heat and brush with half a tablespoon of oil.
  2. Coat the paneer wedges or cubes thoroughly with the remaining half tablespoon of oil.
  3. When the grill pan/frying pan is searingly hot (this is important, otherwise the paneer will stick to it), add the oil-coated paneer pieces. (Please follow the same instructions if you’re grilling tofu for a vegan Tamatar Tofu – see tip #6 at the top first though!)
  4. Let sit undisturbed 2 – 4 minutes or until you can see the bottom edges of the paneer browning.
  5. Turn carefully, prying gently to loosen with a spatula or butter knife if needed, and cook the same way on the other side.
  6. Remove paneer pieces to a plate.


TEMPERING & GARNISH

  1. Spoon the Tomato Curry into a serving dish or bowl.
  2. Arrange the grilled paneer pieces on top.
  3. Heat oil in a small pan.
  4. Add all other ingredients, except the mint and coriander leaves.
  5. Sauté until the garlic turns light golden and pour the hot tempering over the tomato curry and grilled paneer.
  6. Garnish with fresh min leaves, fresh coriander leaves and sliced red chillies, if using and serve.

Filed Under: Budget Friendly, Eateries, Mains, Recipes Tagged With: Budget-Friendly, Desi, Dinner, Eatery, Lunch, Pakistani, Spring, Summer, Vegan, Vegetarian

Momofuku Ginger Scallion Noodles

August 7, 2018 by aliceineatland 2 Comments

Momofuku Ginger Scallion Noodles

Post Updated: 04.12.23

The one and only Momofuku Ginger Scallion Noodles – I am salivating while updating this post.

Also, I am mentally going through the contents of my fridge and pantry, hoping I have all the ingredients to make these noodles after I’m done with this post.

Momofuku Ginger Scallion Noodles: The Legend

Restaurateur David Chang, creator of Netflix cult favourite “Ugly Delicious” and founder of the Momofuku Group of Restaurants writes in his book “Momofuku” (written with Peter Meehan) that “Our ginger scallion noodles are an homage to / out-and-out-rip-off of one of the greatest dishes in New York City: the $4.95 plate of ginger scallion noodles at Great New York Noodle Town down on the Bowery in Chinatown.”

I agree with Chang when he says, “You need ginger scallion sauce on your noodles, in your fridge and in your life. For real.”

Momofuku Ginger Scallion Noodles

Momofuku Ginger Scallion Noodles: The Real Star Of The Show

The real star of this Momofuku Ginger Scallion Noodle dish is the Ginger Scallion Sauce. There is absolutely nothing like it.

Also, the sauce in question is more solid than liquid, more like a chunky condiment or a chutney than a pourable flavouring concoction.

This Ginger Scallion Sauce is also a perfect demonstration of how the correct combination of just a few simple ingredients can result in astoundingly astonishing flavours.

I use it not just for this noodle recipe but also to top fried rice, mashed potatoes and soups. The possibilities are quite literally, endless.

Momofuku Ginger Scallion Noodles: How Do You Serve Them?

The Ginger Scallion Noodles at Momofuku are served with things like bamboo shoots, pickled cucumbers, pan roasted cauliflower, sliced scallions and toasted nori.

I eat mine unadorned, except for a few fresh spring onions tops chopped into bits sometimes. But mostly with nothing else.

These noodles taste great at room temperature but somehow I love them cold straight from the fridge more. Cold buckwheat soba noodles would also go pretty well with this sauce.

Thanks to fellow foodie blogger friend Monita Sen for introducing me to these incredible Momofuku Ginger Scallion Noodles – check out Monita’s luscious Instagram feed; it is insanely gorgeous!

Momofuku Ginger Scallion Noodles

Momofuku Ginger Scallion Noodles


Recipe Type: Main, Snack
Author: Alice In Eatland
Prep Time: 10 Minutes   Cook Time: 10 Minutes    Total Time: 20 Minutes
Serves: 1
Keyword: 10 Minute Recipe, Asian Noodles, Asian Recipe Easy, Dinner Ideas, Easy Recipes, Healthy Asian Recipes, Noodles, Quick And Easy Recipe, Vegetarian Recipes, Quick Recipes


Momofuku Ginger Scallion Noodles:

7 everyday ingredients & 10 minutes of your time are all you need to make David Chang’s ultimate ramen noodle recipe.


INGREDIENTS

  • 100 grams (4 oz) cooked ramen or egg noodles
  • 1 1/4 cups finely chopped spring onions / green onions / scallions (both white and green parts)
  • 1/8 cup peeled, grated ginger
  • 1/4 cup – 1/2 cup oil*
  • Salt
  • A few teaspoons of white vinegar
  • A few teaspoons of soy sauce


METHOD

  1. Place the chopped spring onions / green onions / scallions and the grated ginger in a heatproof bowl.
  2. Pour the oil into a small saucepan and place over medium heat until the surface of the oil is shimmering slightly.
  3. Put a piece of chopped spring onion in to test the oil. If it sizzles immediately upon contact with the oil, your oil is hot enough.
  4. Remove pan from heat and pour the hot oil straight onto the chopped onions and grated ginger.
  5. Stir in salt, vinegar and soy sauce to taste.
  6. Let sit 10-15 minutes.
  7. Place noodles in a bowl and stir in a couple of tablespoons of your ginger scallion sauce.
  8. Top with some fresh spring onion green bits if liked.
  9. Store any leftover ginger scallion sauce airtight in the fridge for up to 2 – 4 days.


*David Chang recommends either grapeseed or any other neutral oil for this recipe.

I just use regular cooking oil from my kitchen.

Any oil would work alright except a strong tasting one like olive oil.

Filed Under: Budget Friendly, Mains, Recipes Tagged With: Budget-Friendly, Dinner, Lunch, Spring, Summer, Vegan, Vegetarian, Winter

Hyderabadi Maash Ki Daal K Dahi Barray

May 22, 2018 by aliceineatland Leave a Comment

Hyderabadi Maash Ki Daal K Dahi Barray

Hyderabadi Maash Ki Daal K Dahi Barray, an absolute knock out of a dish with its big bold flavours.

As someone who’s not too crazy about regular Dahi Barray, I adore the cooling and fragrantly spicy flavour profile of Hyderabadi Maash Ki Daal K Dahi Barray.

To make these, the barray, which are spongy deep fried discs made of ground split black lentils (maash ki daal / urad daal ) are doused in well seasoned yogurt and finally tempered with fragrant spices.


Hyderabadi Maash Ki Daal K Dahi Barray

Soaked maash daal – blended with seasonings & flavourings


My Mother makes Hyderabadi Dahi Barray pretty much the same way, except that she makes the barray with gram flour or besan. A lot of times, store bought boondi is used instead to save time which then becomes Hyderabadi Dahi Boondi.

Dahi Barray, the cooling yogurt based snack is very popular pretty much all over Pakistan: it is readily available as street food, is almost always a part of desi tea parties and also makes appearances at meals sometimes.


Hyderabadi Maash Ki Daal K Dahi Barray

Dahi barra batter, after fermenting in the fridge for 6 hours – ready to deep fry


Hyderabadi Maash Ki Daal K Dahi Barray are pretty similar to regular Dahi Barray but it’s amazing how the addition of a few everyday spices elevate their taste to another level.

Making barray with maash ki daal does take time and a little advanced planning but the result is really worth the effort.


Make Ahead: How To Freeze Hyderabadi Maash Ki Daal K Dahi Barray:

  • Follow the recipe for making the barray till the deep frying stage.
  • Cool the barray completely, place in a single layer on a plastic wrap covered tray or cookie sheet and freeze overnight till firm.
  • Remove to an airtight container, placing plastic wrap between stacks, if necessary and freeze again.
  • To use, add directly from the freezer to the warm salted water called for in the recipe and let soak until softened.
  • Proceed with the rest of the recipe.

It took me a few tries to get this recipe for these Hyderabadi Maash Ki Daal K Dahi Barray right. Thanks to the folks behind the YouTube channel Hyderabadwala.com for explaining the intricacies behind this Hyderabadi specialty in detail.

Chock full of flavour and heady with spices Hyderabadi Maash Ki Daal K Dahi Barray are what you make when you want regular Dahi Barray but with a sizeable shot of with extra oomph.

Hyderabadi Maash Ki Daal K Dahi Barray

Hyderabadi Maash Ki Daal K Dahi Barray

Recipe Type:    Starter / Snack    Author: Alice In Eatland
Prep Time: 12.5 Hours     Cook Time: 10 – 20 Minutes    Total Time: 13 – 14 Hours
Serves:    4 – 6


Hyderabadi Maash Ki Daal K Dahi Barray – deep fried lentil batter discs, soaked in flavoured yogurt & tempered with fragrant spices. A Hyderabadi specialty!


INGREDIENTS FOR BARRAY

  • 1 cup split black lentils (maash daal / urad daal)
  • 3 – 4 cups water
  • 1 – 2 medium fresh green chillies, roughly chopped
  • 1 teaspoon salt or to taste
  • 1″ piece fresh ginger, peeled
  • 2 large cloves garlic, peeled
  • 1 teaspoon cumin seeds
  • 1 cup water, extra
  • 4 cups warm water from a recently boiled kettle
  • 1 teaspoon salt, extra


INGREDIENTS FOR THE YOGURT SOAK

  • 500 grams thick plain yogurt
  • 1/2 to 1 cup cold drinking water
  • 1 teaspoon cumin seeds
  • 2 – 4 medium fresh green chillies, roughly chopped
  • 1 teaspoon salt or to taste
  • 2 – 4 cloves garlic, peeled


INGREDIENTS FOR TEMPERING

  • 4 tablespoons oil
  • 8 dried red chillies
  • 1 teaspoon cumin seeds
  • 1 teaspoon brown mustard seeds
  • 10 – 15 curry leaves, preferably fresh but dry will do too


INGREDIENTS FOR GARNISH

  • 1 tablespoon finely chopped fresh coriander leaves
  • 1 tablespoon finely chopped fresh mint leaves
  • Red chilli flakes


METHOD

  1. Put the daal in a bowl and rinse a couple of times under running water.
  2. Add water and let sit 6 – 12 hours.
  3. Drain water, reserving about 1/4 cup of it.
  4. Put the drained daal in the jug of a blender along with the green chillies, cumin seeds and salt.
  5. Grate in the ginger and garlic, add a tablespoon or so of the reserved water and blend.
  6. Add the water a tablespoon or so at a time and use as little as possible. The less water used, the better.
  7. When the daal is blended into a fine paste, remove to a bowl, cover and put in the fridge to ferment for 6 hours.
  8. Heat oil for deep frying in a roomy pan.
  9. Add 1/2 cup water to the daal batter and stir until blended.
  10. Put all the ingredients for the yogurt soak in the jug of a blender. Blend until combined. The consistency should be medium-thin. Taste to check the salt and spiciness and adjust if needed.
  11. Pour half the yogurt soak in a flat based serving dish. Set aside.
  12. Pour the warm drinking water into a large dish, like a rectangle Pyrex and stir in the extra salt. Set aside.
  13. When the oil is medium hot, drop tablespoonfuls of the batter into it, making sure not to overcrowd the pan.
  14. Your oil must be the correct temperature. If it is too hot, the barray will brown fast on the outside and the centres will turn out hard and not properly cooked. If oil is not hot enough, the barray will absorb too much oil.
  15. When the barray begin to turn golden underneath and along the sides, flip them over to cook the other side.
  16. Once golden all over, drain them well. These tend to absorb more oil than say, pakorray, but don’t be alarmed – the next step will help get rid of much of their excess oil.
  17. Put the drained barray into the warm salted water. This will draw out the extra oil from them. Let sit 2 – 3 minutes, then flip them. After another 2 – 3 minutes, lift the barray out of the water and gently press them between your palms so that most of the water squeezes out. It’s ok if some of the barray crack in places. Just make sure not to break them.
  18. Arrange all the flattened barray on the yogurt soak in the serving dish.
  19. Pour the remaining yogurt on top of the barray to cover completely.
  20. Make the tempering by heating the oil in a small pan over medium heat.
  21. Add the dried red chillies and stir until they darken. Then add the cumin seeds and the mustard seeds. When the mustard seeds begin to crackle, turn off the heat, stand back and throw in the curry leaves.
  22. Give everything a good stir and pour all over the yogurt soaked barray.
  23. Garnish with the fresh coriander and mint leaves, sprinkle with chilli flakes and let sit in the fridge for at least 30 minutes so that the barray absorb some of the yogurt.
  24. Serve Hyderabadi Maash Ki Daal K Dahi Barray cool. Store refrigerated airtight for up to 2 days.


Filed Under: Budget Friendly, Recipes, Snack & Starter

Primary Sidebar

ABOUT ALICE

Favorite recipes, fun eating out experiences and some wonderful food memories from Lahore, Pakistan.

ALICE’S TOP PICKS

Rose Crème Brûlée

Rose Crème Brûlée

Three Cheese Roasted Chilli Bread Pudding

Patisserie at Mocca Coffee Gulberg

Mocca Coffee Gulberg

The Paloma

The Paloma

Tags

Autumn / Fall Baking Budget-Friendly Cafe Chocolate Christmas Daharki Desi Dessert Dinner Easter Eatery Freezer Friendly Halloween Lunch Pakistani Restaurant Romantic Soup Spring Starter Summer Valentine's Day Vegan Vegetarian Winter

Tags

Autumn / Fall Baking Budget-Friendly Cafe Chocolate Christmas Daharki Desi Dessert Dinner Easter Eatery Freezer Friendly Halloween Lunch Pakistani Restaurant Romantic Soup Spring Starter Summer Valentine's Day Vegan Vegetarian Winter

Categories

  • Breakfast & Brunch
  • Budget Friendly
  • Condiment
  • Desserts
  • Drinks
  • Eateries
  • Homemade Cheese
  • Homemade Cheese
  • Mains
  • Recipes
  • Snack & Starter
  • Uncategorized

ABOUT

Hello! If like me, you too love to cook, bake and eat then you're in the right place. From heartwarming, soul-satisfying comfort food to light, fresh and deliciously healthy meals, everything here is made with the utmost TLC :)

Tags

Autumn / Fall Baking Budget-Friendly Cafe Chocolate Christmas Daharki Desi Dessert Dinner Easter Eatery Freezer Friendly Halloween Lunch Pakistani Restaurant Romantic Soup Spring Starter Summer Valentine's Day Vegan Vegetarian Winter

Copyright © 2025 · Foodie Pro Theme by Shay Bocks · Built on the Genesis Framework · Powered by WordPress